


In this tutorial, we'll be building a fully-functional an NFT minting app, EPIC NFT Collection. We'll be starting out with knowing what NFTs actually are, building the complete decentralized application, and at the end, we'll get our app live for everyone to use.
What are Non Fungible Tokens or NFTs?
An NFT or Non-Fungible Token is a digital asset that links to some particular "data" (e.g digital art, an image, etc). The main function of an NFT is that each "token" has a unique identifier that lets its owner prove that it's one of a kind.
Here's an example of a popular collection of NFTs with a shared theme amongst them, called Bored Ape Yacht Club.
What We’re Building
We'll be building a decentralized NFT collection app called EPIC NFTs. The application will let users mint NFTs for the collection, and later claim them using their wallet addresses.
Prerequisites
- Beginner to intermediate knowledge of React.
- Familiarity with Solidity programming language.
- Conceptual understanding of blockchain, NFTs, crypto wallets and Etherscan.
Tools We'll Need
We'll be using a number of tools at our disposal to build the app from scratch. All these tools are free and should be easy to integrate into your system.
- Visual Studio Code or any other text editor.
- Hardhat for Ethereum development.
- Metamask as a crypto wallet.
- OpenSea for NFT hosting.
- Vercel and Alchemy as hosting platforms.
Let's Begin!
Now that we have a slight hint of what we're going to build. Let's start writing code!
We'll start with writing a smart contract for our NFT collection. We’re deploying the contract to a publicly-accessible blockchain so that anyone can mint NFTs through our contract. Later on, we'll build a client website to enable minting the same NFTs.

Building Our Smart Contract
1. Setting Up the Tools
We'll be using Hardhat to run our smart contract locally. Before that, we need to install node/npm in our system. Download it here.
Next, let's head to the terminal in order to set up the environment. Once you're there, run the following commands:
mkdir nft-collection
cd nft-collection
npm init -y
npm install --save-dev hardhat
Now that we have set up the environment, let's get the project running. Run this line of code and choose the option to create a basic sample project. You can say yes to everything:
npx hardhat
In case these dependencies didn’t get installed by default, install them by running the following code:
npm install --save-dev @nomiclabs/hardhat-waffle ethereum-waffle chai @nomiclabs/hardhat-ethers ethers
We'll also use something called OpenZeppelin to write our smart contract. Install it by running the following line of code:
npm install @openzeppelin/contracts
In the final step, run the following code to run the sample script:
npx hardhat run scripts/sample-script.js
You'll see something like this:
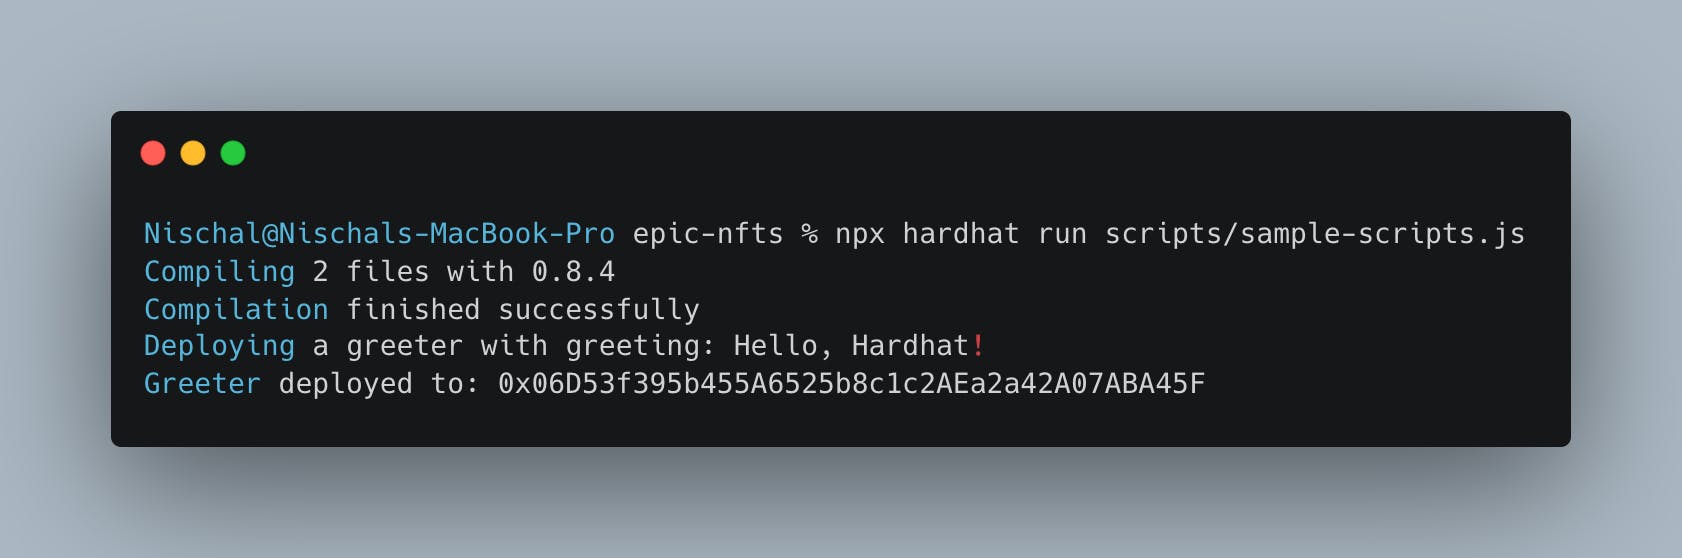
That's it! This means our local environment is set up, and at the same time, we also ran/deployed a smart contract to a local blockchain.
2. Writing a Contract That Mints NFTs
Now, let's write a smart contract that can mint NFTs. Create an EpicNft.sol file in the contracts directory and enter the code given below (we'll go through each line inside the code):
pragma solidity ^0.8.1;

//We'll first import some OpenZeppelin Contracts. These will provide us with some //utility functions to write the smart contract.
import "@openzeppelin/contracts/token/ERC721/extensions/ERC721URIStorage.sol";
import "@openzeppelin/contracts/utils/Counters.sol";

//We'll import the Hardhat console to log messages in the terminal for debugging.
import "hardhat/console.sol";

// We inherit the contract we imported.
// This means we'll have access to the inherited contract's methods.

contract EpicNFT is ERC721URIStorage {
  // Counter given by OpenZeppelin to help us keep track of tokenIds.
  using Counters for Counters.Counter;
  Counters.Counter private _tokenIds;

  // We'll pass the name of our NFTs token and their symbol.
  constructor() ERC721 ("SquareNFT", "SQUARE") {
    console.log("This is my NFT contract. Woah!");
  }

  // The public function our user will hit to get their NFT.
  function makeAnNFT() public {
     // Get the current tokenId, this starts at 0.
    uint256 newItemId = _tokenIds.current();

     // Mint the NFT to the sender using msg.sender.
    _safeMint(msg.sender, newItemId);

    // Set the NFTs data.
    _setTokenURI(newItemId, "blah");

    // Increment the counter for when the next NFT is minted.
    _tokenIds.increment();
  }
}
Let's take it step-by-step through the
makeAnNFTfunction.
uint256 newItemId = _tokenIds.current();
This is a unique identifier for our NFT. This is what will keep it fungible.
_safeMint(msg.sender, newItemId);
Here, we're minting the NFT with the id newItemId to the user with the address msg.sender. Solidity provides us with the variable msg.sender that gives us access to the public address of the person who’s calling a particular contract.
_setTokenURI(newItemId, "blah");
This will create the NFT's unique identifier, along with the data associated with that unique identifier.
_tokenIds.increment();
After the NFT is minted, we increment tokenIds with a function OpenZeppelin gives us. This makes sure that the next time an NFT is minted, it'll have a different tokenIds identifier.
3. Adding Data for Our NFT
If you look at the code again in the EpicNft.sol file, you'll find tokenURI, which is where our NFT data lives. Usually, it’s a link to a JSON file. It looks something like this:
{
    "name": "Spongebob",
    "description": ".A yellow sea sponge who lives in the Pacific Ocean. ",
    "image": "https://i.imgur.com/v7U019j.png"
}
Remember, the JSON structure should match the OpenSea Requirements. Otherwise, the resultant NFT may appear broken on the website.
Since the tokenURI requires a link, we need to go to this link and paste our JSON data. Once saved, it'll give us a link pointing to the same JSON.
You can paste the new link here:
_setTokenURI(newItemId, "JSON_URL");
Under that line, let's add a console.log to help us see when the NFT is minted and to who:
console.log("An NFT w/ ID %s has been minted to %s", newItemId, msg.sender);
4. Minting the NFT Locally
Create a run.js file in the scripts folder to actually call our makeAnNFT() function. Enter the following code in the same file:
const main = async () => {
 //Deploy the contract.
  const nftContractFactory = await hre.ethers.getContractFactory('EpicNFT');
  const nftContract = await nftContractFactory.deploy();
  await nftContract.deployed();
  console.log("Contract deployed to:", nftContract.address);

  // Call the function and wait for it to be mined.
  let txn = await nftContract.makeAnNFT()
  await txn.wait()

  // Mint another NFT for fun and wait for it to be mined as well.
  txn = await nftContract.makeAnNFT()
  await txn.wait()
};

const runMain = async () => {
  try {
    await main();
    process.exit(0);
  } catch (error) {
    console.log(error);
    process.exit(1);
  }
};

runMain();
Run this script using the following command in the terminal:
npx hardhat run scripts/run.js
Once completed, you'll see an output message similar to this in your terminal:

5. Minting the NFT Globally
When we use run.js, we’re just creating an NFT locally. The next step is to move this contract to a Testnet, where we'll be able to give “real” users a chance to mint NFTs and view them on a website.
Create a deploy.js file in the scripts folder and enter the following code:
const main = async () => {
  // Deploy the contract.
  const nftContractFactory = await hre.ethers.getContractFactory('EpicNFT');
  const nftContract = await nftContractFactory.deploy();
  await nftContract.deployed();
  console.log("Contract deployed to:", nftContract.address);

  // Call the function.
  let txn = await nftContract.makeAnEpicNFT()
  // Wait for it to be mined.
  await txn.wait()
  console.log("Minted NFT #1")

  txn = await nftContract.makeAnEpicNFT()
  // Wait for it to be mined.
  await txn.wait()
  console.log("Minted NFT #2")
};

const runMain = async () => {
  try {
    await main();
    process.exit(0);
  } catch (error) {
    console.log(error);
    process.exit(1);
  }
}

runMain();
The next step in deploying the contract globally is to make changes to our hardhat.config.js file. You can find this file in the root directory:
require('@nomiclabs/hardhat-waffle');
require("dotenv").config({ path: ".env" });

module.exports = {
  solidity: '0.8.1',
  networks: {
    rinkeby: {
      url: ALCHEMY_API_KEY_URL,
      accounts: [RINKEBY_PRIVATE_KEY],
    },
  },
};
In order to get the RINKEBY_PRIVATE_KEY, you'll need to go to Account Details in your crypto wallet, and get your wallet’s private key on the Rinkeby Test network. Please make sure this is kept private, as it's sensitive information.
Now, to get the ALCHEMY_API_KEY_URL you'll have to go to Alchemy. It's a blockchain platform service which enables you to broadcast your smart contract to a global set of miners, which enables everyone to access the contract.
Make an account on the platform and create an individual project for our smart contract. You can check out the video below to know more about the platform:
At last, we're ready to deploy the blockchain contract to the Rinkeby Test Network. Run the following command in terminal:
npx hardhat run scripts/deploy.js --network rinkeby
It usually takes like 10-20 seconds to deploy. Although, it’ll take us a bit longer, as we’re not only deploying, we’re also minting NFTs in deploy.js.
Your terminal will end up looking similar to something like this:
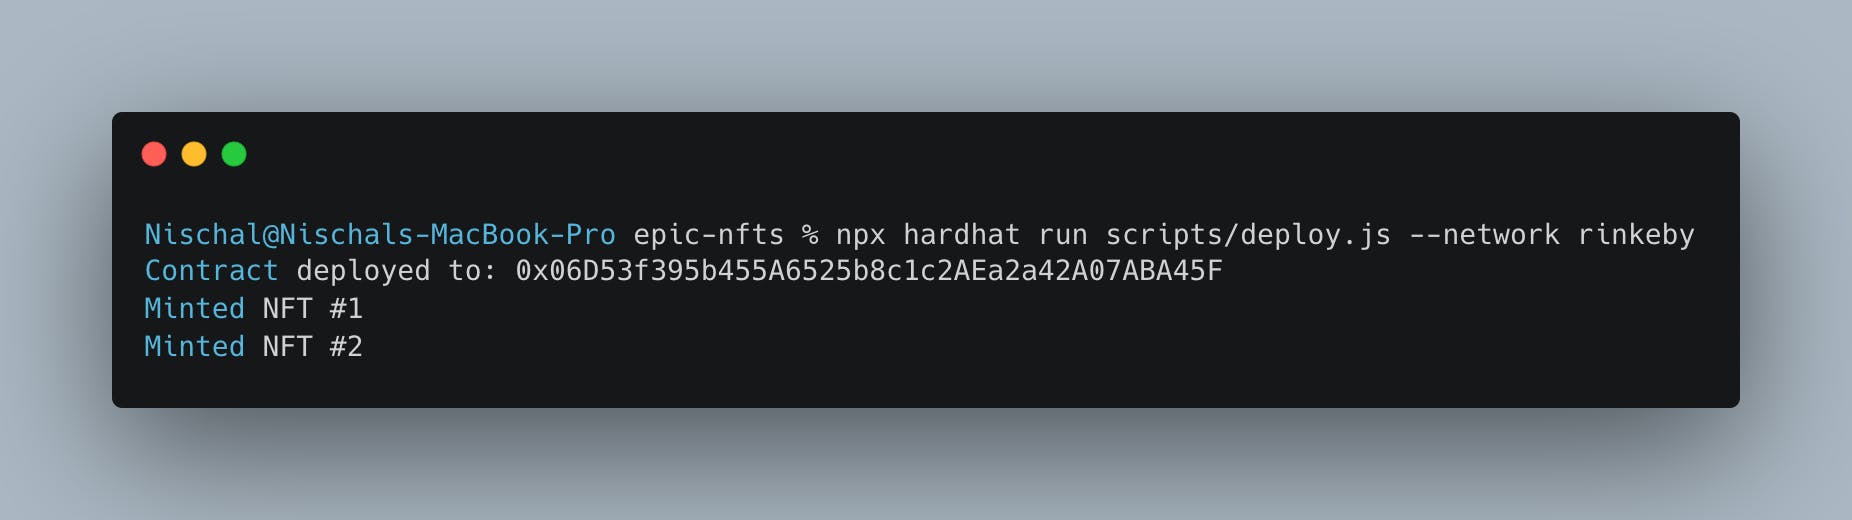
If it worked, congratulations! You're done with the difficult part. Now, head to OpenSea Testnet and search the address you see in terminal. It’ll lead you to the NFT collection where you just minted an NFT for yourself.
Setting Up the React App:
Now that we've set up the blockchain side of things, let's move on to working on the client-side. We'll be using the React framework.
We've built a starter-kit for you. You can clone the kit and get started quickly.
The main goal for this piece of content is to get you accustomed to blockchain development. We won't be going deep into the front-end development.
1. Setting Up the Wallet and App
We need an Ethereum wallet. Although there are many to choose from, we’ll be using Metamask in this project.. Download its browser extension and set up your wallet here.
2. Connecting the Wallet
Let's head to the App.js under the src directory. This is where we'll be doing all our work.
In the App.js file, enter the following code:
import React, { useEffect } from "react";
import './styles/App.css';
const App = () => {
// Function to check if wallet is connected.
const checkIfWalletIsConnected = () => {
/*First make sure we have access to window.ethereum*/
const { ethereum } = window;
if (!ethereum) {
console.log("Make sure you have metamask!");
return;
} else {
console.log("We have the ethereum object", ethereum);
}
}
// Render Methods
const renderNotConnectedContainer = () => (
<button className="cta-button connect-wallet-button">
Connect to Wallet
</button>
);
// This runs our function when the page loads.
useEffect(() => {
checkIfWalletIsConnected();
}, [])
return (
<div className="App">
<div className="container">
{/*Header here*/}
<div className="header-container">
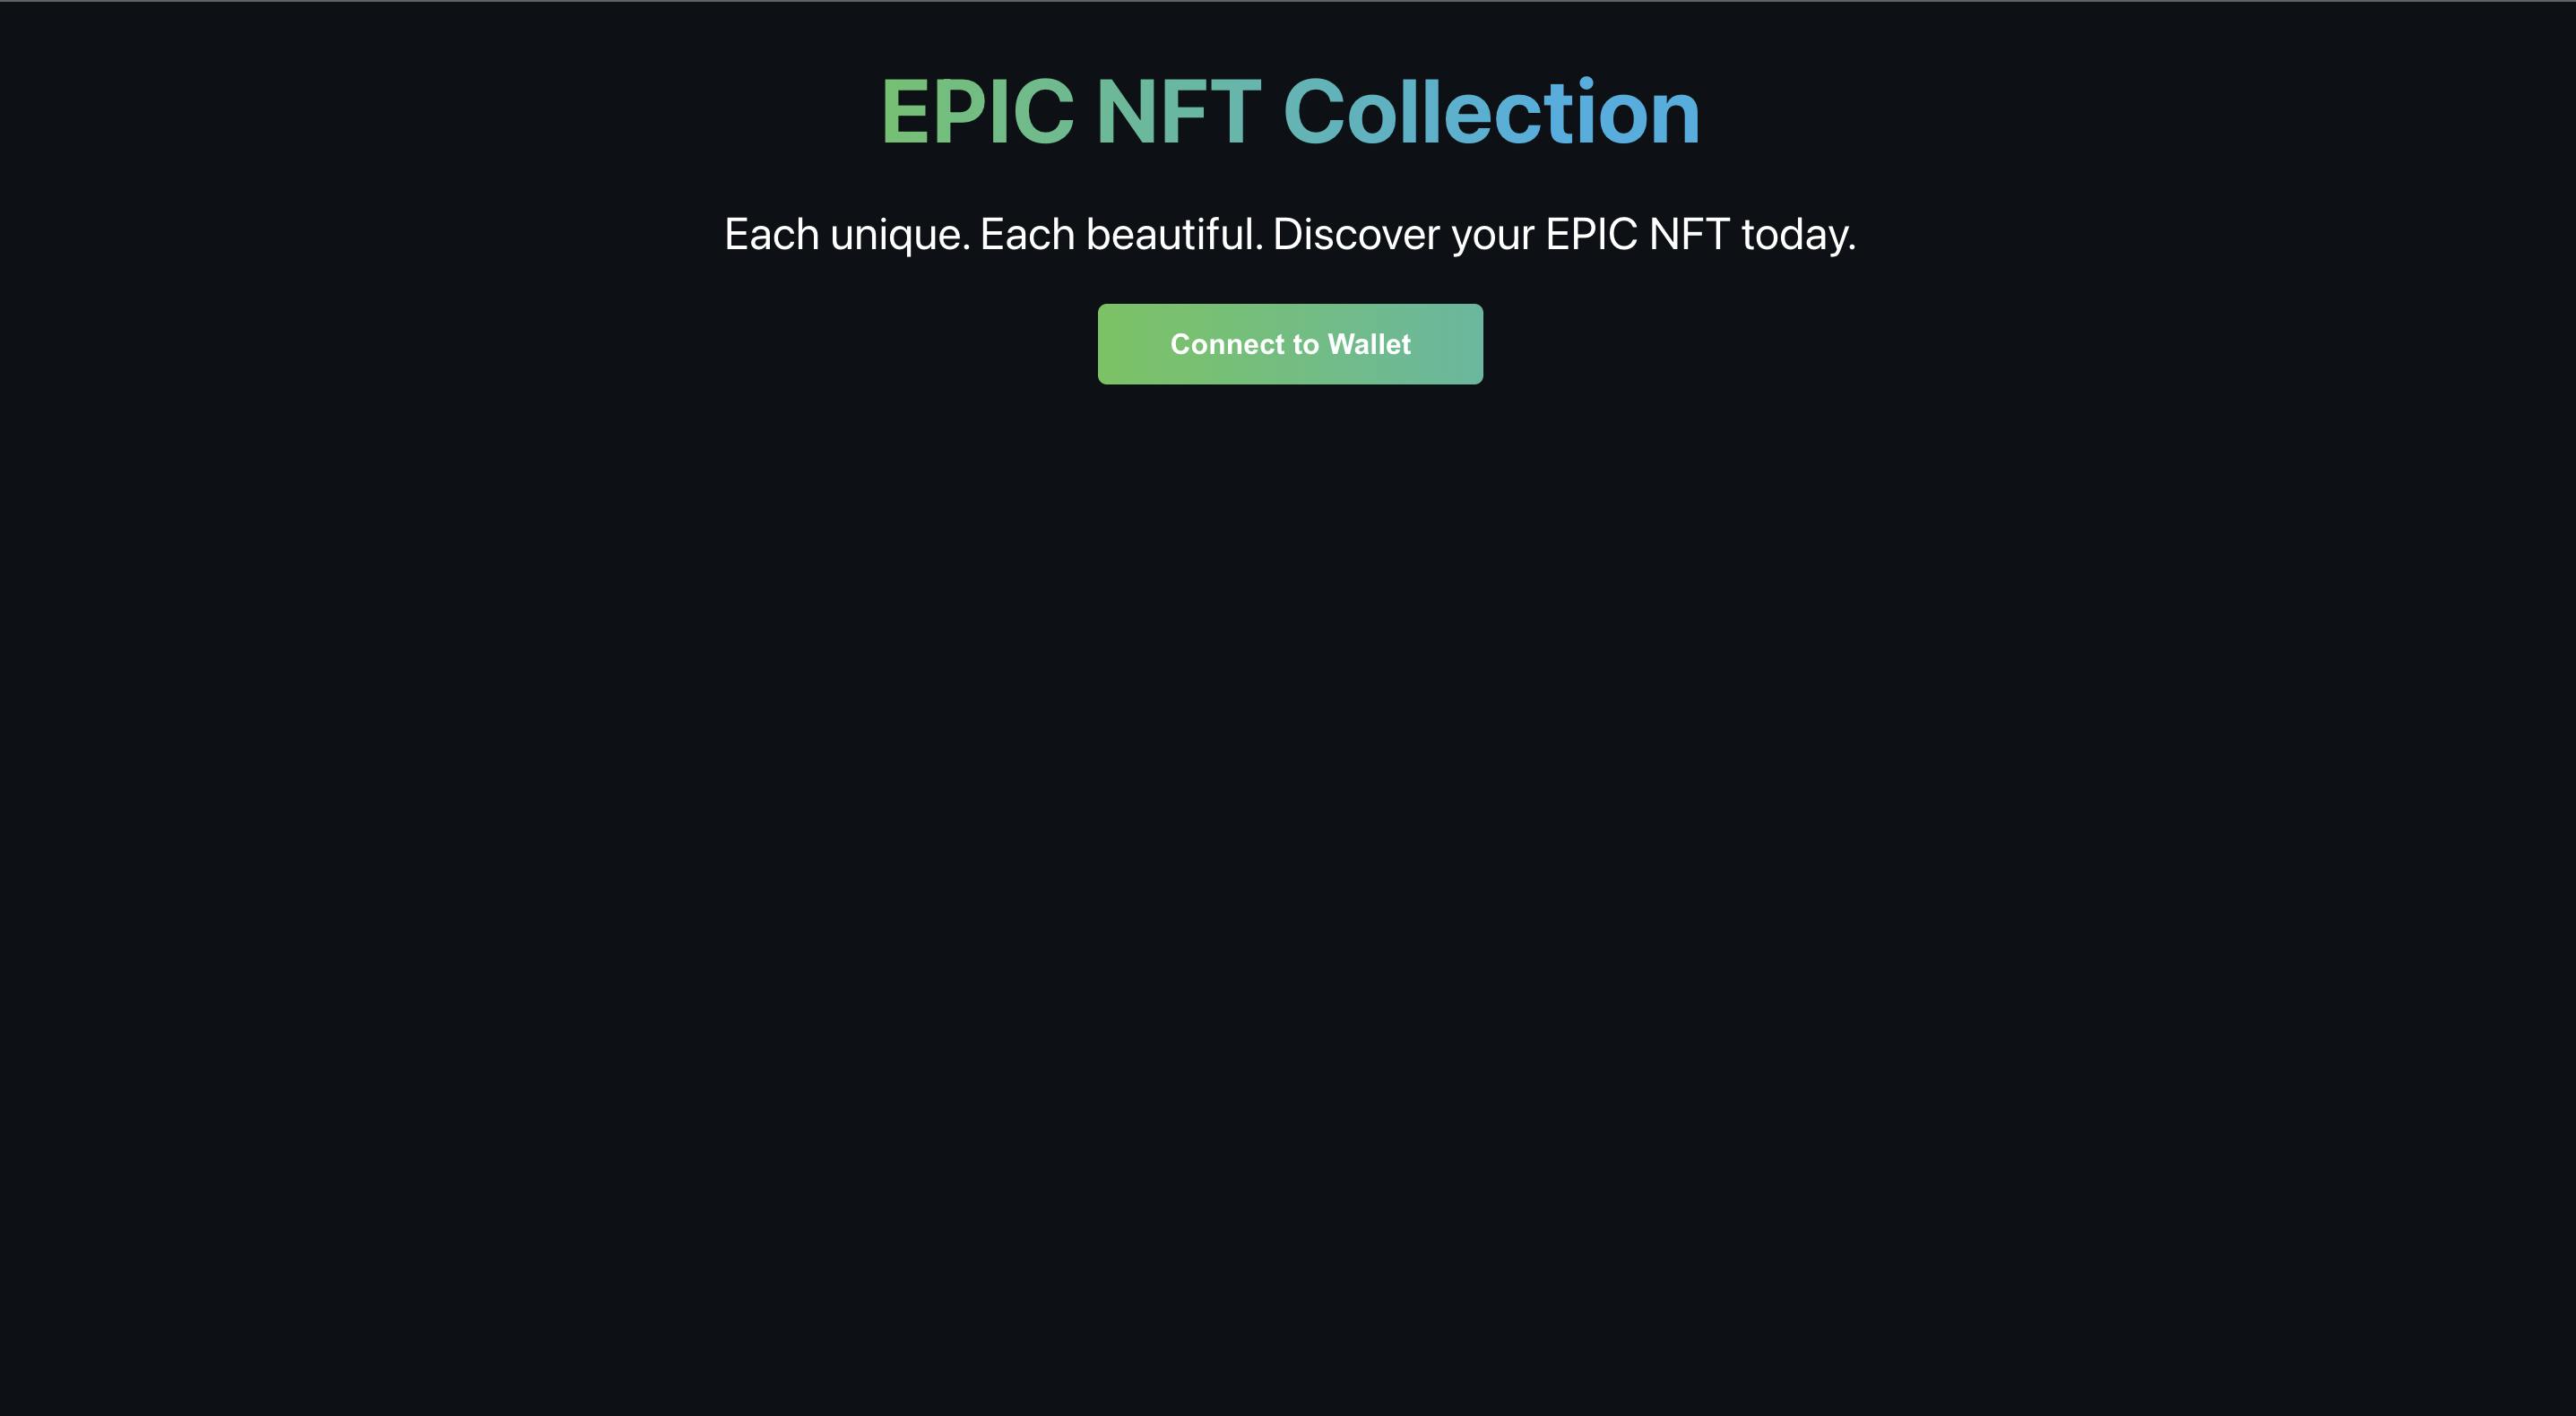
<p className="header gradient-text"EPIC NFT Collection</p>
<p className="sub-text">
Each unique. Each beautiful. Discover your NFT today.
</p>
{/*Render method here*/}
{renderNotConnectedContainer()}
</div>
{/*Footer here*/}
<div className="footer-container">
<p className="footer-text">Built with 💖</a>
</div>
</div>
</div>
);
};
export default App;
Let's add the connectWallet button. In web3, connecting your wallet is similar to the "Login" button for your user.
import React, { useEffect, useState } from "react";
import './styles/App.css';

const App = () => {
      const [currentAccount, setCurrentAccount] = useState("");

      const checkIfWalletIsConnected = async () => {
      const { ethereum } = window;

      if (!ethereum) {
        console.log("Make sure you have metamask!");
        return;
      } else {
        console.log("We have the ethereum object", ethereum);
      }

      const accounts = await ethereum.request({ method: 'eth_accounts' });
      if (accounts.length !== 0) {
        const account = accounts[0];
        console.log("Found an authorized account:", account);
        setCurrentAccount(account);
      } else {
        console.log("No authorized account found");
      }
    }

    //Implement your connectWallet method here
    const connectWallet = async () => {
    try {
      const { ethereum } = window;

      if (!ethereum) {
        alert("Get MetaMask!");
        return;
      }

     //Method to request access to the account.
     const accounts = await ethereum.request({ method: "eth_requestAccounts" });

     //Print out public address once we authorize Metamask.
     console.log("Connected", accounts[0]);
     setCurrentAccount(accounts[0]);
     } catch (error) {
      console.log(error);
     }
  }

  // Render Methods
  const renderNotConnectedContainer = () => (
    <button onClick={connectWallet} className="cta-button connect-wallet-button">
      Connect to Wallet
    </button>
  );

  useEffect(() => {
    checkIfWalletIsConnected();
  }, [])

  //Render Method
  return (
    <div className="App">
      <div className="container">
        <div className="header-container">
          <p className="header gradient-text">My NFT Collection</p>
          <p className="sub-text">
            Each unique. Each beautiful. Discover your NFT today.
          </p>
          {currentAccount === "" ? (
            renderNotConnectedContainer()
          ) : (
            <button onClick={null} className="cta-button connect-wallet-button">
              Mint NFT
            </button>
          )}
        </div>
        <div className="footer-container">
          <p className="footer-text">Built with 💖</a>
        </div>
      </div>
    </div>
  );
}

export default App;
3. Calling the Contract and Minting an NFT
Our contract has the function makeAnNFT, which will actually mint the NFT. We now need to call this function from our web app.
Write the code below under the connectWallet function:
//Function to mint NFT.
const askContractToMintNft = async () => {
  //Contract Address from deployment.
  const CONTRACT_ADDRESS = "DEPLOYED_RINKEBY_CONTRACT_ADDRESS";

  try {
    const { ethereum } = window;
    if (ethereum) {
      //Creating a connection with the contract.
      const provider = new ethers.providers.Web3Provider(ethereum);
      const signer = provider.getSigner();
      const connectedContract = new ethers.Contract(CONTRACT_ADDRESS, EpicNft.abi, signer);

      //Calling the actual function to mint NFT.
      console.log("Going to pop wallet now to pay gas...")
      let nftTxn = await connectedContract.makeAnNFT();

      //Waiting for transaction to complete.
      console.log("Mining...please wait.")
      await nftTxn.wait();

      console.log(`Mined, see transaction: https://rinkeby.etherscan.io/tx/${nftTxn.hash}`);
    } else {
      console.log("Ethereum object doesn't exist!");
    }
  } catch (error) {
    console.log(error)
  }
}
We'll want to call this function when someone clicks the Mint NFT button. Edit the following code in the render function:
return (
  {currentAccount === ""
    ? renderNotConnectedContainer()
    : (
      /** Add askContractToMintNft Action for the onClick event **/
      <button
         onClick={askContractToMintNft}
         className="cta-button connect-wallet-button"
      >
        Mint NFT
      </button>
    )
  }
);
For the ABI files, you'll need to navigate to artifacts/contracts/EpicNFT.sol/EpicNFT.json in the smart contract project and do the following operation:
Copy the contents from your
EpicNFT.jsonfile and then head to your web app. Make a new folder calledutilsundersrc. Under theutilsfolder, create a new file namedEpicNFT.json.
The full path will look something like src/utils/EpicNFT.json.
Paste the ABI file contents right there in our new file i.e.,
EpicNFT.json.
In the App.js file, import the same file, EpicNFT.json by adding the following code:
import EpicNft from './utils/EpicNFT.json';

We’re done!
Now, you should be able to mint an NFT from your app.
Finishing Touches
While we're done with basic NFT minting, it's certainly not the end of the road, and there are finishing touches we can bring to the app. Here are a few good ones to tackle straight away:
1. Dynamic NFT Combination*
As of now, the NFTs are the same and get minted based on the wallet address. However, we can modify the contract in such a way so it produces different NFTs every time with a shared theme. The updated contract is available here, with comments explaining all the new changes.
2.Set a Limit on the Number of Minted NFTs
Currently, a single user can mint multiple NFTs based on their wallet balance. A good update can be to limit the number of individual NFTs that can be minted by one particular address.
Hint, you'll need something in Solidity called
require. Perhaps, you'll need to create a function likegetTotalNFTsMintedfor your web app to call.
3. Let People See the Collection
Right now, our users have to navigate to the OpenSea Testnet and search for the collection using the deployed contract address. This is not exactly user-friendly.
We can create a button like "🌊 View Collection on OpenSea" that links directly to the collection page on OpenSea.
Conclusion

Now, you can go ahead and share the project with your friends, and family and have them mint their first NFTs!
This is just the beginning. There's a lot we can do with this project and NFT projects in general.
Selling NFTs: There are several ways to alter the smart contract that makes a user pay us to mint a transaction, such as adding
payableto your contract and usingrequireto set a minimum amount.Adding Royalties: We can also add royalties to our smart contract that would give a percentage of every future sale of the NFT to us, as well the creators of the NFT collection.
This blog is a part of the Hashnode Web3 blog, where a team of curated writers are bringing out new resources to help you discover the universe of web3. Check us out for more on NFTs, blockchains, and the decentralized future.