


Artists and content creators have a unique potential to monetize their work due to blockchain technology, especially NFTs.
Artists are no longer reliant on galleries or auction houses to sell their art. Instead, they can sell it directly to the consumer as an NFT, allowing them to keep a more significant portion of the profit.
This article will guide us through building and deploying an NFT whitelist smart contract, enabling us to add, remove, validate, and verify if a user is part of a project's whitelist.
Prerequisites
Make sure to have Node.js or npm installed on your computer. If you don't, click here.
Project Setup and Installation
Let's create a new folder/directory for our project, whitelist-project in the terminal. We'll work in this directory through the course of this tutorial. In the directory we just created, run the following commands:
npm init -y
npm install --save-dev hardhat
Let's get a sample project by running the command below:
npx hardhat
We'll go with the following options:
- A sample project.
- Accept all other requests.
Having hardhat-waffle and hardhat-ethers installed is required for the sample project.
Just in case it didn't install automatically, we will install it manually with the following command:
npm install --save-dev @nomiclabs/hardhat-waffle ethereum-waffle chai @nomiclabs/hardhat-ethers ethers
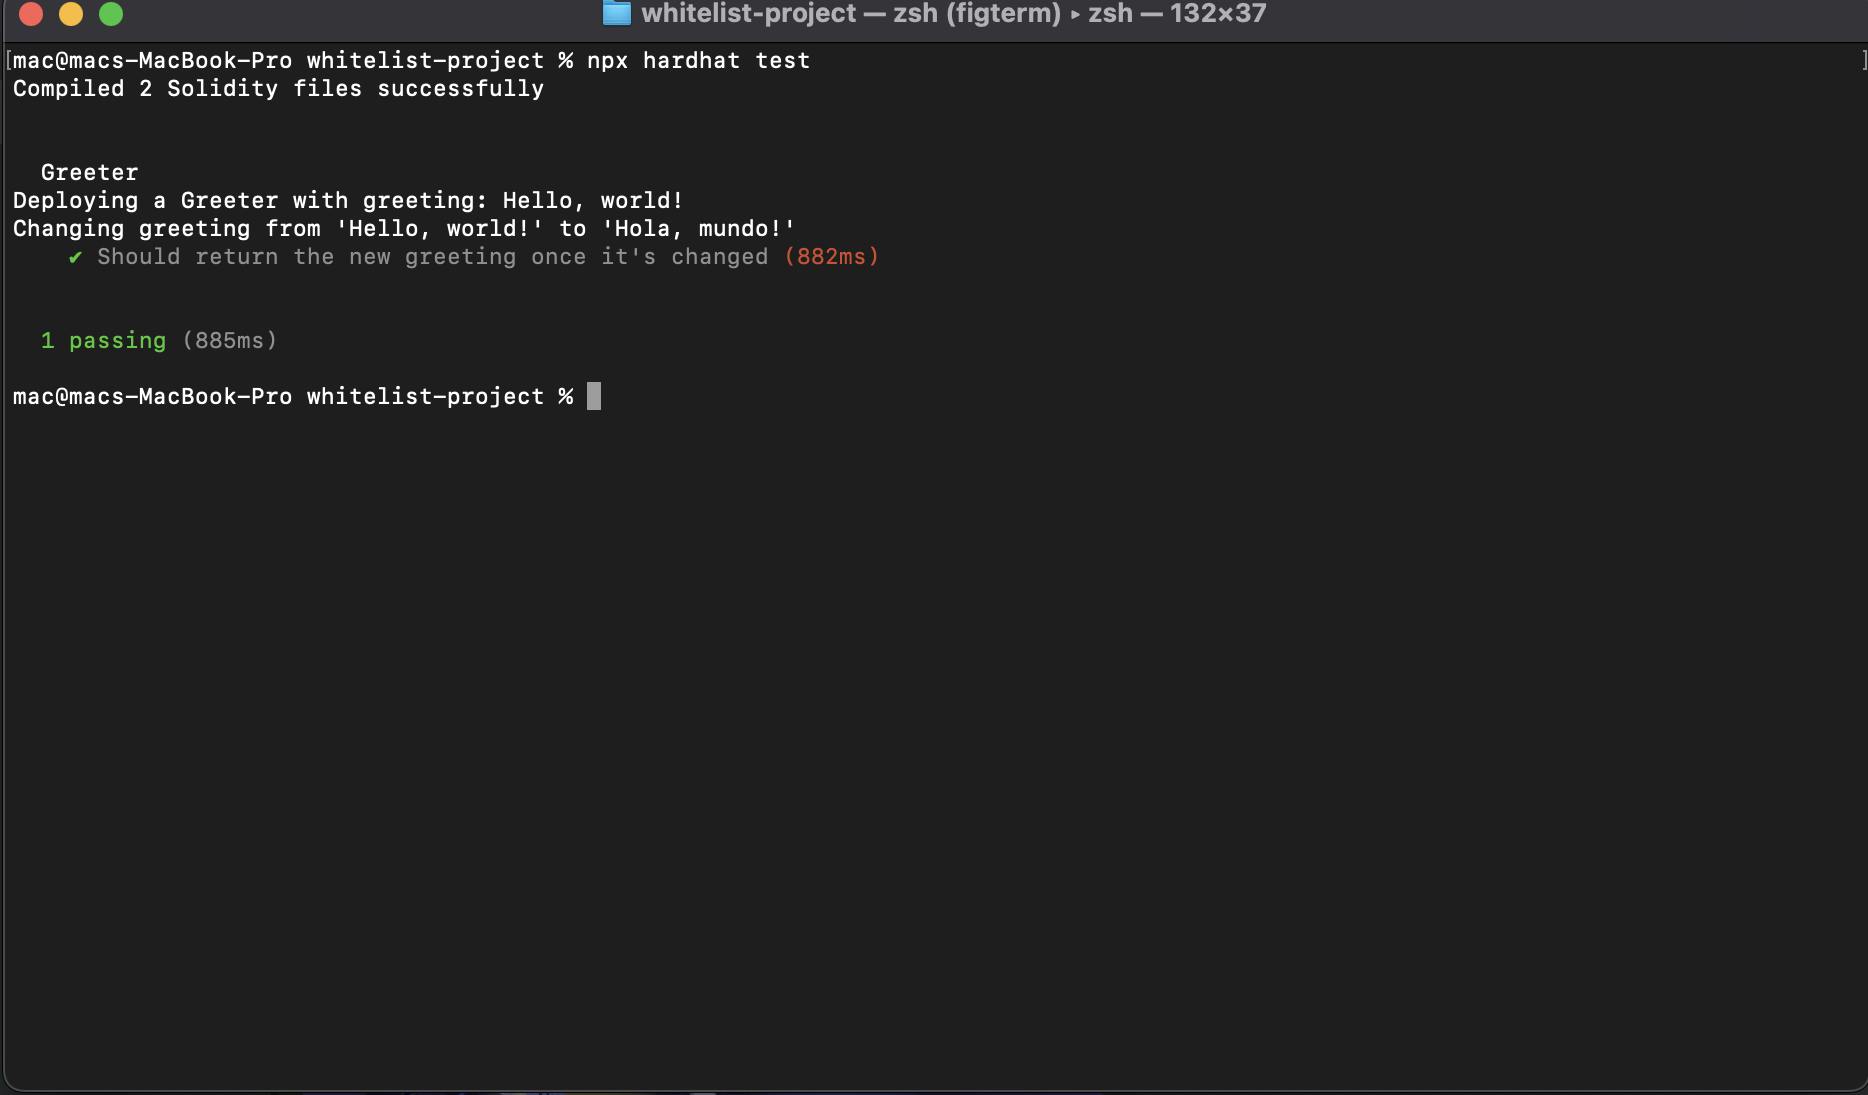
To make sure everything is working, run the following code:
npx hardhat test
If everything is working as it should, you'll see a passed test result in your console:
Now, delete sample-test.js from the test folder, sample-script.js from the scripts folder, and Greeter.sol from the contracts folder.
The folders themselves should not be deleted.
We'll create a Whitelist.sol file inside the contracts directory. When using Hardhat, file layout is crucial, so pay attention! We'll start with the most basic structure of any contract.
//SPDX-License-Identifier: Unlicense
pragma solidity ^0.8.0;

import "hardhat/console.sol";

contract Whitelist {
    constructor() {
        console.log("Hello! from Whitelist Contract");
    }
}
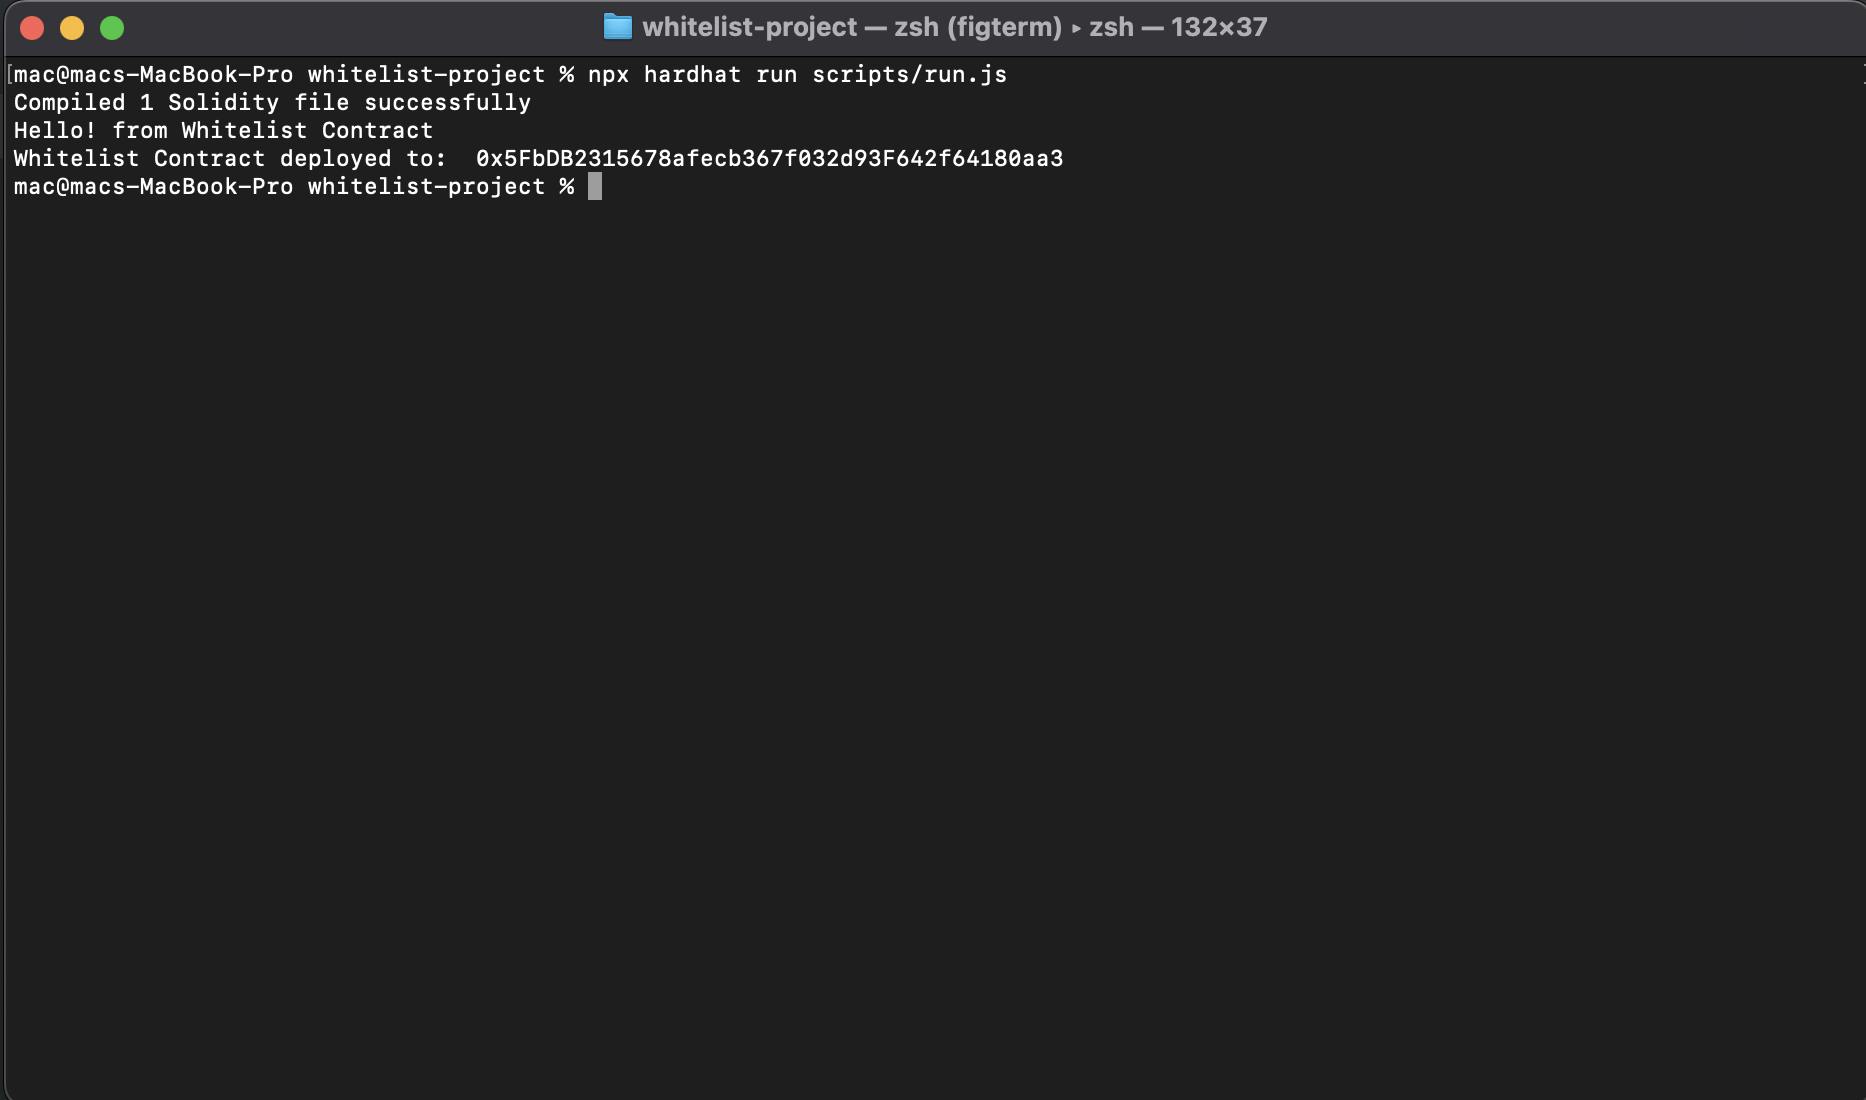
To build and deploy our smart contract, we'll navigate to the scripts folder, create a new run.js file, and update it with the following code snippet:
const main = async () => {
  // This will compile our contract and generate the necessary files we need to work with our contract under the artifacts directory.
  const whitelistContractFactory = await hre.ethers.getContractFactory(
    "Whitelist"
  );
  const whitelistContract = await whitelistContractFactory.deploy();

  //We'll wait until our contract is officially deployed to our local blockchain! Our constructor runs when we deploy.
  await whitelistContract.deployed();

  console.log("Whitelist Contract deployed to: ", whitelistContract.address);
};

const runMain = async () => {
  try {
    await main();
    process.exit(0);
  } catch (error) {
    console.log(error);
    process.exit(1);
  }
};

runMain();
In the code snippet above, we've created a script that lets us deploy the smart contract we wrote earlier.
Let's run it with the following command:
npx hardhat run scripts/run.js
You should see something similar to this:
Now, we have a working smart contract. Let's deploy it to our local network.
In the scripts folder, let's create a deploy.js file and copy and paste the code below:
const main = async () => {
  const [deployer] = await hre.ethers.getSigners();
  const accountBalance = await deployer.getBalance();

  console.log("Deploying contracts with account: ", deployer.address);
  console.log("Account balance: ", accountBalance.toString());

  const Token = await hre.ethers.getContractFactory("Whitelist");
  const portal = await Token.deploy();
  await portal.deployed();

  console.log("Whitelist address: ", portal.address);
};

const runMain = async () => {
  try {
    await main();
    process.exit(0);
  } catch (error) {
    console.error(error);
    process.exit(1);
  }
};

runMain();
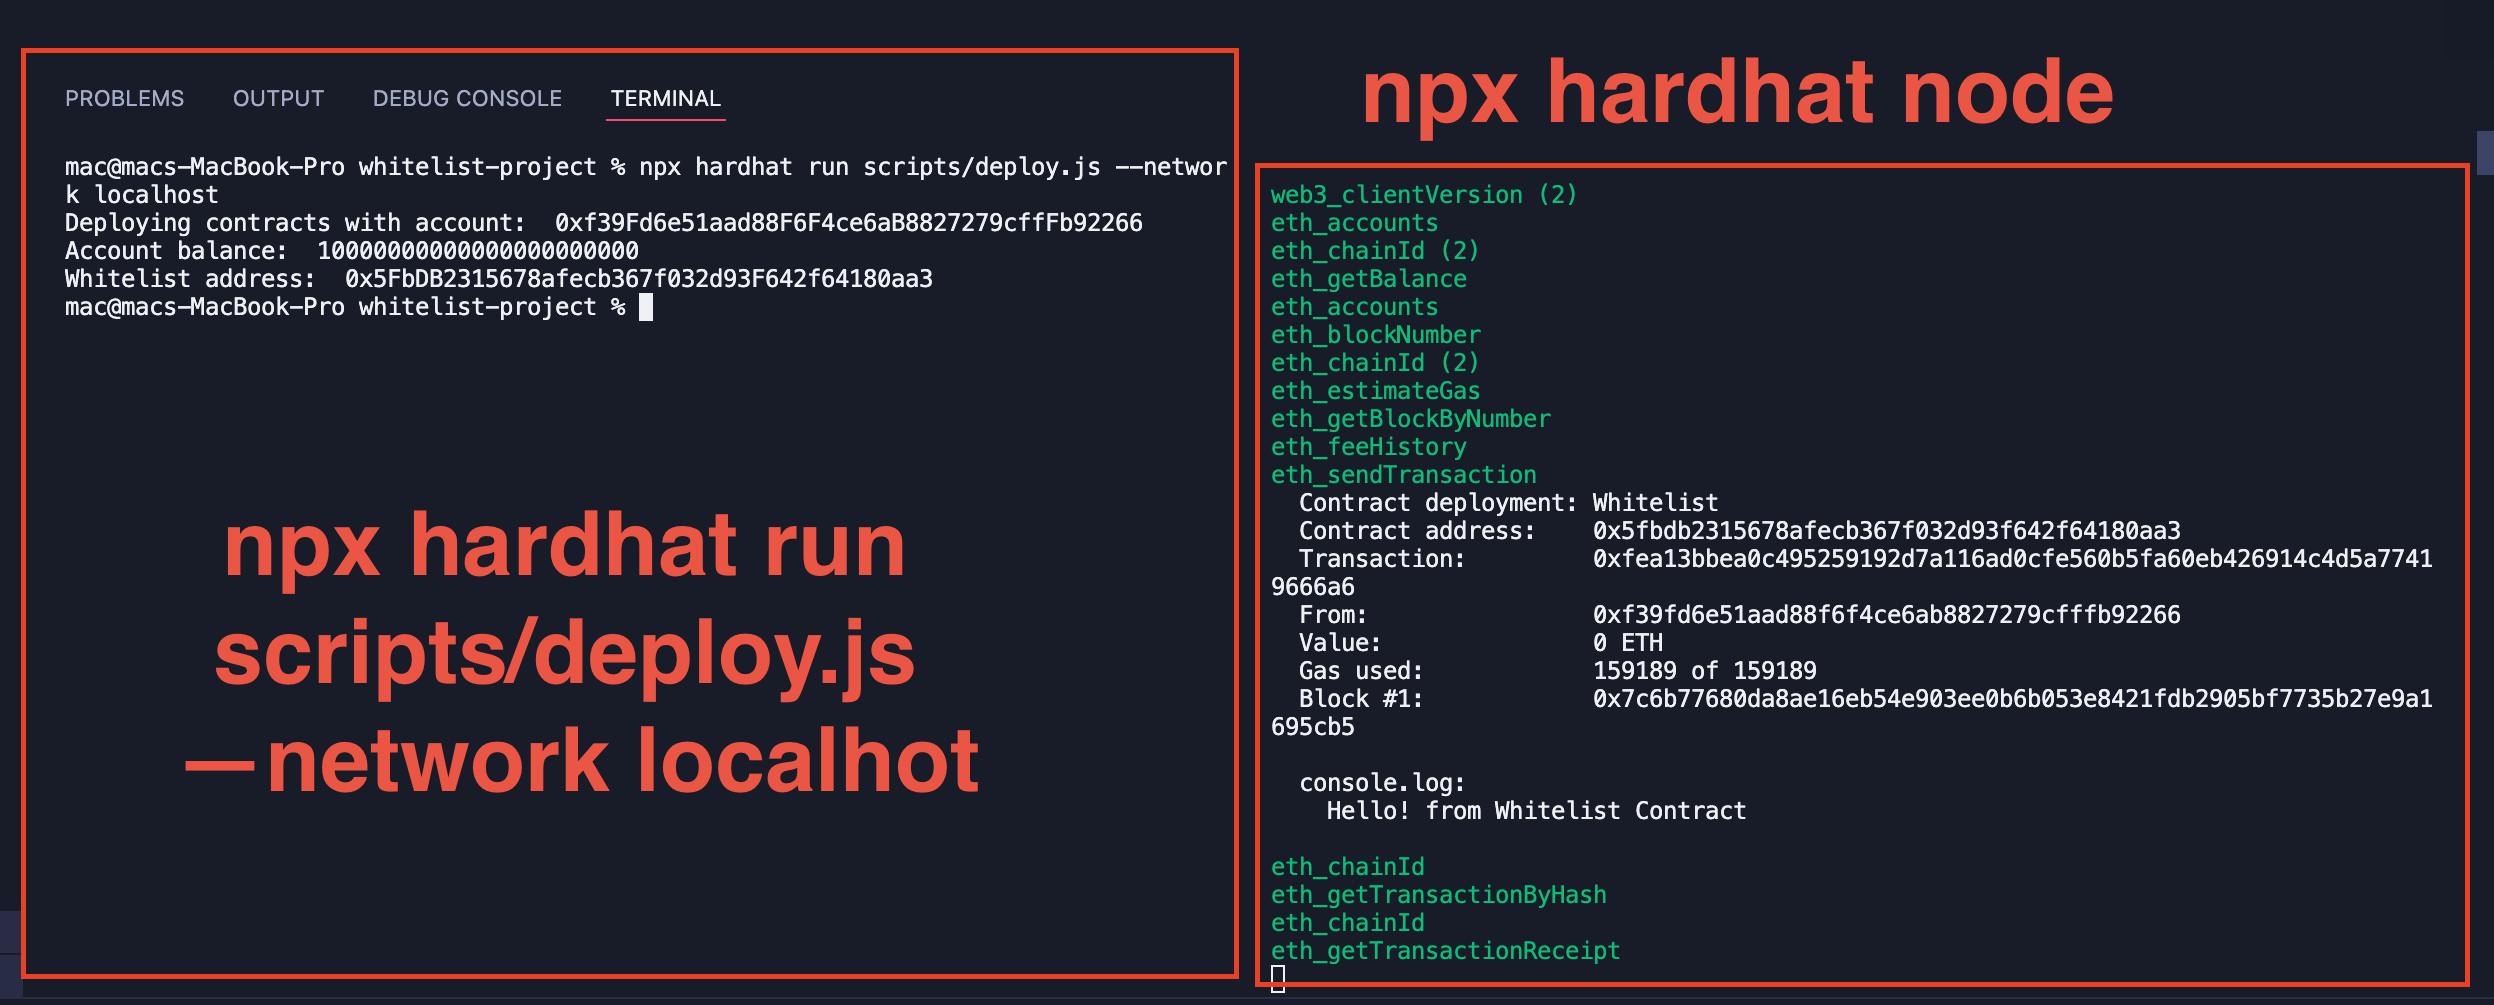
Before deploying, let's make sure our local blockchain node is running in a separate terminal with the following command:
npx hardhat node
Next, we'll deploy our smart contract:
npx hardhat run scripts/deploy.js --network localhost
We should have something like this:
Building a Whitelist
In this section, we'll update the smart contract Whitelist.sol and deploy.js files respectively.
Update the Whitelist.sol file with the following code snippet:
//SPDX-License-Identifier: Unlicensed
pragma solidity ^0.8.0;

contract Whitelist {
    // The number of accounts we want to have in our whitelist.
    uint256 public maxNumberOfWhitelistedAddresses;

    // Track the number of whitelisted addresses.
    uint256 public numberOfAddressesWhitelisted;

    // The owner of the contract
    address owner;

    // To store our addresses, we need to create a mapping that will receive the user's address and return if he is whitelisted or not.
    mapping(address => bool) whitelistedAddresses;

    constructor(uint256 _maxWhitelistedAddresses) {
        owner = msg.sender;
        maxNumberOfWhitelistedAddresses = _maxWhitelistedAddresses;
    }

    // Validate only the owner can call the function
    modifier onlyOwner() {
        require(msg.sender == owner, "Error: Caller is not the owner");
        _;
    }

    function addUserAddressToWhitelist(address _addressToWhitelist)
        public
        onlyOwner
    {
        // Validate the caller is not already part of the whitelist.
        require(
            !whitelistedAddresses[_addressToWhitelist],
            "Error: Sender already been whitelisted"
        );

        // Validate if the maximum number of whitelisted addresses is not reached. If not, then throw an error.
        require(
            numberOfAddressesWhitelisted < maxNumberOfWhitelistedAddresses,
            "Error: Whitelist Limit exceeded"
        );

        // Set whitelist boolean to true.
        whitelistedAddresses[_addressToWhitelist] = true;

        // Increasing the count
        numberOfAddressesWhitelisted += 1;
    }

    function verifyUserAddress(address _whitelistedAddress)
        public
        view
        returns (bool)
    {
        // Verifying if the user has been whitelisted
        bool userIsWhitelisted = whitelistedAddresses[_whitelistedAddress];
        return userIsWhitelisted;
    }

 // Is the user whitelisted?
    function isWhitelisted(address _whitelistedAddress)
        public
        view
        returns (bool)
    {
        // Verifying if the user has been whitelisted
        return whitelistedAddresses[_whitelistedAddress];
    }

  // Remove user from whitelist
    function removeUserAddressFromWhitelist(address _addressToRemove)
        public
        onlyOwner
    {
        // Validate the caller is already part of the whitelist.
        require(
            whitelistedAddresses[_addressToRemove],
            "Error: Sender is not whitelisted"
        );

        // Set whitelist boolean to false.
        whitelistedAddresses[_addressToRemove] = false;

        // This will decrease the number of whitelisted addresses.
        numberOfAddressesWhitelisted -= 1;
    }

    // Get the number of whitelisted addresses
    function getNumberOfWhitelistedAddresses() public view returns (uint256) {
        return numberOfAddressesWhitelisted;
    }

    // Get the maximum number of whitelisted addresses
    function getMaxNumberOfWhitelistedAddresses()
        public
        view
        returns (uint256)
    {
        return maxNumberOfWhitelistedAddresses;
    }

    // Get the owner of the contract
    function getOwner() public view returns (address) {
        return owner;
    }

}
Update the deploy.js file in the script directory with the following code snippet:
const main = async () => {
  //...

  // Deploy the contract and set the maximum number of whitelisted addresses to 5
  const portal = await Token.deploy(5);

  // Wait for it to finish deploying
  await portal.deployed();

  console.log("Whitelist address: ", portal.address);
};

//...
In the code snippet above, we updated the deploy.js script by specifying 5 in the constructor as the maximum number of addresses to be whitelisted.
Smart Contract Unit Testing
In this section, we'll write a basic test to test out the most critical functions we'll use.
To do so, we'll create a whitelist-test.js file inside the test directory and write the following code:
const { expect, use } = require("chai");
const { ethers } = require("hardhat");

describe("Whitelist", async () => {
  let whitelist;
  let whitelistContract;

  before(async () => {
    whitelist = await ethers.getContractFactory("Whitelist");
    whitelistContract = await whitelist.deploy(5);
  });

  it("should deploy", async () => {
    expect(whitelistContract.address).to.be.a("string");
    expect(whitelistContract.address).to.not.be.null;
  });

  it("should allow address to be added to whitelist", async () => {
    const whitelistAddress = "0x0000000000000000000000000000000000000000";
    await whitelistContract.addUserAddressToWhitelist(whitelistAddress);
    const isWhitelisted = await whitelistContract.isWhitelisted(
      whitelistAddress
    );
    expect(isWhitelisted).to.be.true;
  });

  it("should not allow address to be added to whitelist if already whitelisted", async () => {
    const whitelistAddress = "0x0000000000000000000000000000000000000009";
    await whitelistContract.addUserAddressToWhitelist(whitelistAddress);
    const isWhitelisted = await whitelistContract.isWhitelisted(
      whitelistAddress
    );
    expect(isWhitelisted).to.be.true;
  });

  it("should allow address to be removed from whitelist if already whitelisted", async () => {
    const whitelistAddress = "0x0000000000000000000000000000000000000009";
    await whitelistContract.removeUserAddressFromWhitelist(whitelistAddress);
    const isWhitelisted = await whitelistContract.isWhitelisted(
      whitelistAddress
    );
    expect(isWhitelisted).to.be.false;
  });

  it("should not allow address to be removed from whitelist if not whitelisted", async () => {
    const whitelistAddress = "0x0000000000000000000000000000000000000000";
    await whitelistContract.removeUserAddressFromWhitelist(whitelistAddress);
    const isWhitelisted = await whitelistContract.isWhitelisted(
      whitelistAddress
    );
    expect(isWhitelisted).to.be.false;
  });

  // Get number of whitelisted addresses
  it("should return number of whitelisted addresses", async () => {
    const whitelistAddress = "0x0000000000000000000000000000000000000000";
    await whitelistContract.addUserAddressToWhitelist(whitelistAddress);
    const numberOfWhitelistedAddresses =
      await whitelistContract.getNumberOfWhitelistedAddresses();
    expect(numberOfWhitelistedAddresses).to.equal(1);
  });

  // Get the maximum number of whitelisted addresses
  it("should return the maximum number of whitelisted addresses", async () => {
    const maxNumberOfWhitelistedAddresses =
      await whitelistContract.getMaxNumberOfWhitelistedAddresses();
    expect(maxNumberOfWhitelistedAddresses).to.equal(5);
  });

  // Get the owner of the contract
  it("should return the owner of the contract", async () => {
    const owner = await whitelistContract.getOwner();
    expect(owner).to.be.a("string");
    expect(owner).to.not.be.null;
  });
});
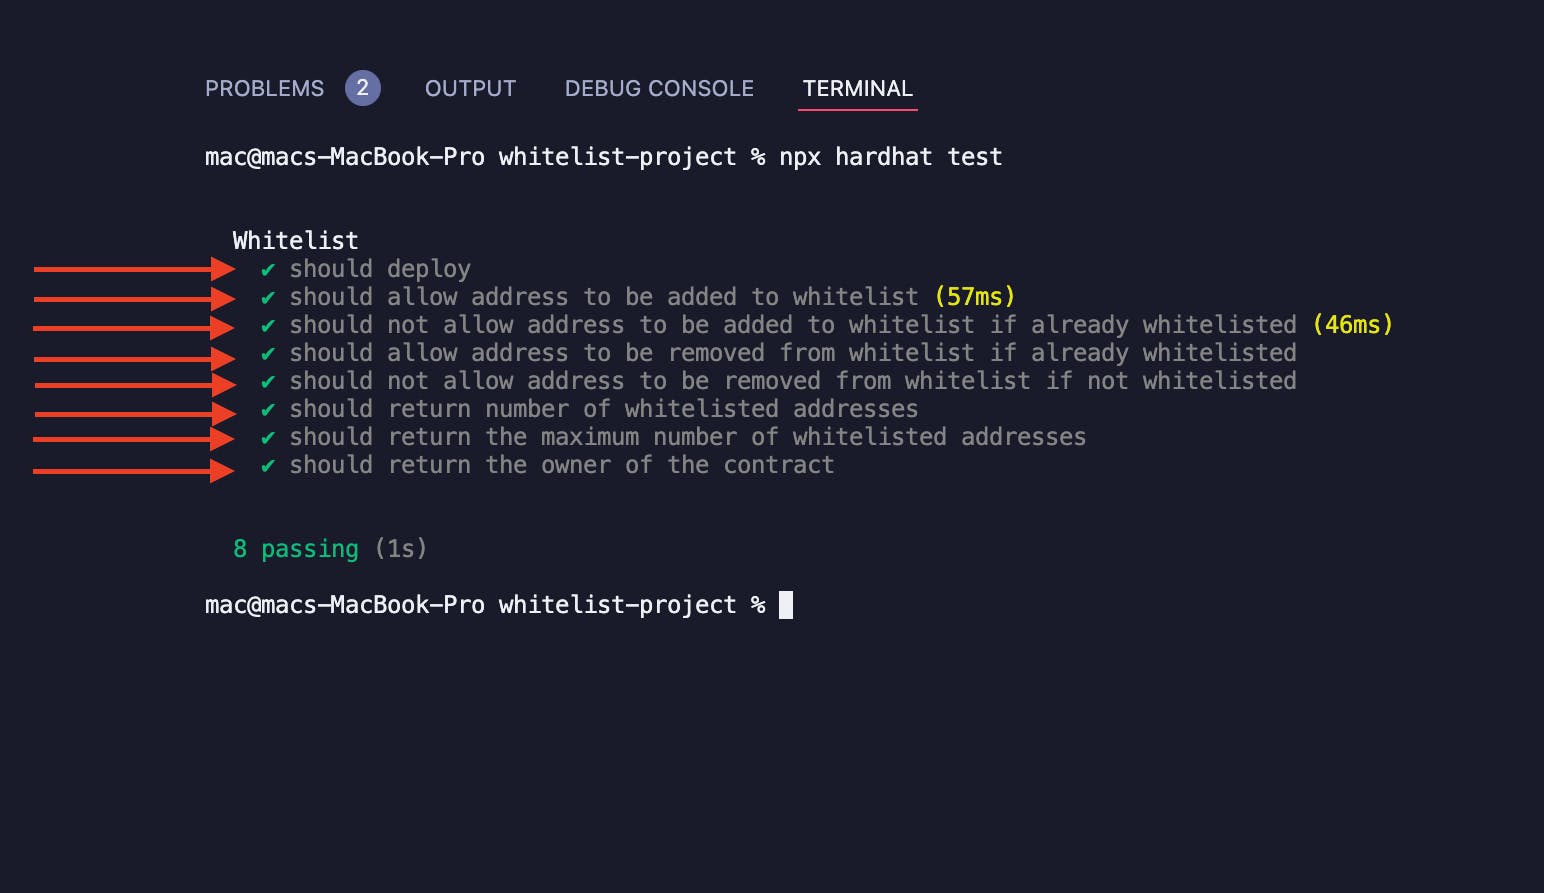
Next, let's run the test with the following command:
npx hardhat test
We should have something similar to the image below:
RPC(Remote Procedure Call) Setup
Let's set up an RPC and deploy the contract to the blockchain.
Before deploying to the blockchain, we'll need to create an Alchemy account.
We'll publish our contract creation transaction with Alchemy. The transaction will be mined and added to the blockchain as a valid transaction.
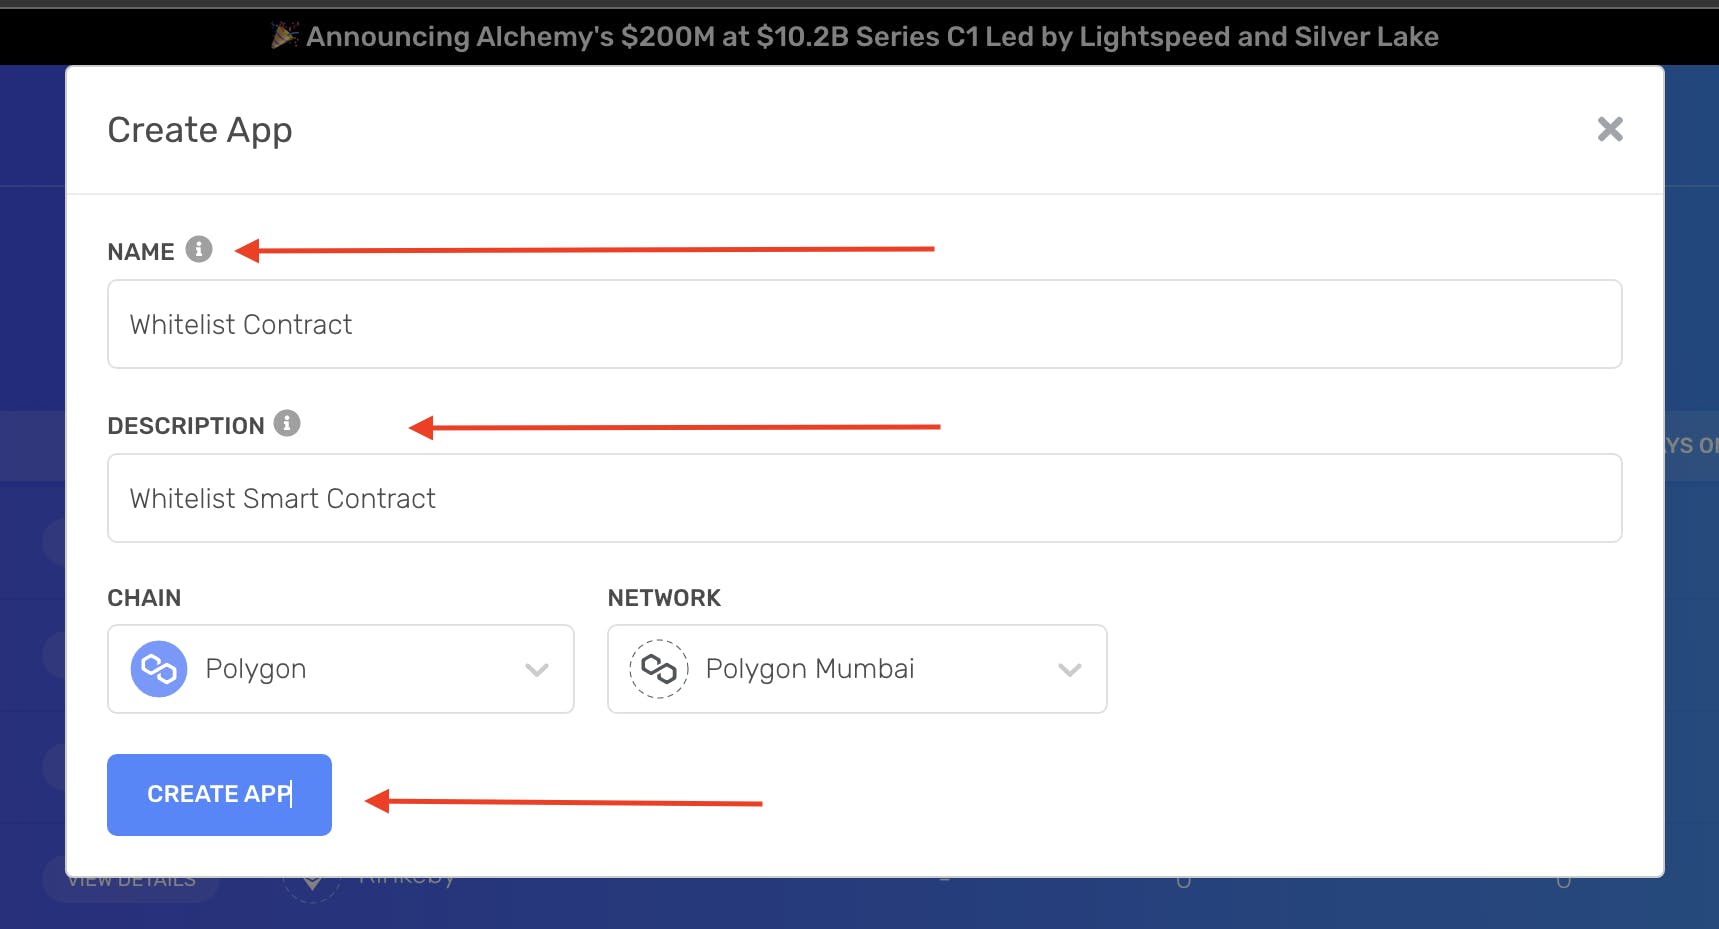
After you sign up, we'll create an app like the one below. Remember to switch the network to Mumbai, where we'll be deploying.
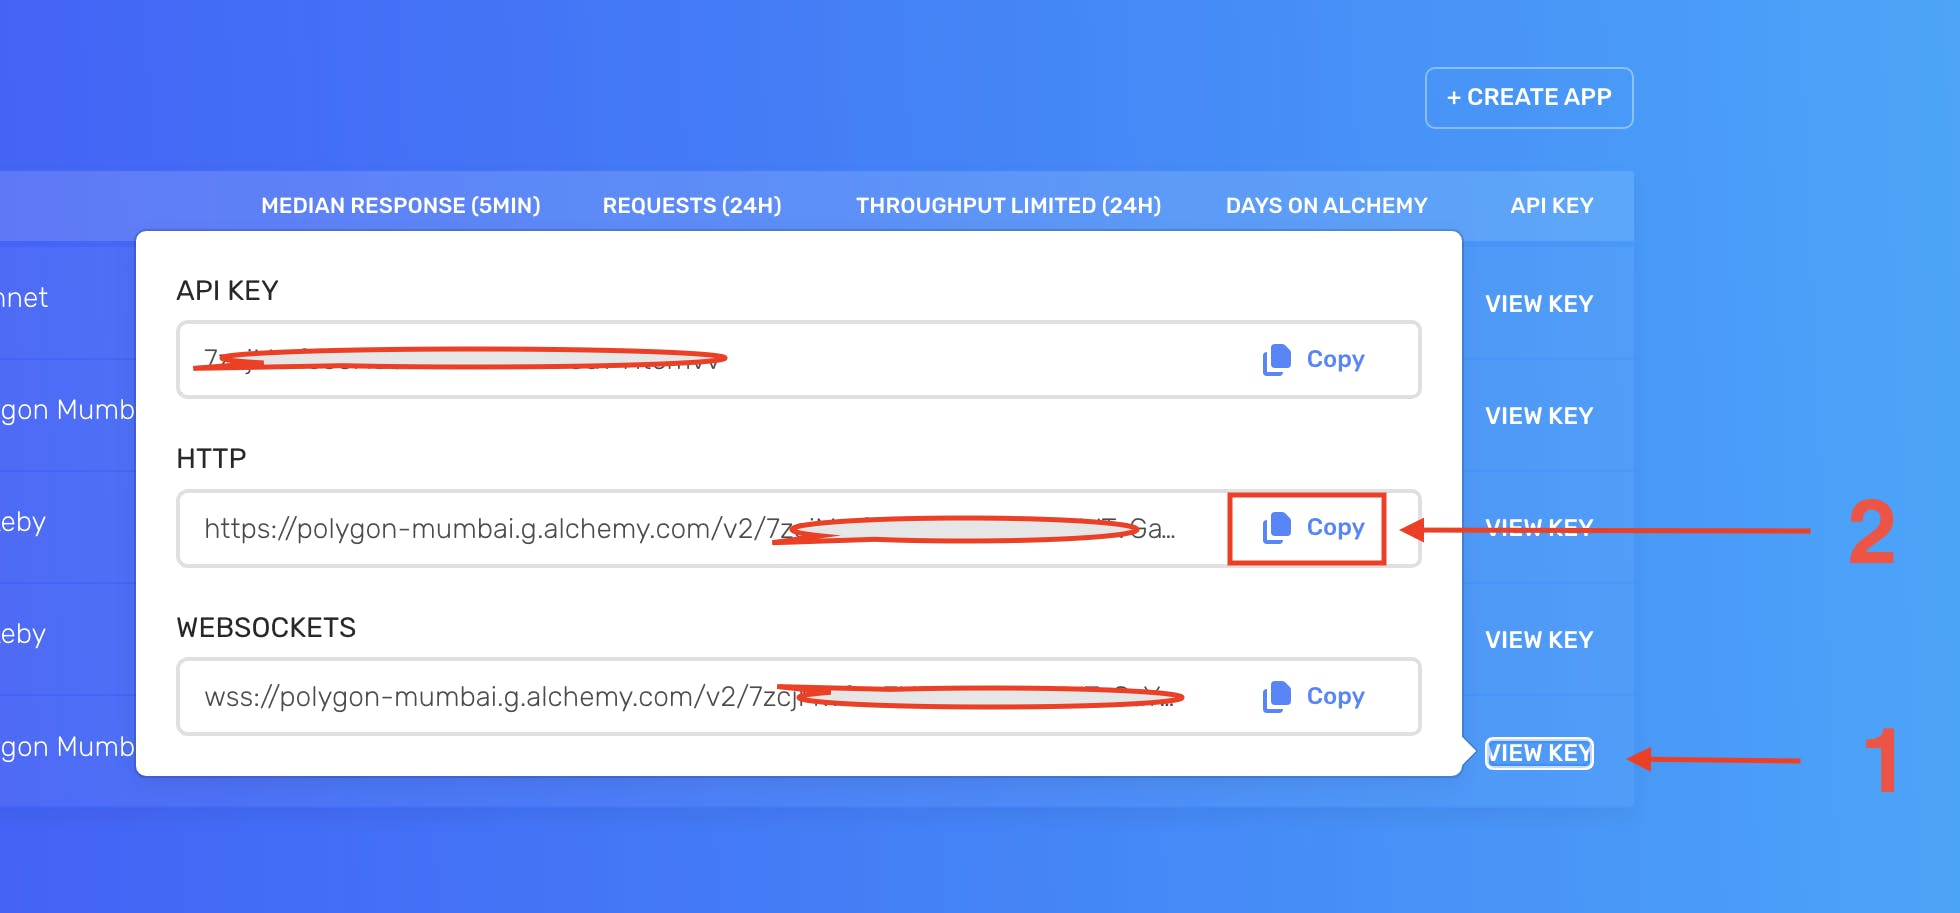
We'll need to grab our keys, as shown below, and store them for later use:
To use the Testnet, we'll need some fake MATIC tokens in our Testnet account, so we'll request some from Polygon Mumbai using a faucet.
This "fake" MATIC can only be used on the Testnet.
We can grab some MATIC tokens here.
Let us update the hardhat.config.js file in the root project directory:
require("@nomiclabs/hardhat-waffle");
require("dotenv").config();

// This is a sample Hardhat task. To learn how to create your own go to
// https://hardhat.org/guides/create-task.html
task("accounts", "Prints the list of accounts", async (taskArgs, hre) => {
  const accounts = await hre.ethers.getSigners();

  for (const account of accounts) {
    console.log(account.address);
  }
});

// You need to export an object to set up your config
// Go to https://hardhat.org/config/ to learn more

/**
 * @type import('hardhat/config').HardhatUserConfig
 */
module.exports = {
  solidity: "0.8.4",
  networks: {
    mumbai: {
      url: process.env.STAGING_ALCHEMY_KEY,
      accounts: [process.env.PRIVATE_KEY],
    },
  },
};
In the code snippet above, some keys were read from the .env file, as well as the import at the top of require("dotenv").config(). This implies that we need to install the dotenv package and also create a .env file using the command below:
npm install -D dotenv

touch .env
Inside the .env file, let's add the following keys:
STAGING_ALCHEMY_KEY= // Add the key we copied from the Alchemy
PRIVATE_KEY= // Add your private key here
In the code above, we need to put our private key. Fortunately, getting our private key isn't that hard. Check out this post.
Smart Contract Deployment to Polygon Network
It's time to deploy our application on the Polygon network.
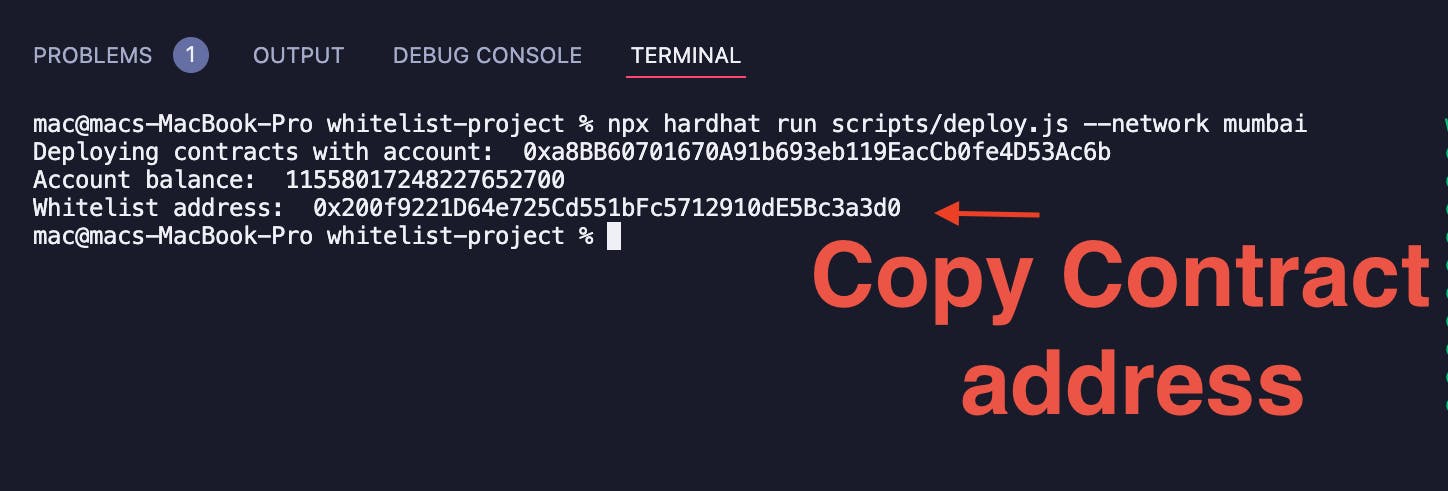
Let's run the command below to deploy our contract to a blockchain network:
npx hardhat run scripts/deploy.js --network mumbai
We should have something similar to this:
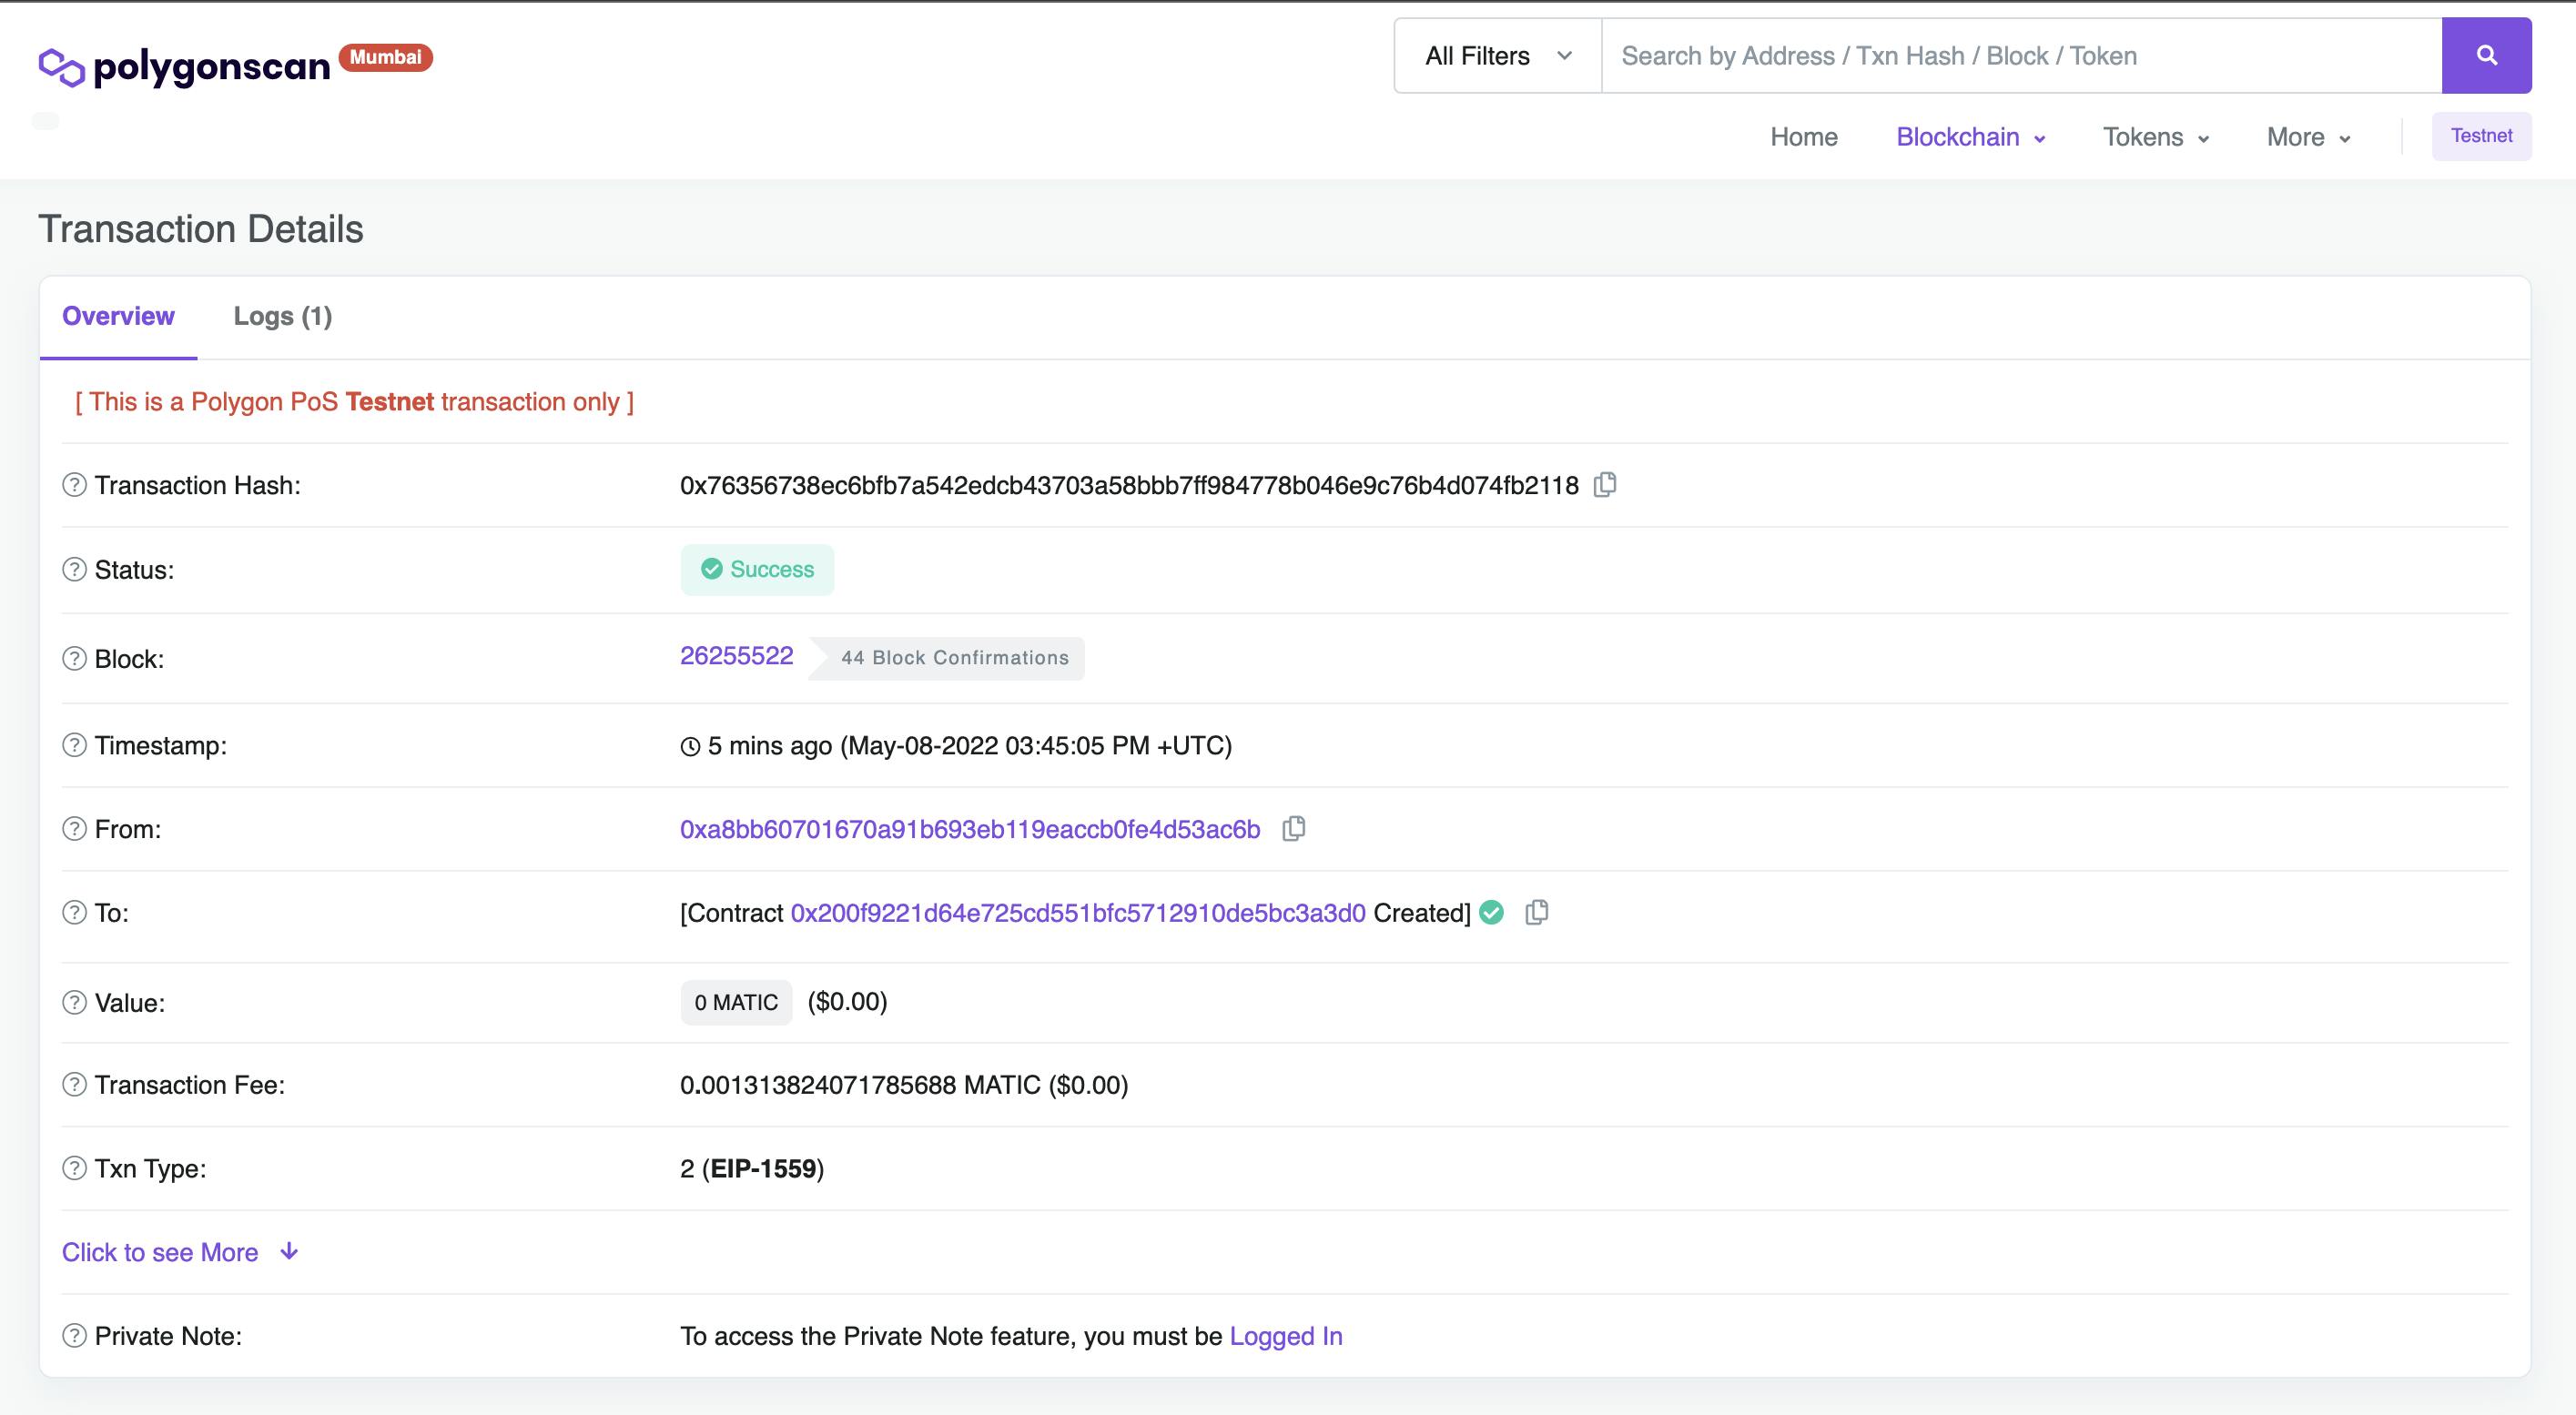
We can verify our contract deployment on Polygon Mumbai Network.
Here's the link to the repository so that you can check the code or in case you missed anything:
Conclusion
We built a whitelist smart contract in this article and deployed it to the Polygon Testnet.
This article is a part of the Hashnode Web3 blog, where a team of curated writers brings out new resources to help you discover the universe of web3. Check us out for more on NFTs, DAOs, blockchains, and the decentralized future.