


Table of contents
Thirdweb is a platform that provides a suite of tools for creators, artists, and entrepreneurs to build, launch and manage a Web3 project easily.
It enables users to add features such as NFTs, marketplaces, and social tokens to their Web3 projects without writing a line of code.
In this article, you'll better understand what DAO is, why you should create a DAO, and how you can create a DAO with Thirdweb.
This will allow users to mint your DAO's NFT, receive cryptocurrency via airdrops, and participate in the DAO's polls.
Prerequisites
Before you can continue with this tutorial, you should:
- Have Metamask installed
- Have knowledge of JavaScript/React.js, and the blockchain
- Have set up an account with Alchemy
What is a DAO? Decentralized autonomous organizations (DAOs) are a type of governance commonly used for DApps, projects, and crypto-investment funds. DAOs are famous for their openness, decentralization, and working with self-executing smart contracts. There are so many different definitions and explanations of what a DAO is.
In general terms, DAOs are member-owned communities without centralized leadership. The precise legal status of this type of business organization is unclear. A DAO's financial transaction records and program rules are maintained on a blockchain.
Setting up the DAO Client-side
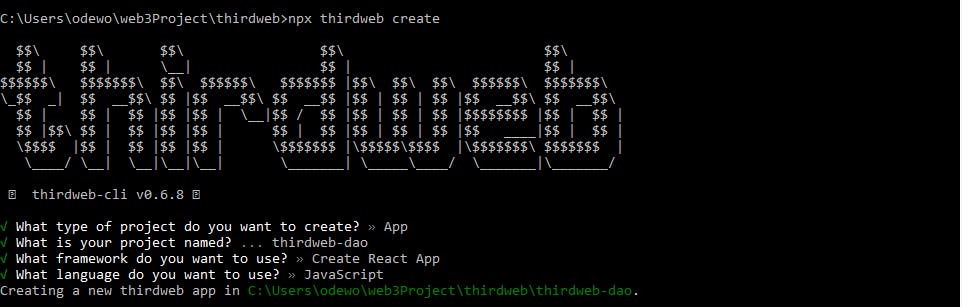
To start building your DAO client-side application, you'll be using the thirdweb-CLI command.
First, Install the Thirdweb CLI globally tool by typing the below command:
yarn add @thirdweb-dev/cli
Thirdweb contains starters that help generate a base setup for your project. Use the command below to generate a Thirdweb starter project. Type a project title and name of your choice for the project directory. Follow the prompts to complete the setup.
npx thirdweb create
Once the installation is complete, head over to the project directory and run the command below to start your application:
npm start
Navigate to localhost:3000 to view your project on a browser.
Get Metamask
Next, you need an Ethereum wallet. There are a bunch of these, but for this project, you will use Metamask. Download the browser extension and set up your wallet here. Even if you already have another wallet provider, just use Metamask for now.
But why Metamask?
Well. You need to be able to call functions on your smart contract that live on the blockchain. And to do that, you need to have a wallet with your Ethereum address and private key.
It's almost like authentication. You need something to "Login" to the blockchain and then use those login credentials to make API requests from your website.
So, for your website to talk to the blockchain, you need to somehow connect your wallet to it. Once you connect your wallet to the website, your website will have permission to call smart contracts on your behalf. Remember, it's just like authenticating into a website.
So, go ahead and set it all up! Their setup flow is pretty self-explanatory.
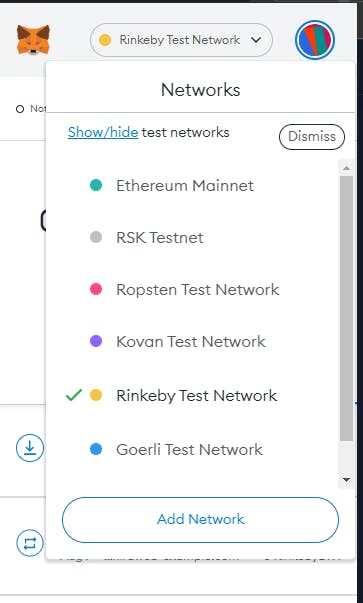
Once you set up your wallet, switch the network to "Rinkeby", the test network you'll be working with.
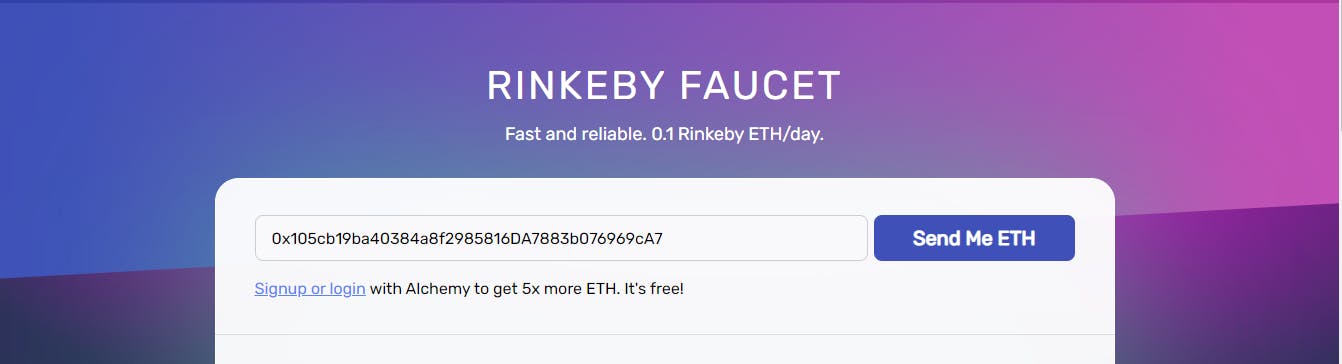
Make sure you have testnet funds
You're not going to be deploying to the "Ethereum mainnet". Why? Because it costs real funds, and it's not worth messing up. You're going to start with a "testnet," which is a clone of "mainnet," but it uses fake funds; you can test stuff out as much as you want. But, it's important to know that testnets are run by actual miners and mimic real-world scenarios.
You'll be using Rinkeby, which the Ethereum Foundation runs. To get some fake ETH, head to the RINKEBY FAUCET website, paste your address in the input form, and click on the "Send Me ETH" button.
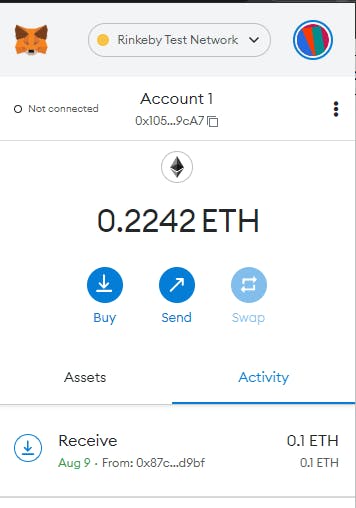
Once your transaction is mined, you'll have some fake ETH in your wallet.
Specify your chain and wallet type
So, for your website to talk to the blockchain, you need to somehow connect your wallet to it. Once you connect your wallet to your website, the website will have permission to call smart contracts on your behalf. Remember, it's just like authenticating into a website.
You may have built "Connect to Wallet" buttons in the past! This time, you'll be using thirdweb’s front-end SDK, which makes it crazy easy.
Head over to src/index.js in your React App and add the following code:
import React from 'react';
import ReactDOM from 'react-dom';
import './index.css';
import App from './App';
import { ChainId, ThirdwebProvider } from '@thirdweb-dev/react';

const activeChainId = ChainId.Rinkeby;

ReactDOM.render(
  <React.StrictMode>
    <ThirdwebProvider desiredChainId={activeChainId}>
      <App />
    </ThirdwebProvider>
  </React.StrictMode>,
  document.getElementById('root'),
);
In the code snippet above, you did the following:
- Imported thirdweb dependency
- Specified the
chainIdof the chain you're working on, which is Rinkeby! - Wrapped everything with
<ThirdwebProvider>. This provider holds the user's authenticated wallet data
Note: If you've worked on dapps before, make sure you disconnect your wallet from localhost:3000 on Metamask if you have ever connected it.
Add Connect to Wallet
If you head to your web app, you'll see a button to let users connect their wallets.
Head over to src/App.jsx. Add the following code.
import { useAddress, useMetamask } from "@thirdweb-dev/react";
const App = () => {
const address = useAddress();
const connectWithMetamask = useMetamask();
console.log("👋 Address:", address);
if (!address) {
return (
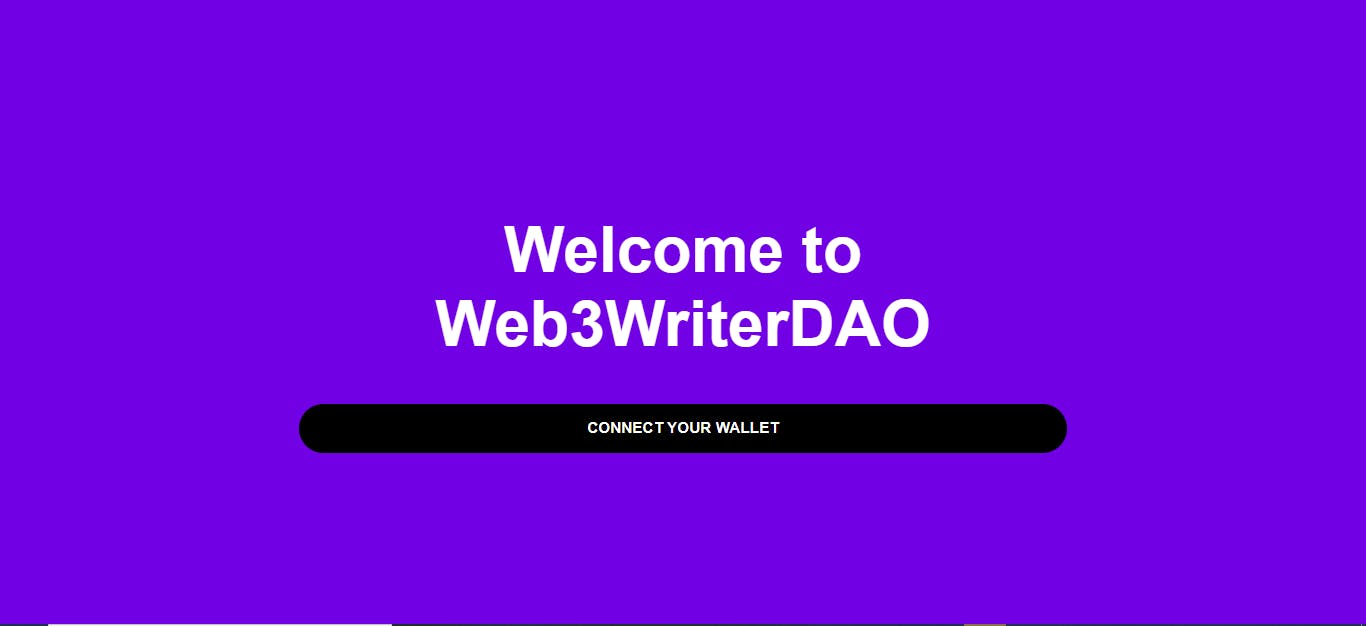
<div className="landing">
<h1>Welcome to Web3WriterDAO</h1>
<button onClick={connectWithMetamask} className="btn-hero">
Connect your wallet
</button>
</div>
);
}
return (
<div className="landing">
<h1>👀 Welcome to Web3Writer DAO membership</h1>
</div>
);
};
export default App;
Now, when you go to your web app, the web app looks like this:
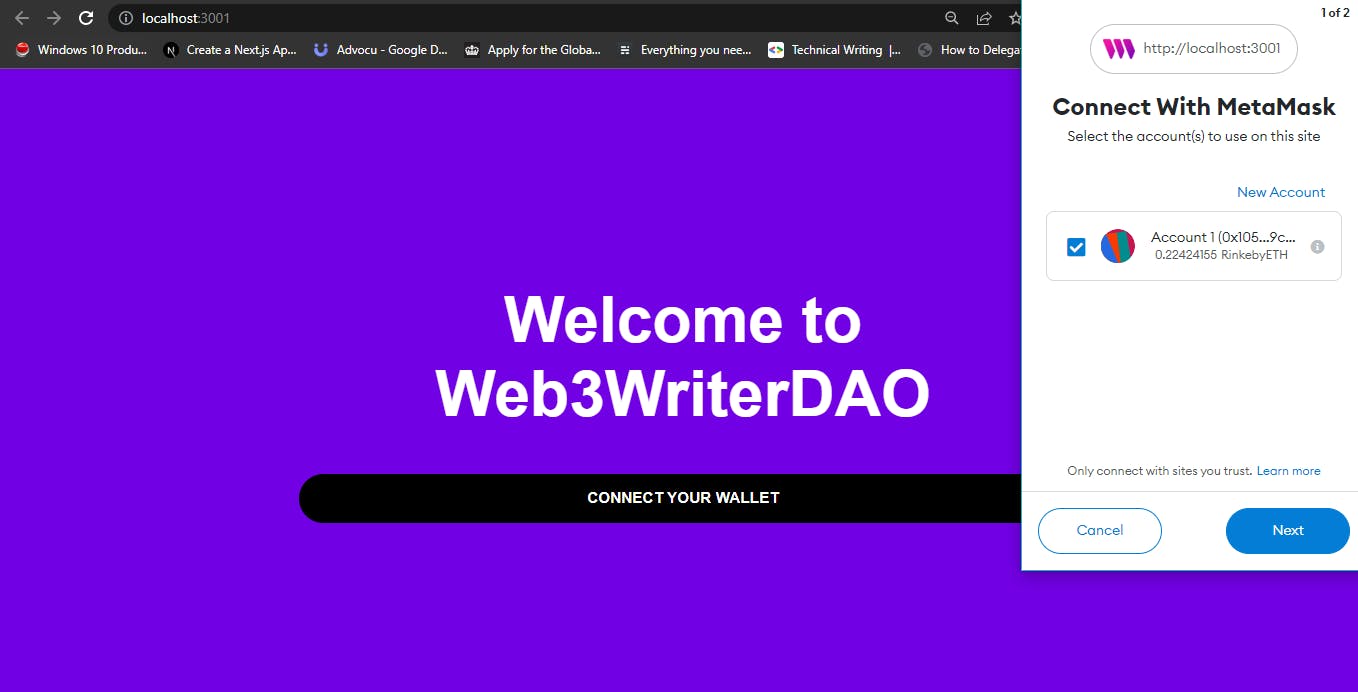
Next, click on the "Connect your wallet" button, and you'll see it pops Metamask!
After you authorize your wallet, you'll see this screen:
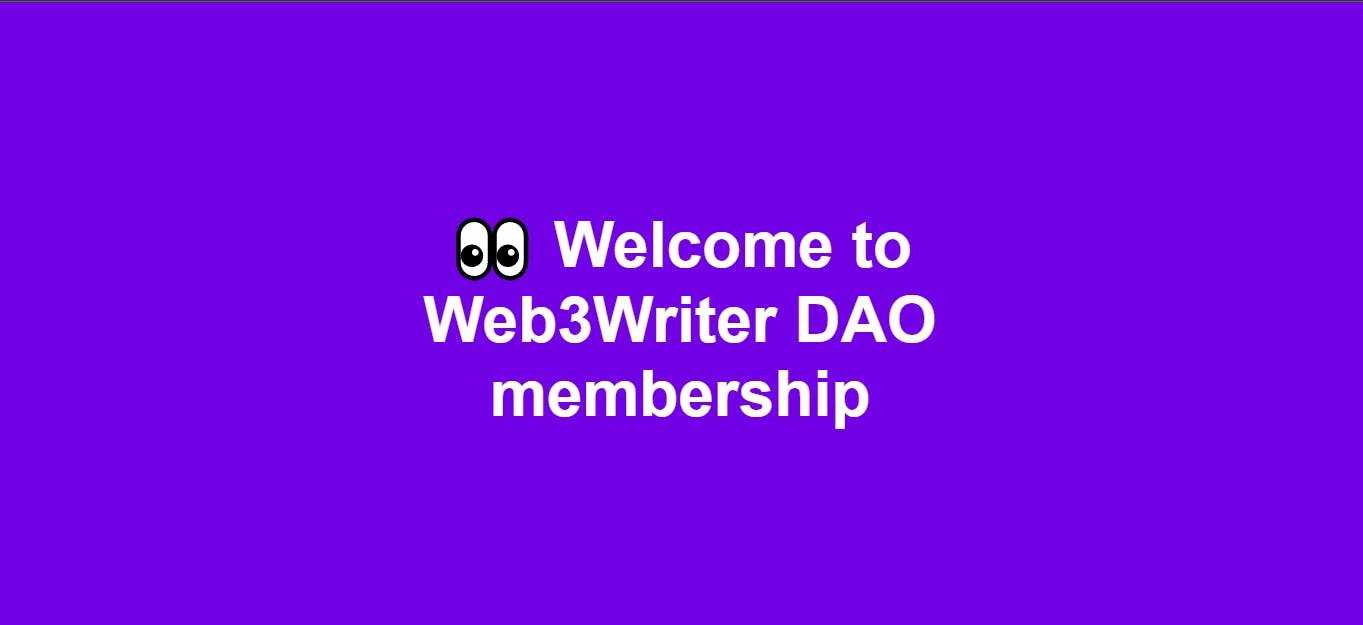
And if you go to your console, you'll see it prints out your public address. If you refresh your page here, you'll see your wallet connection also sticks around.
Adding .env variables
You need to write some scripts that let you create and deploy your contract to Rinkeby using Thirdweb. You'll first create a .env file that looks like this at the root of your project.
PRIVATE_KEY=YOUR_PRIVATE_KEY_HERE
WALLET_ADDRESS=YOUR_WALLET_ADDRESS
ALCHEMY_API_URL=YOUR_QUICKNODE_API_URL
Because we don’t want to push these to GitHub, be sure to add them in .gitignore
Creating an Alchemy app
Next, head to Alchemy, sign in, click on "Create App", and provide the required details. Make sure to use the same chain as the one you used in the thirdweb – in your case, it is the Ethereum chain and the Rinkeby network.
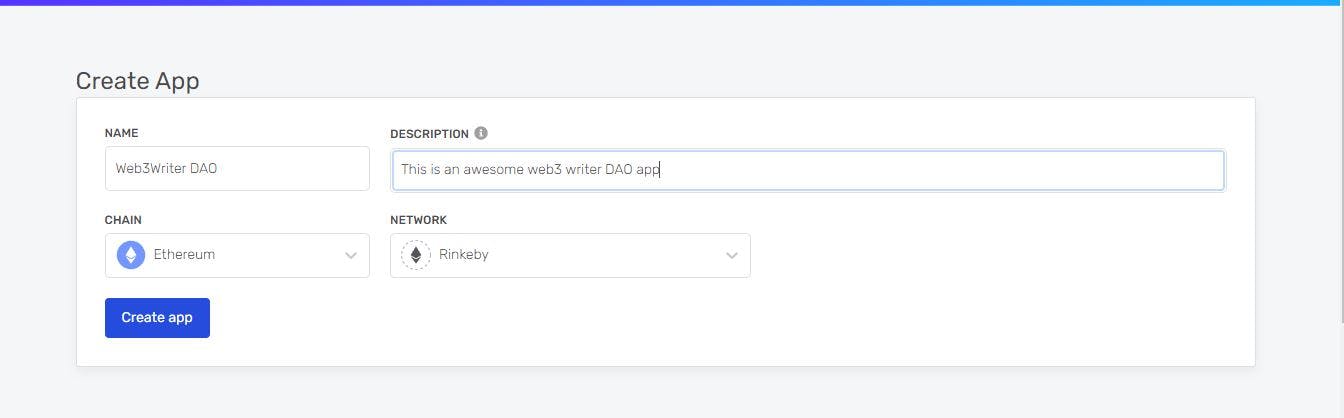
After the app is created, copy the HTTP API key.
Getting the wallet’s private key
To mint NFTs and perform certain scripts, you will need the wallet’s private key.
To access it, open the MetaMask browser extension and click on Account Details. You should see your private key here; export it and copy it somewhere safe.
Getting Started with Thirdweb
Awesome! You can now connect to a user's wallet to check if they're in your DAO! To join your DAO, the user will need a membership NFT. If they don't have a membership NFT, you'll prompt them actually to mint a membership NFT and join your DAO!
But, there's a problem. For us to mint NFTs, you must write and deploy your own NFT smart contract. This is actually where Thirdweb comes in clutch.
Thirdweb gives us a set of tools to create all our smart contracts without writing any Solidity. You write no Solidity. All you need to do is write a script using JavaScript to create and deploy your contracts.
Thirdweb will use a set of secure, standard contracts created here. The cool part is after you create the contracts, you own them, and they're associated with your wallet.
Once you deploy the contract, you can interact with those contracts from your front-end easily using their client-side SDK.
Thirdweb dashboard allows us to create contracts without writing any code, but for this tutorial, we will create them with JavaScript. Also, thirdweb doesn't have a database; all your data is stored on-chain.
Initialize Thirdweb SDK
Now, write scripts that let you initialize Thirdweb SDK. You'll create scripts directory in the project root folder and create a 1-initialize-sdk.js file
import { ThirdwebSDK } from "@thirdweb-dev/sdk";
import ethers from "ethers";
import dotenv from "dotenv";

dotenv.config();
if (!process.env.PRIVATE_KEY || process.env.PRIVATE_KEY === "") {
  console.log("🛑 Private key not found.");
}

if (!process.env.ALCHEMY_API_URL || process.env.ALCHEMY_API_URL === "") {
  console.log("🛑 Alchemy API URL not found.");
}

if (!process.env.WALLET_ADDRESS || process.env.WALLET_ADDRESS === "") {
  console.log("🛑 Wallet Address not found.");
}

const sdk = new ThirdwebSDK(
  new ethers.Wallet(
    process.env.PRIVATE_KEY,
    ethers.getDefaultProvider(process.env.ALCHEMY_API_URL)
  )
);

(async () => {
  try {
    const address = await sdk.getSigner().getAddress();
    console.log("👋 SDK initialized by address:", address);
  } catch (err) {
    console.error("Failed to get apps from the sdk", err);
    process.exit(1);
  }
})();

export default sdk;
In the code snippet above, all you're doing is initializing thirdweb and then adding an export default sdk since you'll be reusing the initialized sdk in other scripts. It's almost like initializing a connection to a database from a server. You give it stuff like your private key and your provider (which is Alchemy).
This will initialize the Thirdweb SDK, and as you can see, we need to install some packages:
npm i dotenv # npm

yarn add dotenv # yarn
We are using modular imports here, so create a new package.json file inside the scripts folder and simply add the following:
{
  "name": "scripts",
  "type": "module"
}
Let's execute it! Go to your terminal and paste the following command:
node scripts/1-initialize-sdk.js
The script may take some time to run, but you will get your app address after some time.

You will need this in the next steps, so store it somewhere safe.
Deploying NFT and metadata
You will now create and deploy an ERC-1155 contract to Rinkeby. This is basically the base module you'll need to create your NFTs. You're not creating your NFT here yet. You're just setting up metadata around the collection itself. This is stuff like the name of the collection and an image associated with the collection that shows up on OpenSea as the header.
With an ERC-1155, multiple people can be the holder of the same NFT. In this case, your "membership NFT" is the same for everyone, so instead of making a new NFT every time, you can simply assign the same NFT to all your members. This is also more gas efficient! This is a common approach for cases where the NFT is the same for all holders.
Create a new file called 2-deploy-drop.js inside the scripts folder. Here, add the following script:
import { AddressZero } from "@ethersproject/constants";
import sdk from "./1-initialize-sdk.js";
import { readFileSync } from "fs";

(async () => {
  try {
    const editionDropAddress = await sdk.deployer.deployEditionDrop({
      name: "Web3Writer Membership",
      description: "A DAO for Web3 writers.",
      image: readFileSync("scripts/assets/naruto.png"),
      primary_sale_recipient: AddressZero,
    });
    const editionDrop = sdk.getEditionDrop(editionDropAddress);
    const metadata = await editionDrop.metadata.get();

    console.log(
      "✅ Successfully deployed editionDrop contract, address:",
      editionDropAddress
    );
    console.log("✅ editionDrop metadata:", metadata);
  } catch (error) {
    console.log("failed to deploy editionDrop contract", error);
  }
})();
From the code snippet above, you give your collection a name, description, primary_sale_recipient, and image. The image you're loading is from your local file, so be sure to include that image under scripts/assets. Be sure it's a PNG, JPG, or GIF for now and be sure it's a local image — this won't work if you use an internet link!
After you have updated the details, run the following script:
node scripts/2-deploy-drop.js
Wait for the script to run; you should get an address and metadata.
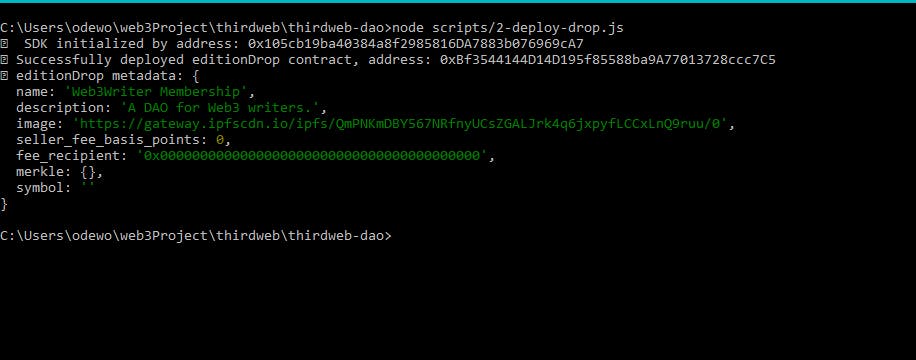
You just deployed an ERC-1155 contract to Rinkeby. That's right! If you head over to https://rinkeby.etherscan.io/ and paste in the address of the editionDrop contract, you'll see you just deployed a smart contract! The coolest part is that you own this contract deployed from your wallet. The “From” address will be your public address.
Note: Keep the address of your
editionDroparound; you'll need it later! if you ever lose it, you can always retrieve it from the thirdweb dashboard
Another thing that happened here is that Thirdweb automatically uploaded and pinned your collection's image to IPFS. You'll see a link that starts with https://gateway.ipfscdn.io printed out. If you paste that into your browser, you'll see your NFT's image retrieved from IPFS via Cloudflare!
Configuring NFT Data
Let's actually deploy metadata associated with your membership NFT. You haven't done that yet. All you did so far was create the ERC-1155 contract and add some basic metadata.
Create a new 3-config-nft.js file inside the scripts folder and add the following:
import sdk from "./1-initialize-sdk.js";
import { readFileSync } from "fs";

const editionDrop = sdk.getEditionDrop("INSERT_EDITION_DROP_ADDRESS");

(async () => {
  try {
    await editionDrop.createBatch([
      {
        name: "Hashnode",
        description: "This NFT will give you access to Web3WriterDAO!",
        image: readFileSync("scripts/assets/hashnodep.png"),
      },
    ]);
    console.log("✅ Successfully created a new NFT in the drop!");
  } catch (error) {
    console.error("failed to create the new NFT", error);
  }
})();
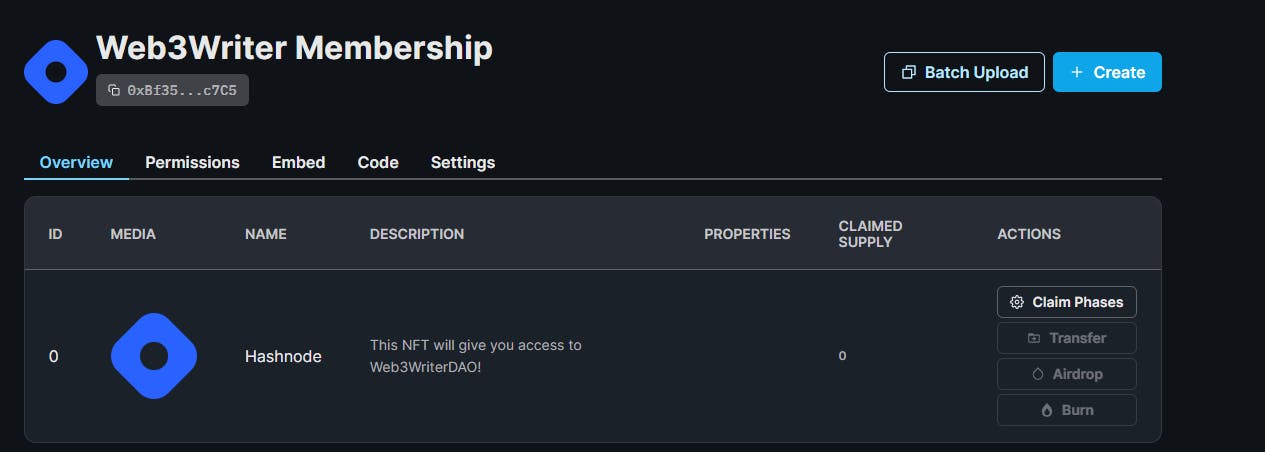
From the code snippet above, The first thing you'll be doing is accessing your editionDrop contract, which is an ERC-1155. The INSERT_EDITION_DROP_ADDRESS is the address printed out from the step before. It's the address printed out after Successfully deployed editionDrop contract, address. You can also find this on your thirdweb dashboard.

Then, you're setting up your actual NFT on your ERC-1155 using createBatch. You need to set up some properties:
name: The name of your NFT.description: The description of your NFTimage: The image for your NFT. This is the image of the NFT that users will claim to be able to access your DAO.
Remember, because it's an ERC-1155, all your members will mint the same NFT.
Once you have updated all of them, run the following script:
node scripts/3-config-nft.js
It should give you an output like this.

If you see the module in the Thirdweb dashboard, you will see that an NFT has been created! 🥳
Setup claim condition
Setting a claim condition will allow us to set a limit for the NFTs and allow a specific max limit per transaction.
Create a new 4-set-claim-condition.js file inside the scripts folder and add the following:
import sdk from "./1-initialize-sdk.js";
import { MaxUint256 } from "@ethersproject/constants";

const editionDrop = sdk.getEditionDrop("INSERT_EDITION_DROP_ADDRESS");

(async () => {
  try {

    const claimConditions = [{

      startTime: new Date(),

      maxQuantity: 50_000,

      price: 0,

      quantityLimitPerTransaction: 1,

      waitInSeconds: MaxUint256,
    }]

    await editionDrop.claimConditions.set("0", claimConditions);
    console.log("✅ Successfully set claim condition!");
  } catch (error) {
    console.error("Failed to set claim condition", error);
  }
})();
In the code snippet above, you include the following properties:
startTimeis when users are allowed to start minting NFTs; in this case, you just set that date/time to the current time, meaning minting can start immediatelymaxQuantityis the max number of membership NFTs that can be minted. quantityLimitPerTransaction specifies how many tokens someone can claim in a single transaction; you set this to one because you only want users minting one NFT at a timepricesets the price of your NFT; in your case, 0 for freewaitInSecondsis the amount of time between transactions; because you only want people claiming once, you set it to the maximum number that the blockchain allows- Finally, the
editionDrop.claimConditions.set("0", claimConditions)and this will actually interact with your deployed contract on-chain and adjust the conditions
After running node scripts/4-set-claim-condition.js, here's what you'll get:

Letting users mint their NFT
At this stage now, you'll be checking two things:
If your user has a membership NFT, show them your "DAO Dashboard" screen where they can vote on proposals and see DAO-related info.
If the user doesn't have your NFT, you'll give them a button to mint one.
Checking if users own a membership NFT
Head over to App.jsx. Update your imports to:
import { useAddress, useMetamask, useEditionDrop } from '@thirdweb-dev/react';
import { useState, useEffect } from 'react';
From there, below your console.log("👋 Address:", address); you're going to add:
const editionDrop = useEditionDrop("INSERT_EDITION_DROP_ADDRESS");
  const [hasClaimedNFT, setHasClaimedNFT] = useState(false);

  useEffect(() => {
    if (!address) {
      return;
    }

    const checkBalance = async () => {
      try {
        const balance = await editionDrop.balanceOf(address, 0);
        if (balance.gt(0)) {
          setHasClaimedNFT(true);
          console.log("🌟 this user has a membership NFT!");
        } else {
          setHasClaimedNFT(false);
          console.log("😭 this user doesn't have a membership NFT.");
        }
      } catch (error) {
        setHasClaimedNFT(false);
        console.error("Failed to get balance", error);
      }
    };
    checkBalance();
  }, [address, editionDrop]);
In the code snippet above, you did the following:
- First, initialize your
editionDropcontract - Create a state
hasClaimedNFTto know if the user has your NFT - Use
editionDrop.balanceOf(address, "0")to check if the user has our NFT.
If you open the console on the website, it should show that you don’t have an NFT.

Creating a button to mint NFTs
Let’s create the button to mint NFTs. But first, in the App.jsx,and let’s add the isClaiming state:
const [isClaiming, setIsClaiming] = useState(false);
Create a new function called mintNft like so:
const mintNft = async () => {
try {
setIsClaiming(true);
await editionDrop.claim("0", 1);
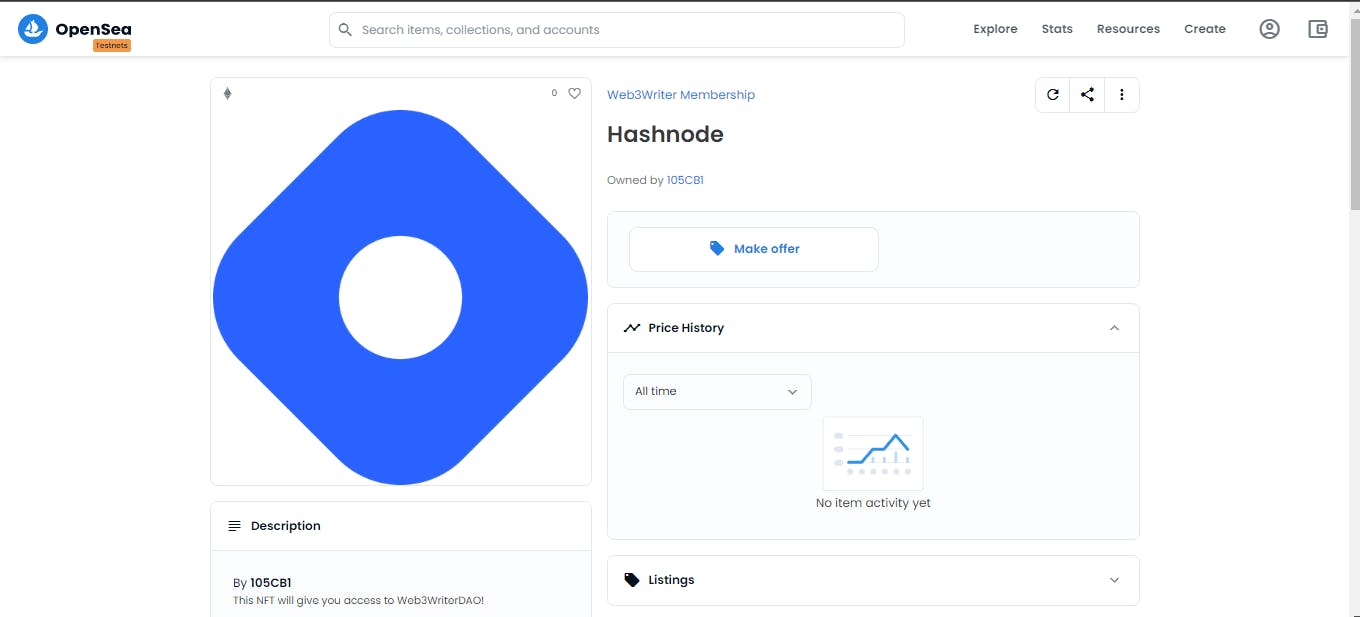
console.log(`🌊 Successfully Minted! Check it out on OpenSea: https://testnets.opensea.io/assets/${editionDrop.getAddress()}/0`);
setHasClaimedNFT(true);
} catch (error) {
setHasClaimedNFT(false);
console.error("Failed to mint NFT", error);
} finally {
setIsClaiming(false);
}
};
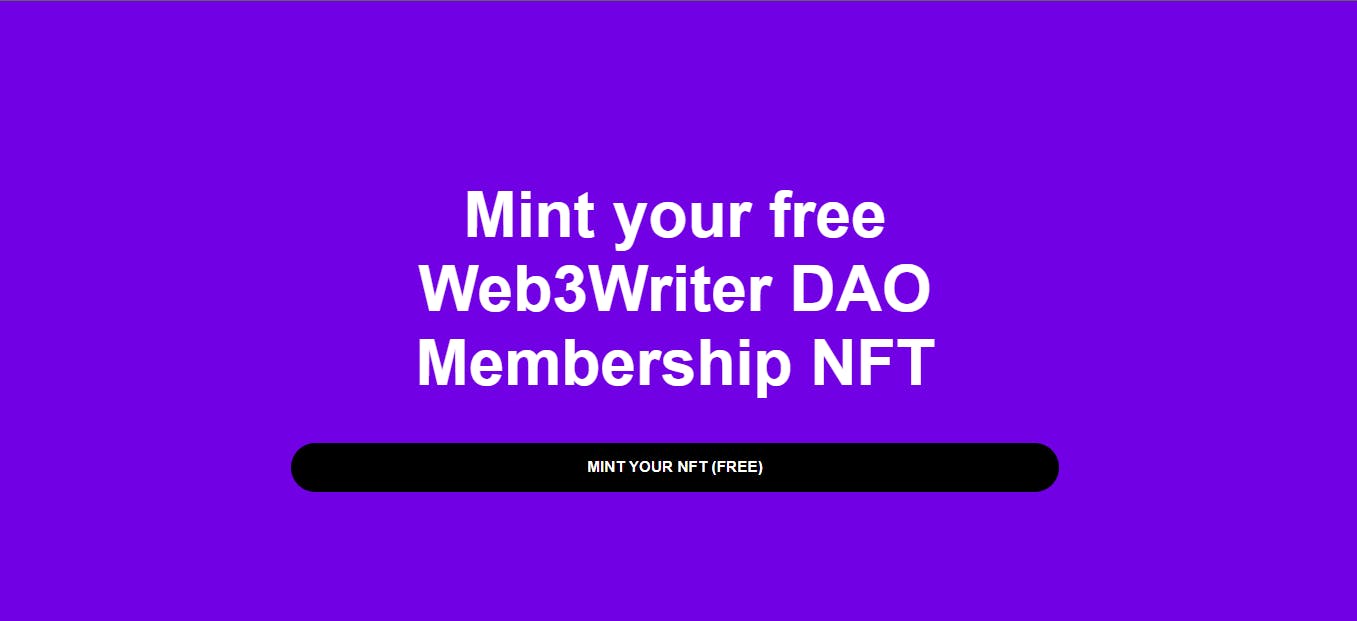
Let’s create the button now! Inside the final return block, add the following:
<div className="mint-nft">
      <h1>Mint your free 🍪DAO Membership NFT</h1>
      <button
        disabled={isClaiming}
        onClick={mintNft}
      >
        {isClaiming ? "Minting..." : "Mint your nft (FREE)"}
      </button>
</div>
After you sign in, it should show you a screen like this.
If you click on the Mint your nft (FREE) button, it should pop up on your MetaMask screen to complete the transaction. In the console, you should see the following.

Once it's done minting, you should see Successfully Minted! in your console along with the Testnet OpenSea link. On testnets.opensea.io, you can actually see NFTs minted on the testnet. When you head to your link, you'll see something like this:
Show DAO Dashboard only if the user owns the NFT
Finally, just above the final return block, add this check to see if the user has claimed the NFT already:
if (hasClaimedNFT) {
    return (
      <div className="member-page">
        <h1>Web3Writer DAO Member Page</h1>
        <p>Congratulations on being a member</p>
      </div>
    );
  }
We have completed building the minting NFT functionality.
Creating a brand new Token
Let’s create and deploy a token smart contract! Create a new scripts/5-deploy-token.js file inside the scripts folder and add the following:
import { AddressZero } from "@ethersproject/constants";
import sdk from "./1-initialize-sdk.js";

(async () => {
  try {
    const tokenAddress = await sdk.deployer.deployToken({
      name: "Web3Writer Token", // Your token's name?
      symbol: "W3W", //your token's symbol
      primary_sale_recipient: AddressZero, // This will be in case you want to sell your token,
    });
    console.log(
      "✅ Successfully deployed token module, address:",
      tokenAddress
    );
  } catch (error) {
    console.error("failed to deploy token module", error);
  }
})();
Run the scripts/5-deploy-token.js file, and you'll get this:

Boom! It deployed a fresh token contract. If you head to https://rinkeby.etherscan.io/ and search the token module’s address, you’ll see the contract you just deployed.
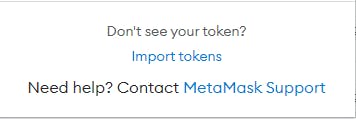
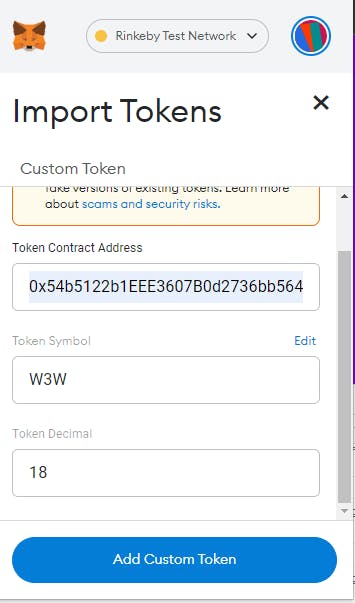
You can even add your token to Metamask as a custom token. By clicking on Import Token
Then, paste in your ERC-20 contract address, and you’ll see Metamask magically grab your token symbol automatically:
Then, head back to your wallet, scroll down, and boom!
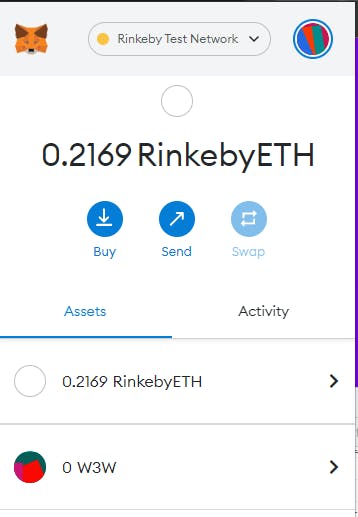
You officially have your own token.
Minting your own tokens
Create a new file called 6-mint-token.js inside the scripts folder and add the following:
import sdk from "./1-initialize-sdk.js";

const token = sdk.getToken("INSERT_TOKEN_ADDRESS");

(async () => {
  try {
    const amount = 1_000_000;

    await token.mintToSelf(amount);
    const totalSupply = await token.totalSupply();

    console.log(
      "✅ There now is",
      totalSupply.displayValue,
      "$W3W in circulation"
    );
  } catch (error) {
    console.error("Failed to print money", error);
  }
})();
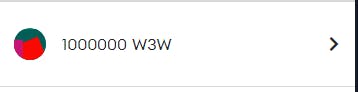
Here’s what you'll get when you run the script node scripts/6-mint-token.js:

You should now see the amount of tokens you minted on your MetaMask wallet!
Airdropping tokens
You might want to airdrop the tokens to your NFT holders, so let’s build a script for that. Create a new 7-airdrop-token.js file inside scripts and add the following:
import sdk from "./1-initialize-sdk.js";

const editionDrop = sdk.getEditionDrop("INSERT_EDITION_DROP_ADDRESS");
const token = sdk.getToken("INSERT_TOKEN_ADDRESS");

(async () => {
  try {
    const walletAddresses = await editionDrop.history.getAllClaimerAddresses(0);

    if (walletAddresses.length === 0) {
      console.log(
        "No NFTs have been claimed yet; maybe get some friends to claim your free NFTs!"
      );
      process.exit(0);
    }

    const airdropTargets = walletAddresses.map((address) => {
      const randomAmount = Math.floor(
        Math.random() * (10000 - 1000 + 1) + 1000
      );
      console.log("✅ Going to airdrop", randomAmount, "tokens to", address);

      // Set up the target.
      const airdropTarget = {
        toAddress: address,
        amount: randomAmount,
      };

      return airdropTarget;
    });

    // Call transferBatch on all our airdrop targets.
    console.log("🌈 Starting airdrop...");
    await token.transferBatch(airdropTargets);
    console.log(
      "✅ Successfully airdropped tokens to all the holders of the NFT!"
    );
  } catch (err) {
    console.error("Failed to airdrop tokens", err);
  }
})();
After you run the script, you should get something like this.

Currently, only you have minted an NFT, so it won’t send the token to someone else. But this can be used to send to other NFT holders later.
Building a Treasury and Governance
A governance token is cool, but it’s useless if people can’t use it to govern anything! What you’re going to do next here is set up a governance contract that lets people vote on proposals using their tokens.
Create a new deploy-vote.js file in the scripts folder and add the following:
import sdk from "./1-initialize-sdk.js";

(async () => {
  try {
    const voteContractAddress = await sdk.deployer.deployVote({
      name: "Web3Writer DAO proposal",
      voting_token_address: "INSERT_TOKEN_ADDRESS",
      voting_delay_in_blocks: 0,
      voting_period_in_blocks: 6570,
      voting_quorum_fraction: 0,
      proposal_token_threshold: 0,
    });

    console.log(
      "✅ Successfully deployed vote contract, address:",
      voteContractAddress,
    );
  } catch (err) {
    console.error("Failed to deploy vote contract", err);
  }
})();
Go ahead and run this using node scripts/deploy-vote.js. Here’s what you'll end up getting:

Setup your treasury
You also need to set up a voting module, so create a new script called setup-vote.js and add the following:
import sdk from "./1-initialize-sdk.js";

const vote = sdk.getVote("INSERT_VOTE_ADDRESS");
const token = sdk.getToken("INSERT_TOKEN_ADDRESS");

(async () => {
  try {
    await token.roles.grant("minter", vote.getAddress());

    console.log(
      "Successfully gave vote contract permissions to act on token contract"
    );
  } catch (error) {
    console.error(
      "failed to grant vote contract permissions on token contract",
      error
    );
    process.exit(1);
  }

  try {
    const ownedTokenBalance = await token.balanceOf(
      process.env.WALLET_ADDRESS
    );

    const ownedAmount = ownedTokenBalance.displayValue;
    const percent90 = Number(ownedAmount) / 100 * 90;
    await token.transfer(
      vote.getAddress(),
      percent90
    );

    console.log("✅ Successfully transferred " + percent90 + " tokens to vote contract");
  } catch (err) {
    console.error("failed to transfer tokens to vote contract", err);
  }
})();
Once you finish up, you can run this using node scripts/9-setup-vote.js. Here’s what you'll get as your output:

Let users vote on proposals.
Cool. Everything is set up. Now, you just need to create your first proposal! Create a new file called create-vote-proposals.js inside the scripts folder and add the following:
import sdk from "./1-initialize-sdk.js";
import { ethers } from "ethers";

const vote = sdk.getVote("INSERT_VOTE_ADDRESS");
const token = sdk.getToken("INSERT_TOKEN_ADDRESS");

(async () => {
  try {
    const amount = 420_000;
    const description = "Should the DAO mint an additional " + amount + " tokens into the treasury?";
    const executions = [
      {
        toAddress: token.getAddress(),
        nativeTokenValue: 0,
        transactionData: token.encoder.encode(
          "mintTo", [
          vote.getAddress(),
          ethers.utils.parseUnits(amount.toString(), 18),
        ]
        ),
      }
    ];

    await vote.propose(description, executions);

    console.log("✅ Successfully created proposal to mint tokens");
  } catch (error) {
    console.error("failed to create first proposal", error);
    process.exit(1);
  }

  try {
    const amount = 6_900;
    const description = "Should the DAO transfer " + amount + " tokens from the treasury to " +
      process.env.WALLET_ADDRESS + " for being awesome?";
    const executions = [
      {
        nativeTokenValue: 0,
        transactionData: token.encoder.encode(
          // We're doing a transfer from the treasury to our wallet.
          "transfer",
          [
            process.env.WALLET_ADDRESS,
            ethers.utils.parseUnits(amount.toString(), 18),
          ]
        ),
        toAddress: token.getAddress(),
      },
    ];

    await vote.propose(description, executions);

    console.log(
      "✅ Successfully created proposal to reward ourselves from the treasury, let's hope people vote for it!"
    );
  } catch (error) {
    console.error("failed to create second proposal", error);
  }
})();
You need to update the module addresses, and if you want to update the message of the proposal, you can also update that.
Finally, run the script. It should give you something like this.

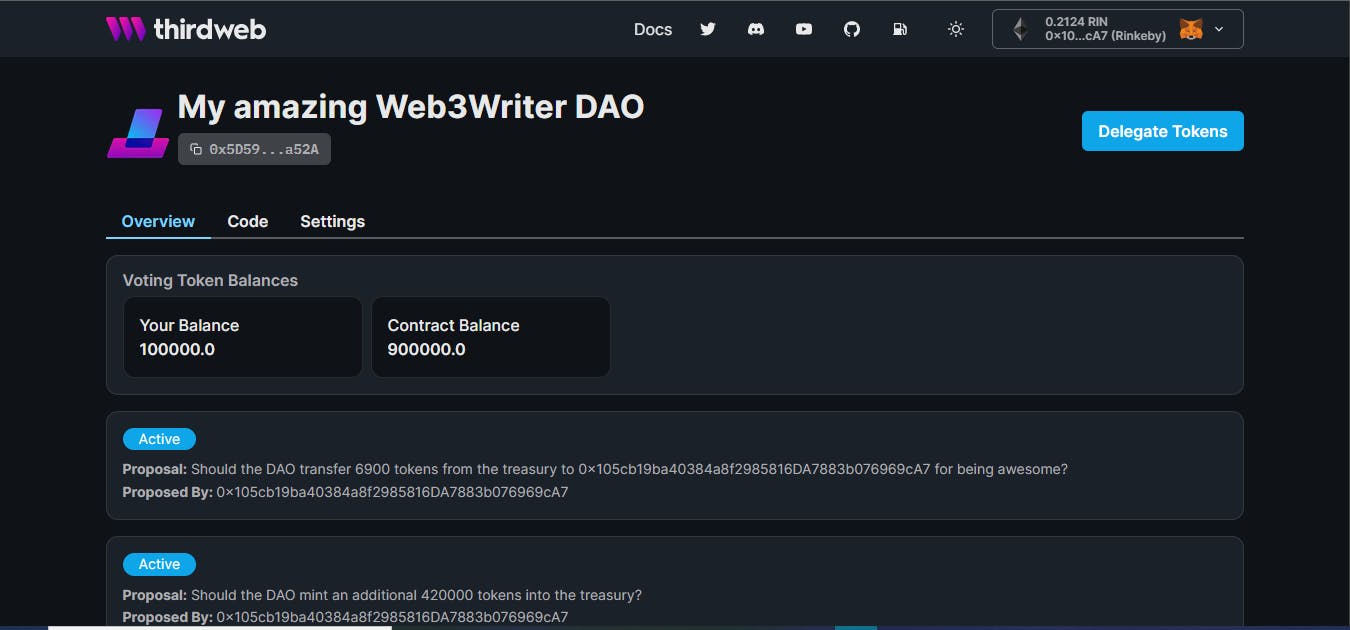
If you now check the Thirdweb dashboard, the proposal has been created.
Let users vote on proposals from the dashboard
Finally, let’s bring it all to the web page. Right now, your proposals live on smart contracts. But, you want your users to be able to see them and vote easily!
First, Head to App.jsx. Add the useVote hook to your imports:
import { useAddress, useMetamask, useEditionDrop, useToken, useVote } from '@thirdweb-dev/react';
We are going to need three useStates, like so:
const [proposals, setProposals] = useState([]);
const [isVoting, setIsVoting] = useState(false);
const [hasVoted, setHasVoted] = useState(false);
Getting the proposals
The web app needs access to your vote so users can interact with that contract.
Let's add the following code somewhere underneath the shortenAddress function:
useEffect(() => {
  if (!hasClaimedNFT) {
    return;
  }

  const getAllProposals = async () => {
    try {
      const proposals = await vote.getAll();
      setProposals(proposals);
      console.log(" Proposals:", proposals);
    } catch (error) {
      console.log("failed to get proposals", error);
    }
  };
  getAllProposals();
}, [hasClaimedNFT, vote]);

useEffect(() => {
  if (!hasClaimedNFT) {
    return;
  }

  if (!proposals.length) {
    return;
  }

  const checkIfUserHasVoted = async () => {
    try {
      const hasVoted = await vote.hasVoted(proposals[0].proposalId, address);
      setHasVoted(hasVoted);
      if (hasVoted) {
        console.log("🥵 User has already voted");
      } else {
        console.log("🙂 User has not voted yet");
      }
    } catch (error) {
      console.error("Failed to check if the wallet has voted", error);
    }
  };
  checkIfUserHasVoted();

}, [hasClaimedNFT, proposals, address, vote]);
The code above has two React useEffect Hook which did the following:
- The first
useEffectused thevote.getAll()to grab all the proposals that exist on your governance contract and then doingsetProposalsto render them later - The second
useEffectused thevote.hasVoted(proposals[0].proposalId, address)to checks if this address has voted on the first proposal. If it has, thesetHasVotedso the user can’t vote again!
Thirdweb not only makes it really easy to deploy smart contracts, but it also makes it very easy to interact with them from your client with simple functions like
vote.getAll()!
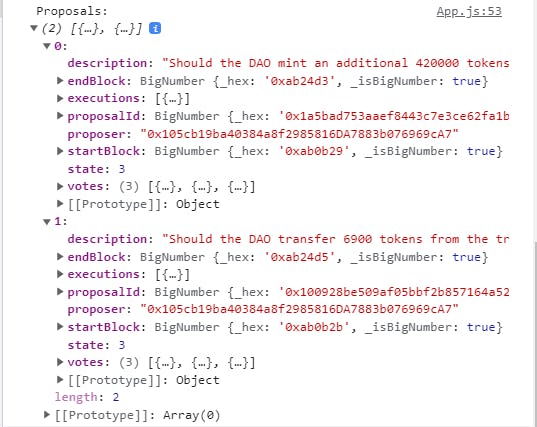
Go ahead and refresh your page, you should see your proposals printed out, and you can explore all the data.
Rendering the proposals
Add the zero address import after your existing imports:
import { AddressZero } from "@ethersproject/constants";
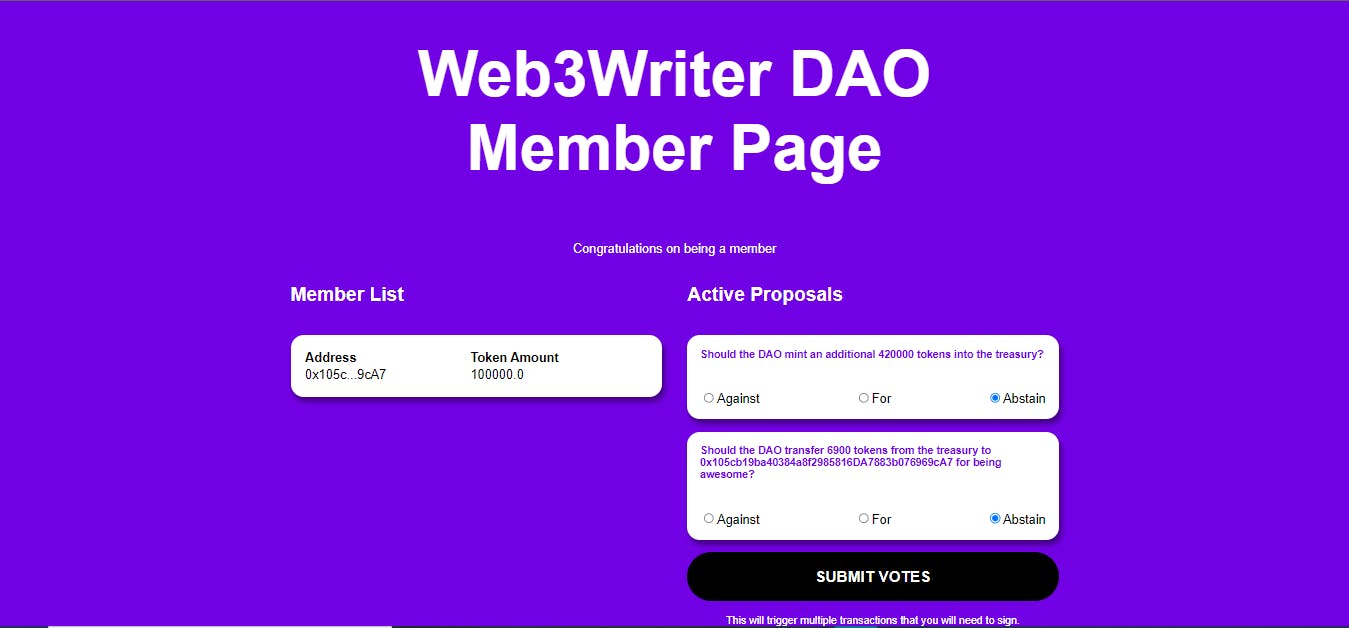
Go ahead and replace the code of if(hasClaimedNFT) { } with the code here.
When you check out your web app, you’ll see something like:
Removing Admin Privileges
If you remember, you actually still hold “minting” rights on the ERC-20 contract. That means you can go and create more tokens if you want, which may freak out members of your DAO.
So, It’s best to revoke your “minting” role completely. That way, only the voting contract can mint new tokens.
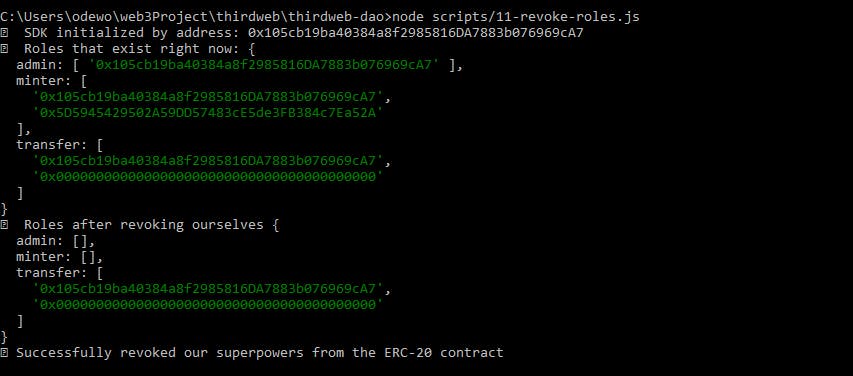
We can do this by creating revoke-roles.js file in the scripts folder and the following:
import sdk from "./1-initialize-sdk.js";

const token = sdk.getToken("INSERT_TOKEN_ADDRESS");

(async () => {
  try {
    const allRoles = await token.roles.getAll();

    console.log("👀 Roles that exist right now:", allRoles);

    await token.roles.setAll({ admin: [], minter: [] });
    console.log(
      "🎉 Roles after revoking ourselves",
      await token.roles.getAll()
    );
    console.log("✅ Successfully revoked our superpowers from the ERC-20 contract");

  } catch (error) {
    console.error("Failed to revoke ourselves from the DAO treasury", error);
  }
})();
When you run this using node scripts/11-revoke-roles.js. you'll get:
Handle basic unsupported network error
To recognize a connection outside the Rinkeby network, let's import one last hook, useNetwork at the top of App.jsx. We're also importing ChainId from the Thirdweb SDK to get Rinkeby's chain ID.
import { useAddress, useMetamask, useEditionDrop, useToken, useVote, useNetwork } from '@thirdweb-dev/react';
import { ChainId } from '@thirdweb-dev/sdk'
Then, define your useNetwork hook under your useAddress hook:
const network = useNetwork();
Next, add the following in your App.jsx file right under the mintNft function:
if (address && (network?.[0].data.chain.id !== ChainId.Rinkeby)) {
  return (
    <div className="unsupported-network">
      <h2>Please connect to Rinkeby</h2>
      <p>
        This dapp only works on the Rinkeby network. Please switch networks
        in your connected wallet.
      </p>
    </div>
  );
}
We're checking if we're finding a chain on our preferred network. In our case Rinkeby, if we are not, we're prompting users to switch networks.
Conclusion
You’ve done it. You made it to the end. In this article, you deployed your own custom ERC-20 token and deployed your own ERC-1155 NFT people can mint to join your DAO.
You also learned to deploy your own governance contract and treasury. Built a dapp that lets people connect their wallet, get an NFT, see a DAO Dashboard where they can see other members, and vote on proposals executed directly by your governance contract.
To learn more about NFTs, dApps, the blockchain, and other web3 content, check out Hashnode’s web3 blog.