


Solidity Tutorial: Creating an Ethereum dApp With Ethers.js
Learn how to interact with a smart contract with Ethers.js


Table of contents
- Introduction
- Demo
- Prerequisites
- Building the dApp
- Building the Back End
- Building the Front End
- What Is Ethers.js
- Step 1 - Installing Ethers.js
- Step 2 - Building the Pet Form
- Step 3 - Building the Pet Details Section
- Step 4 - Creating the Signer Logic
- 1. We're making the PetContract variable global because we'll reuse it in other functions.
- 2. Provide your smart contract Address and ABI in the Pet_Contract_Address and Pet_Contract_ABI.
- 3. We're prompting the user to connect to the Goerli network on their MetaMask wallet, where our smart contract is deployed (see Backend - Step 5).
- Step 5 - Creating the SetNewPet Function
- Step 6 - Creating the getCurrentPet Function
- Testing Our dApp
- Wrapping Up
In this tutorial, we're going to learn how to build a basic Ethereum dApp with a frontend that interacts with a Solidity smart contract using the Ethers.js library.
This tutorial is a continuation of the Solidity Tutorial series. If you're new to writing Solidity smart contracts, check out How to build your first Smart Contract before proceeding with this article.
Introduction
A smart contract is a function that’s deployed and executed on the blockchain only when a specific condition is met. There are a couple of ways in which we can interact with our deployed smart contract on the blockchain.
One way is by using the Ethers.js library to connect our dApp frontend to our smart contract, which serves as the backend.
In this article, we're going to write and deploy a smart contract that accepts a pet's name, its owner’s name, and its age. We'll also retrieve the pet's details from the smart contract using a getter function from our front-end project.
Demo
Here’s the demo video of the pet dApp we're going to build at the end of this tutorial:

Prerequisites
Before you proceed with this tutorial, you should have:
A basic understanding of HTML and CSS,
An understanding of functions and the DOM in JavaScript,
A basic understanding of Solidity, which you can find here.
Other technologies used in this tutorial include Ethers.js library, Remix IDE, and Metamask.
Building the dApp
Our project is divided into two parts: the back end, in which we’ll write and deploy our Solidity smart contract on the Goerli Testnet; and the front end, where we’ll build our dApp interface with HTML and CSS, and interact with our deployed smart contract using JavaScript with Ethers.js.
Building the Back End
In this part, we're going to write and deploy our Solidity smart contract on the Goerli Testnet using Remix IDE and Metamask.
Step 1 - Solidity IDE (Remix)
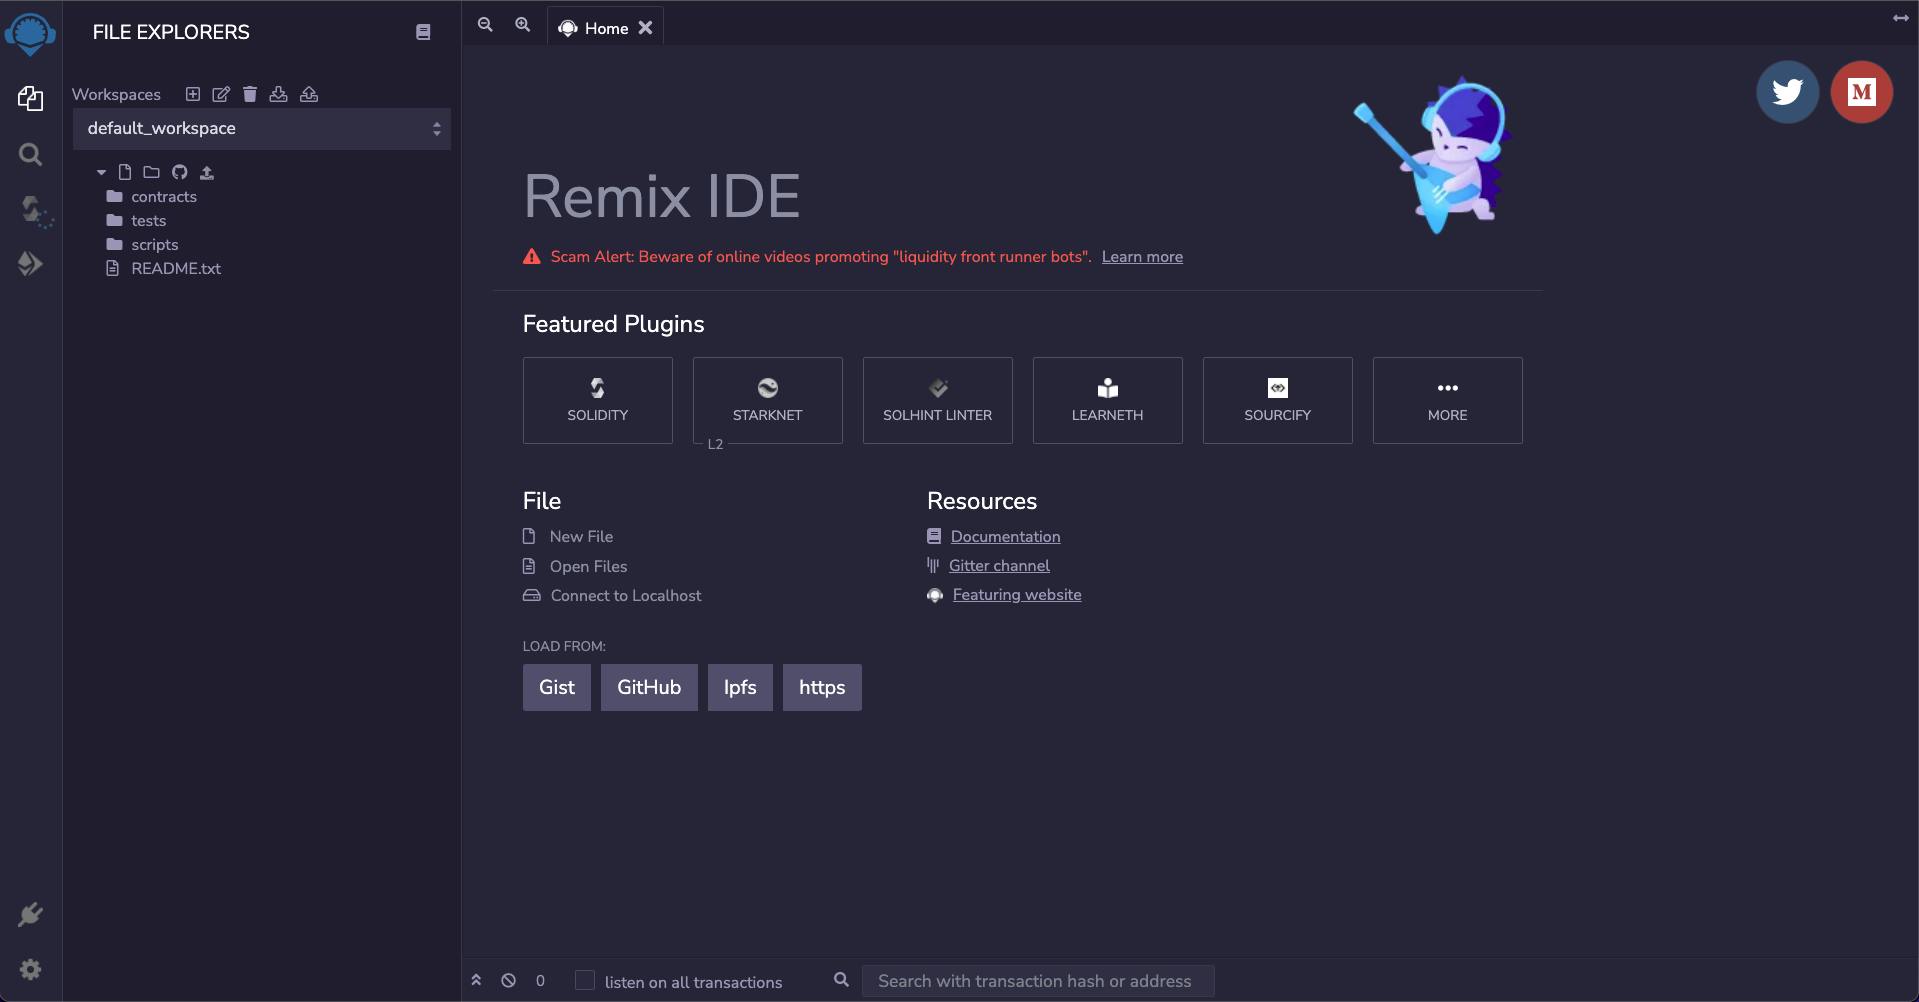
Remix IDE is a web-based Solidity compiler. It allows us to write, test, and deploy our Solidity smart contract directly from our browser without any configurations or setup.
We're going to use the Remix IDE to write and deploy our pet smart contract.
Click here to launch Remix IDE on your browser:
Step 2 - Writing the Smart Contract
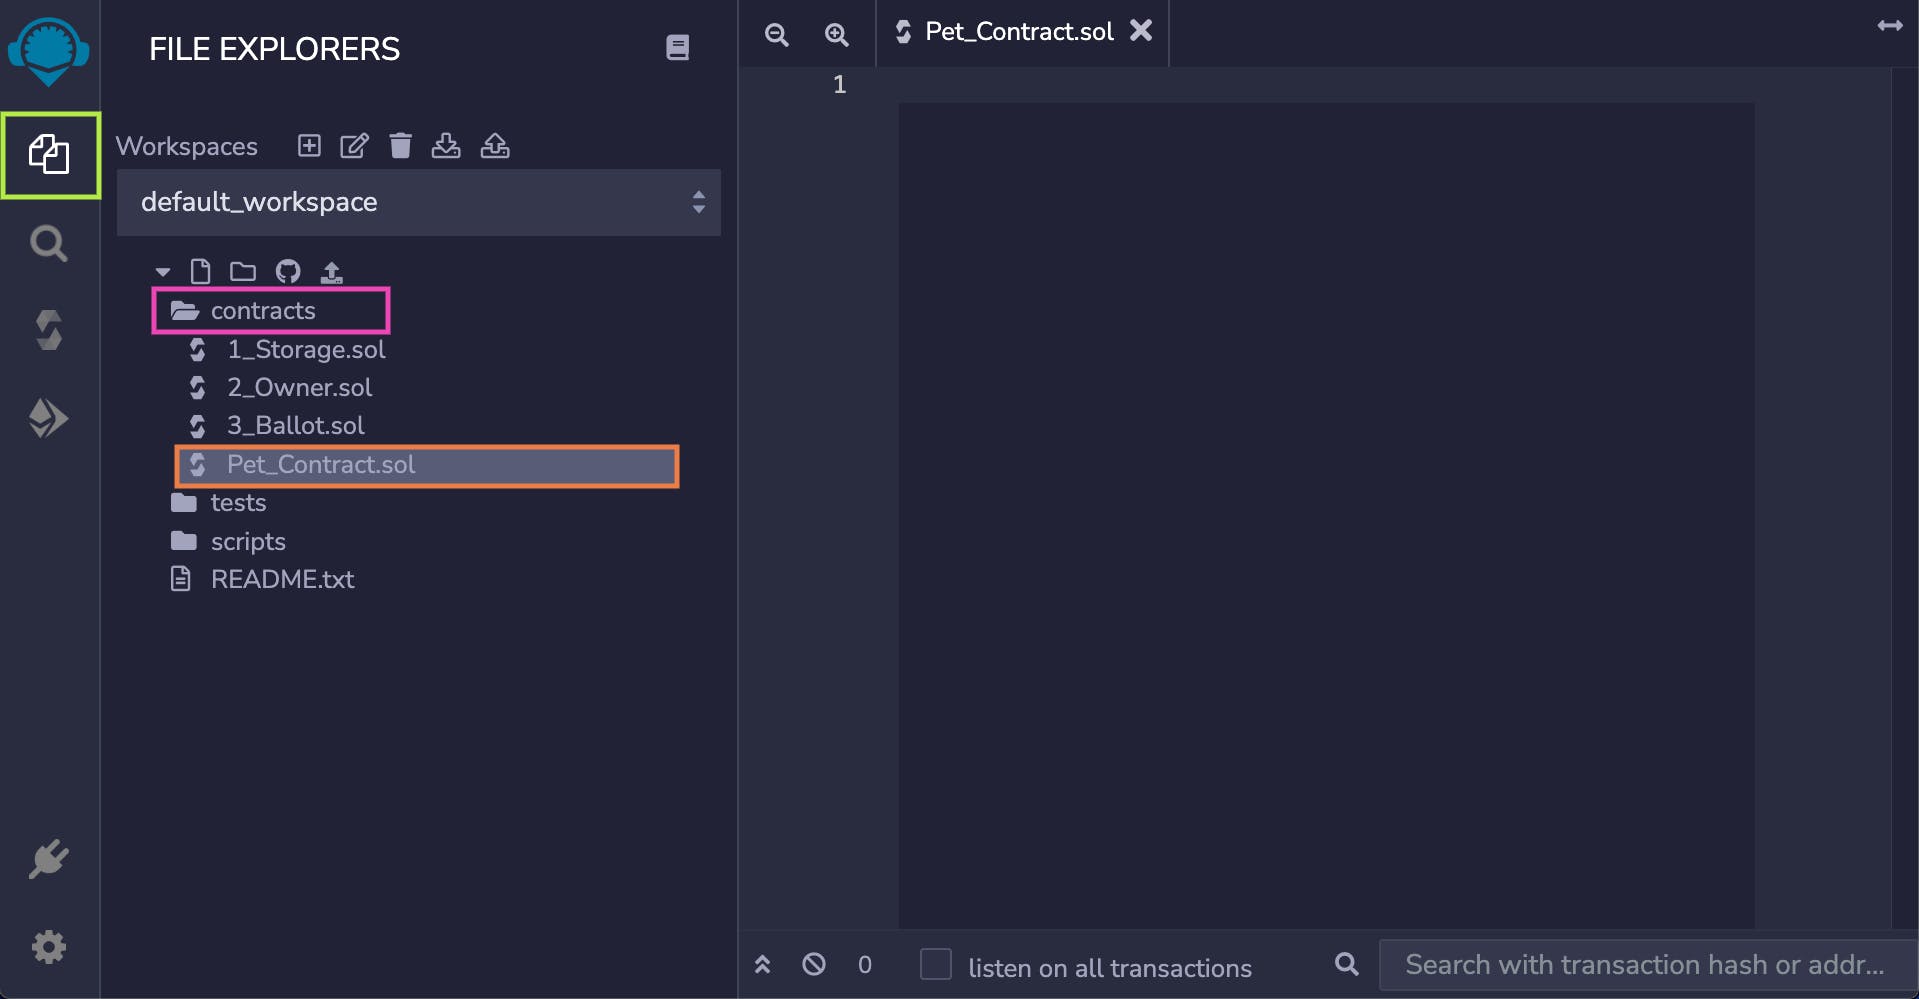
Locate the contracts folder under Remix’s "File Explorers" and create a new file called Pet_Contract.sol:
Copy and paste the Solidity smart contract below, inside the Pet_Contract.sol file:
// SPDX-License-Identifier: MIT
pragma solidity ^ 0.8.13;

// 1. Creating a new pet contract
contract Pet_Contract{

    // 2. Declaring our smart contract state variables
    string public petName;
    string public petOwner;
    string public petAge;

    // 3. Creating a set pet function
   function setPet(
       string memory newPetName,
       string memory newPetOwner,
       string memory newPetAge
    ) public {
        petName = newPetName;
        petOwner = newPetOwner;
        petAge = newPetAge;
    }

    // 4. Creating a fetch pet function
    function getPet() public view returns (
        string memory,
        string memory,
        string memory
    ){
        return (petAge, petName, petOwner);
    }
}
The smart contract above is a modification of the first smart contract we wrote here. We're creating a setPet function that takes in three parameters: petName, petOwner, and petAge, and stores them in memory when we invoke the setPet function.
The getPet function will return the current values of the petAge, petName, and petOwner states in our smart contract memory.
The complete breakdown explanations of the smart contract can be found here.
Step 3 - Compiling the Smart Contract
Follow the steps below to compile your Solidity smart contract on the Remix IDE:
Ensure to save your source file with
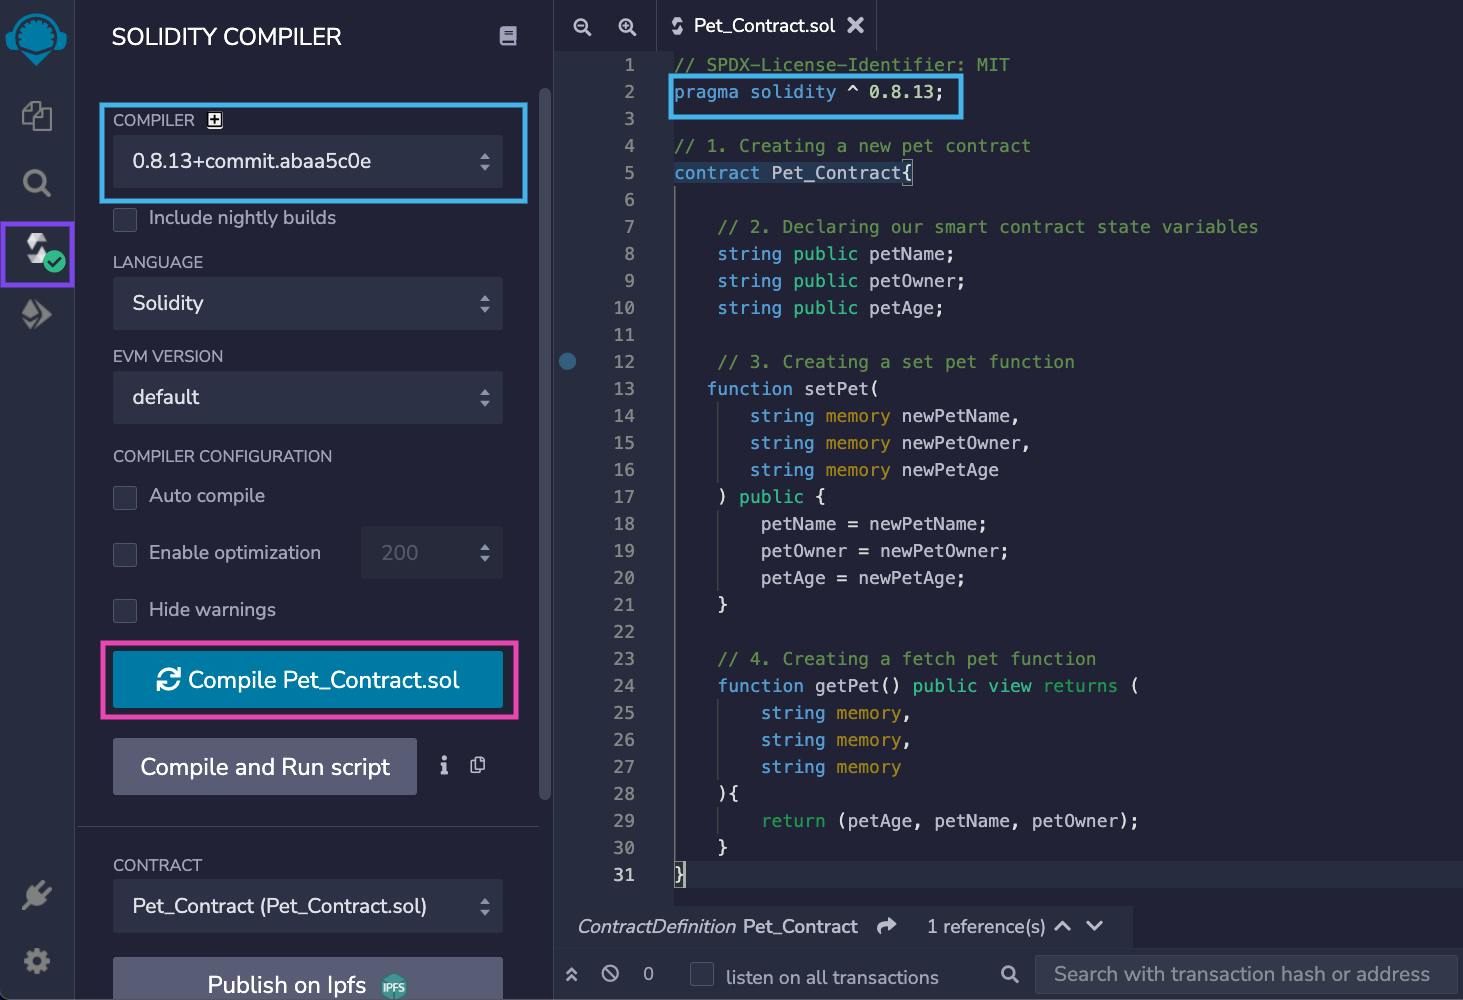
ctrl + s.Then, navigate to the "Solidity Compiler" section:
Select the compiler version that matches the one specified in our smart contract (if you don't do this the green check will turn to red):

Next, ensure to save your file and click on the "Compile" button:
Step 4 - Getting Goerli Testnet Token
Now, we're going to deploy our pet smart contract on the Goerli Test network, and we need some fake ETH to pay for the gas fee.
Follow the steps below to get a free Goerli Testnet token to your Metamask wallet:
Install Metamask if you haven’t already.
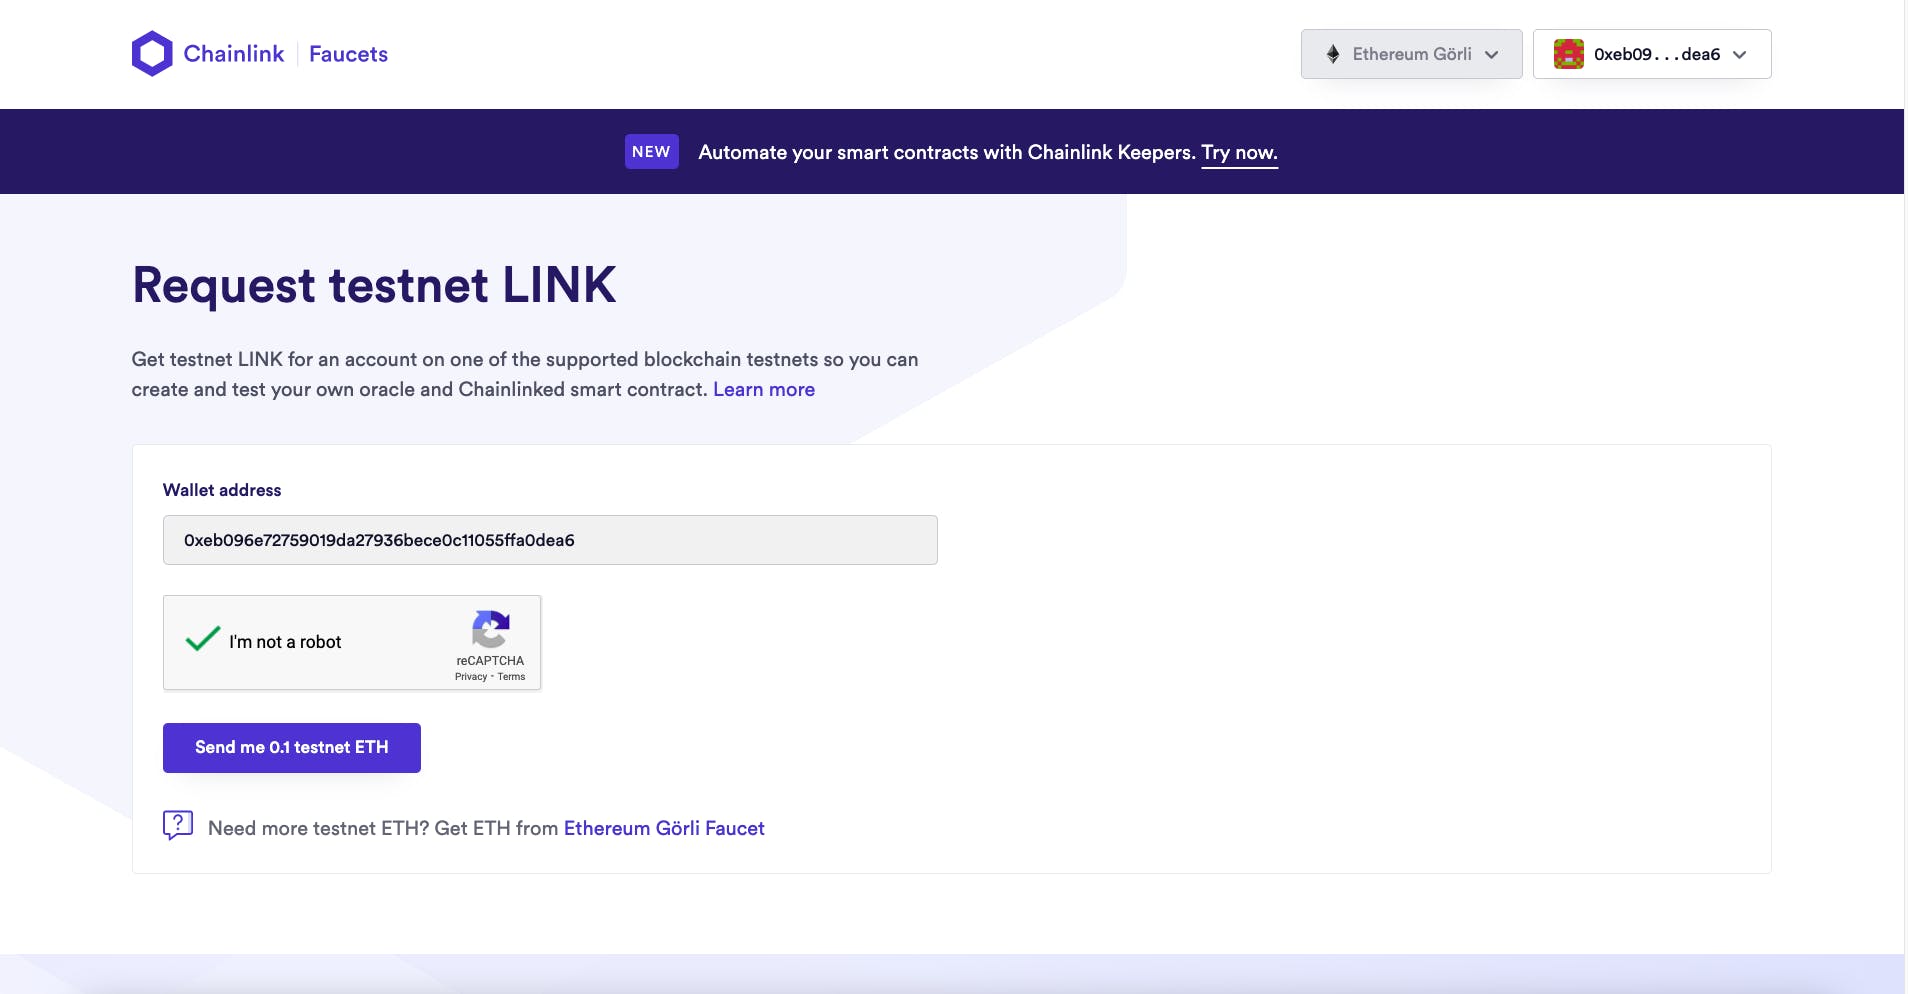
Next, navigate to faucets.chain.link.
Connect with your Metamask wallet:

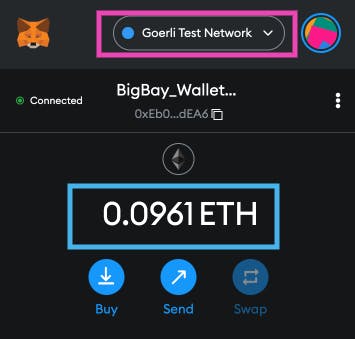
Ensure to switch to the Goerli Test network on your Metamask:
Solve the captcha, and click on the "Send 0.1 test ETH" button:
Wait for the transaction to be confirmed:
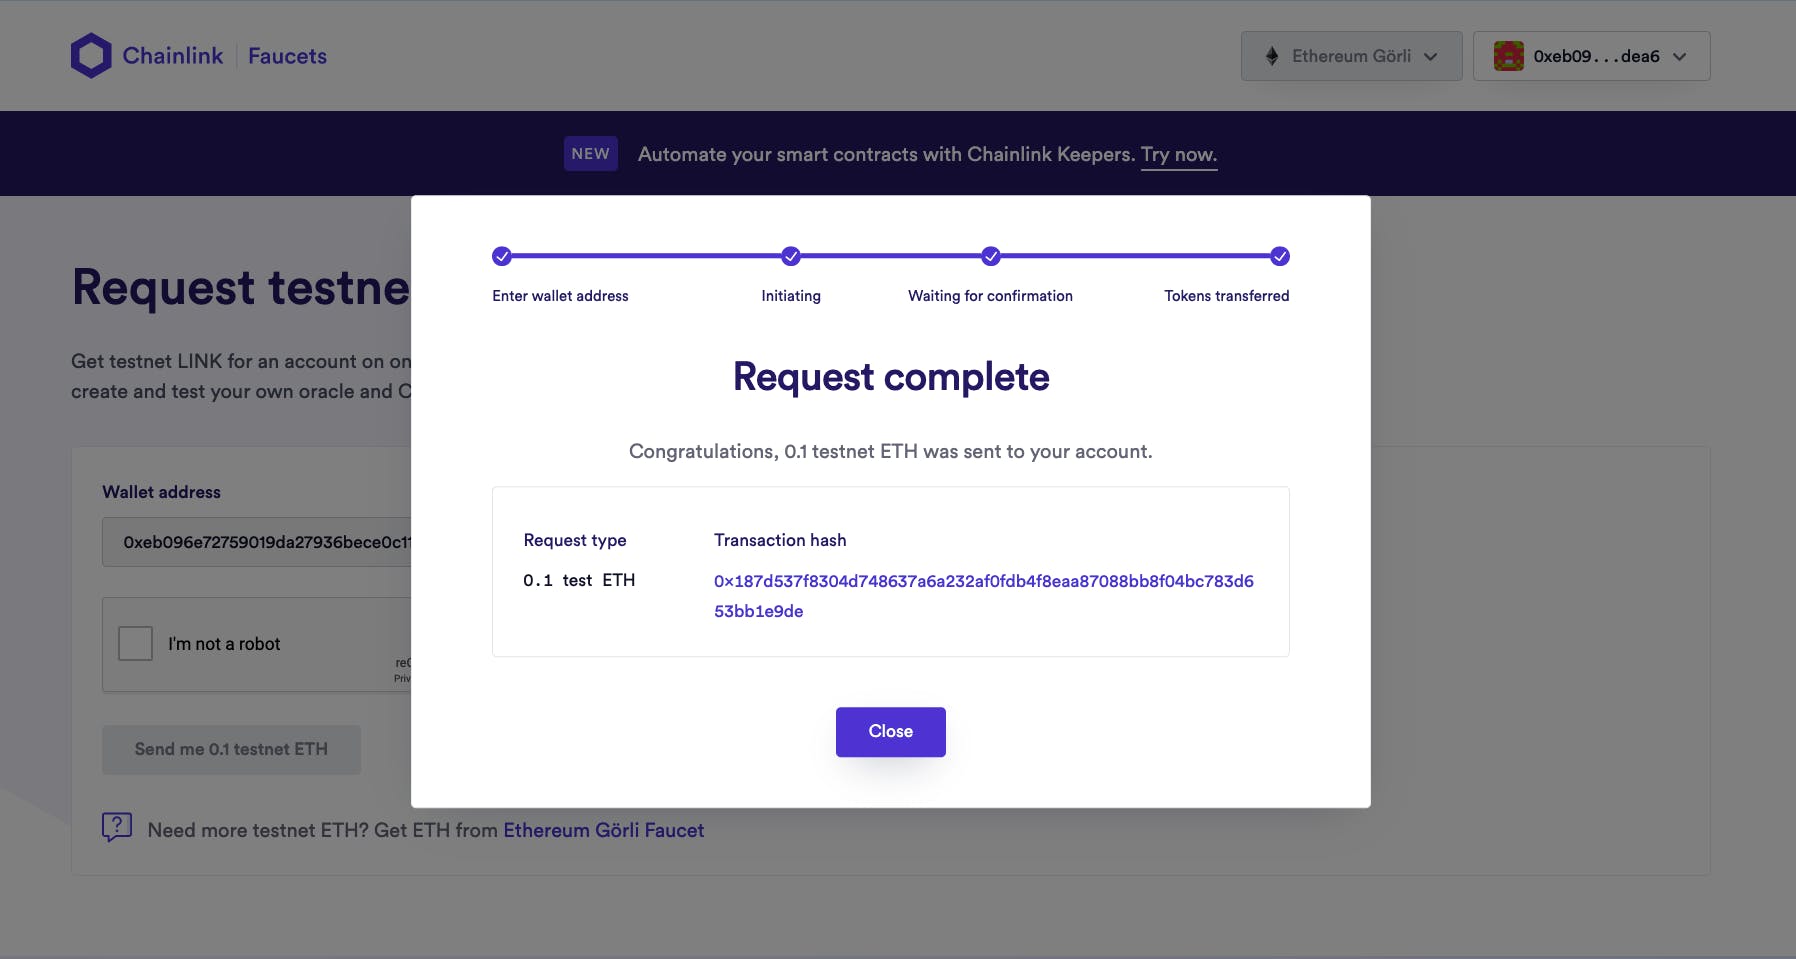
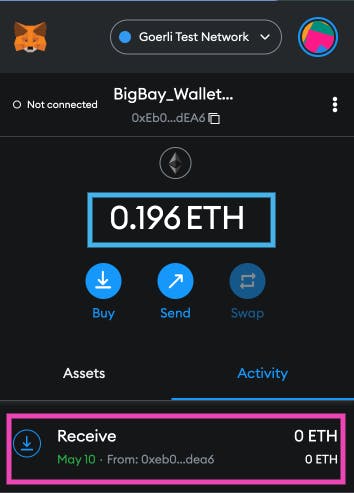
Check your Metamask for the new balance:
You can check out other places to get free ETH for dApp development here.
Step 5 - Deploying the Smart Contract
Now that we've successfully compiled our smart contract (see Step 3), and we have some Goerli Testnet tokens in our Metamask wallet, we're going to deploy our smart contract on the Goerli test network.
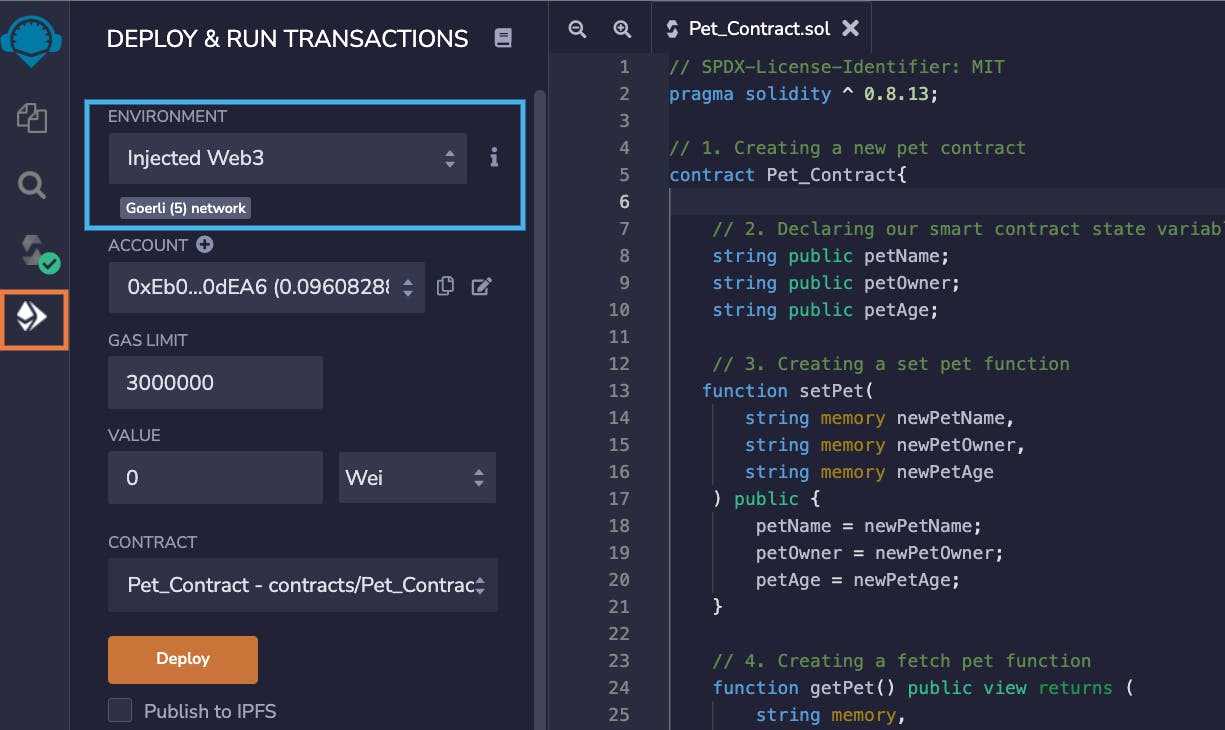
Navigate to the "Deploy and Run Transactions" section:
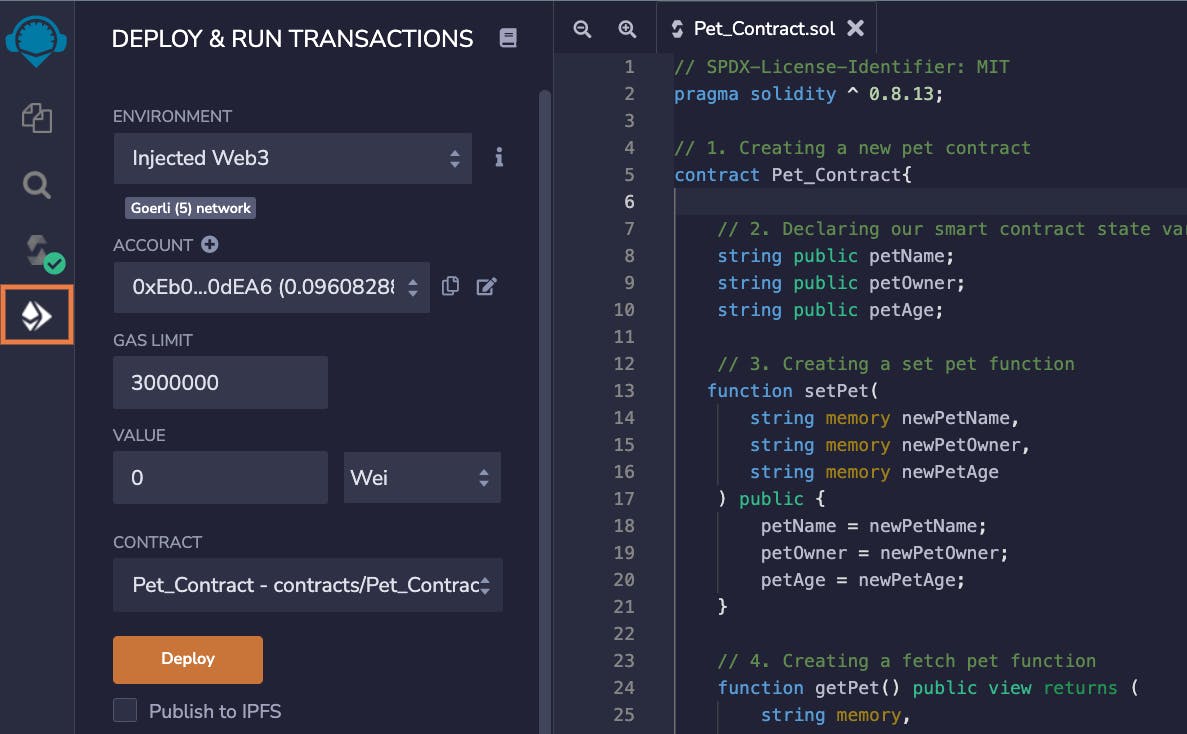
Select "Injected Web3" as the environment:
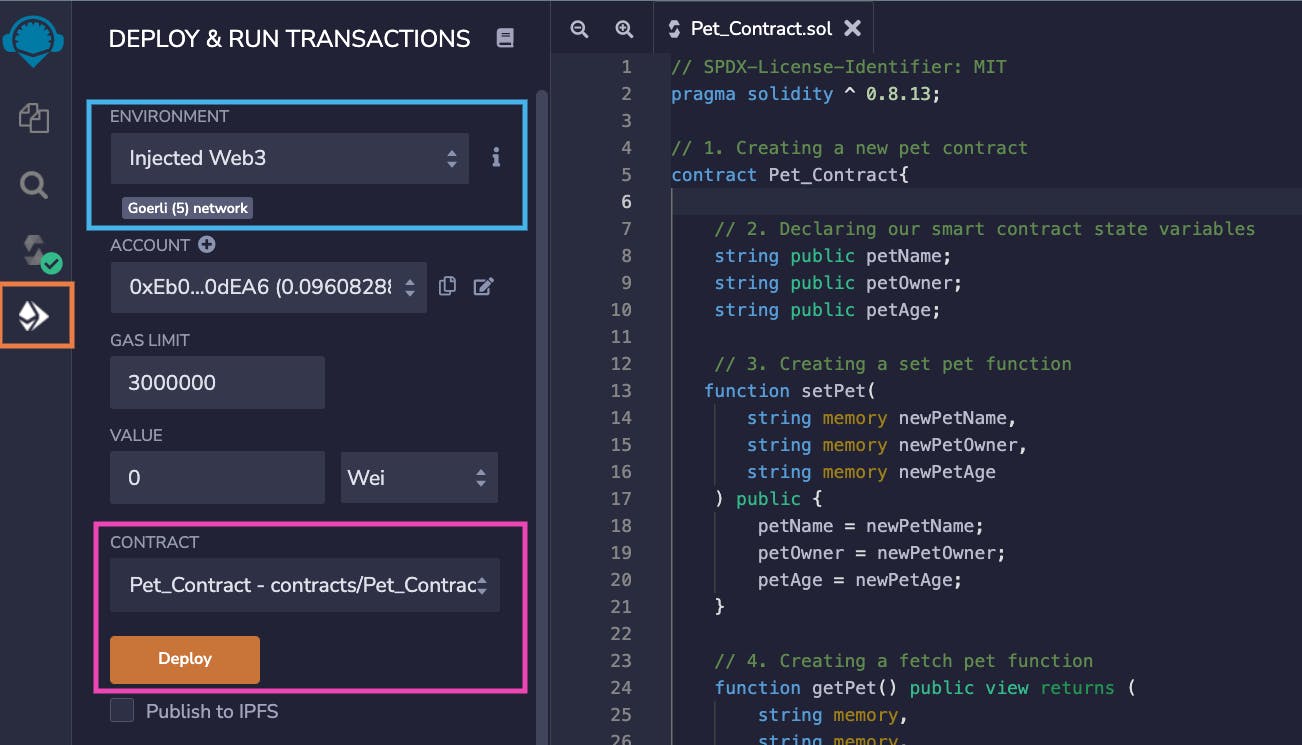
Click on the "Deploy" button to deploy our smart contract on the Goerli Testnet:
You'll be prompted to confirm the contract deployment gas fee:
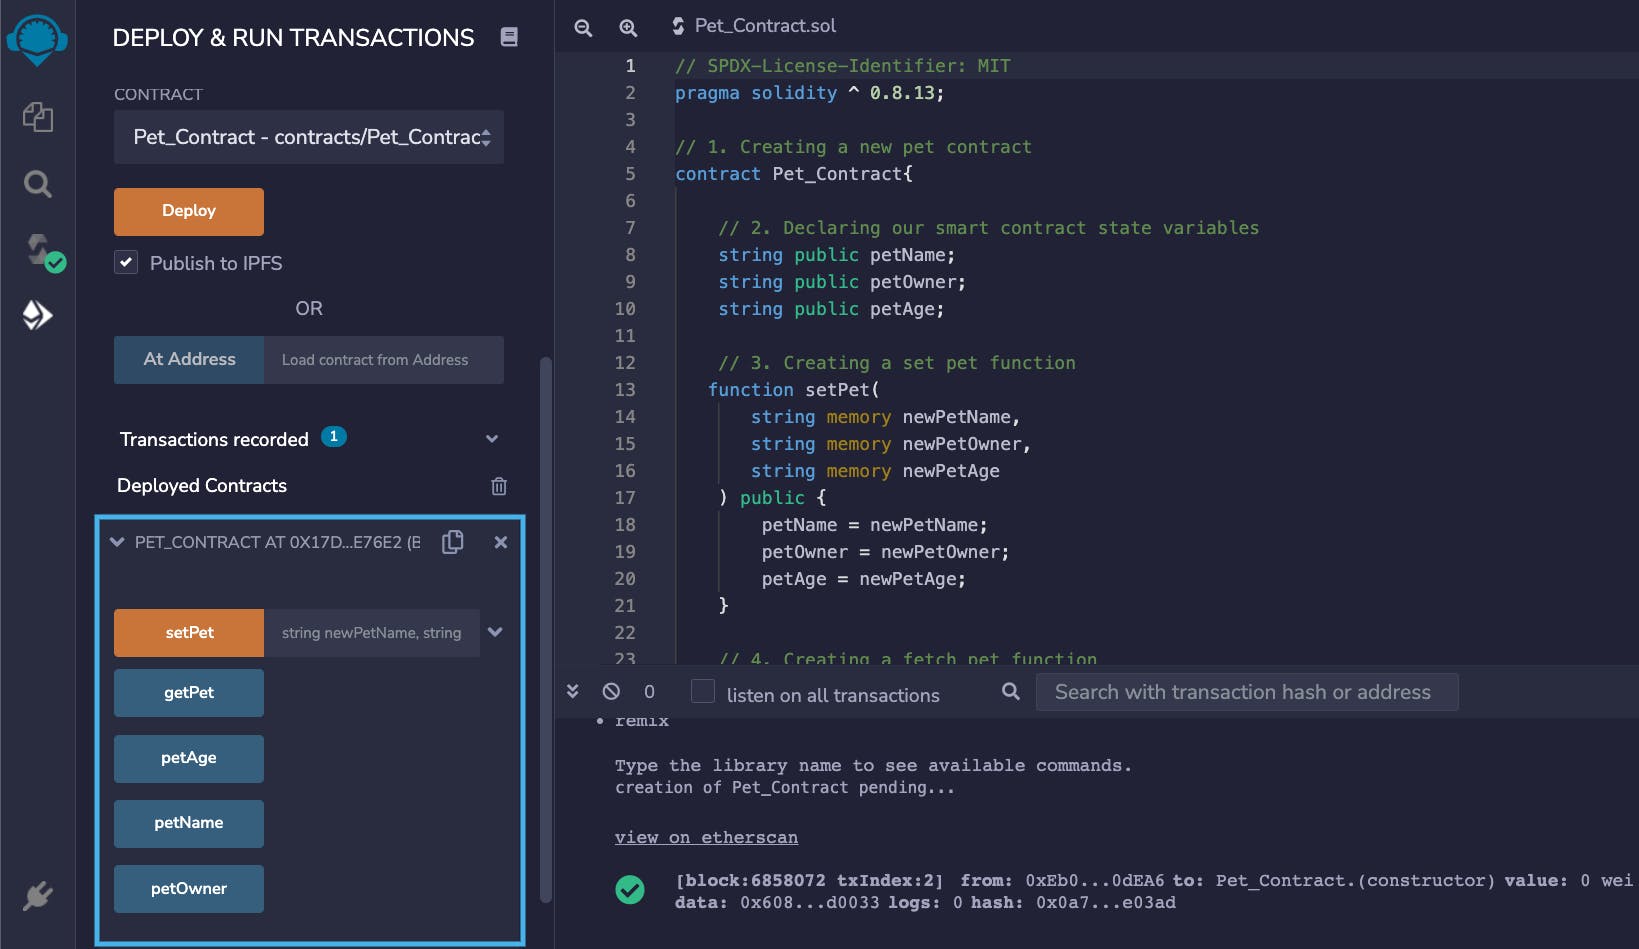
If the deployment was successful, you'll see our smart contract name under the "Deployed Contracts" section, as shown below:
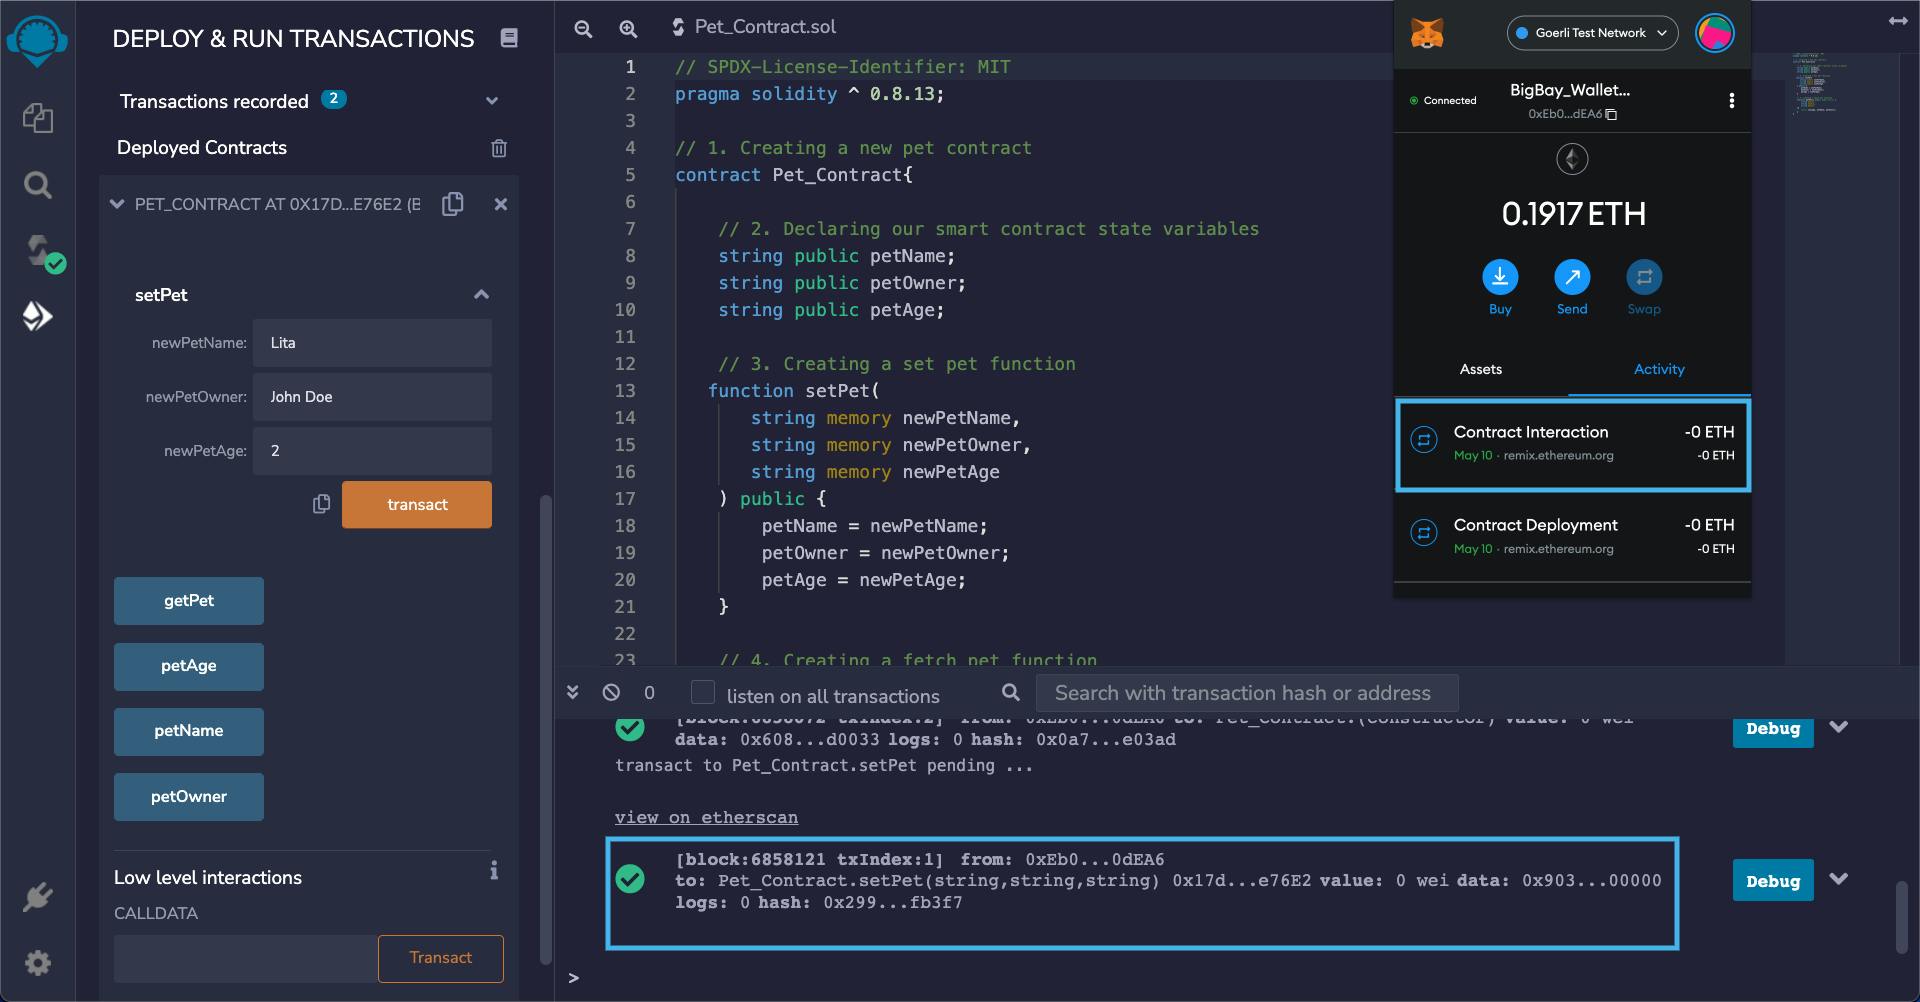
Step 5 - Testing the Smart Contract
In this step, we're going to test and interact with our smart contract on the Remix IDE.
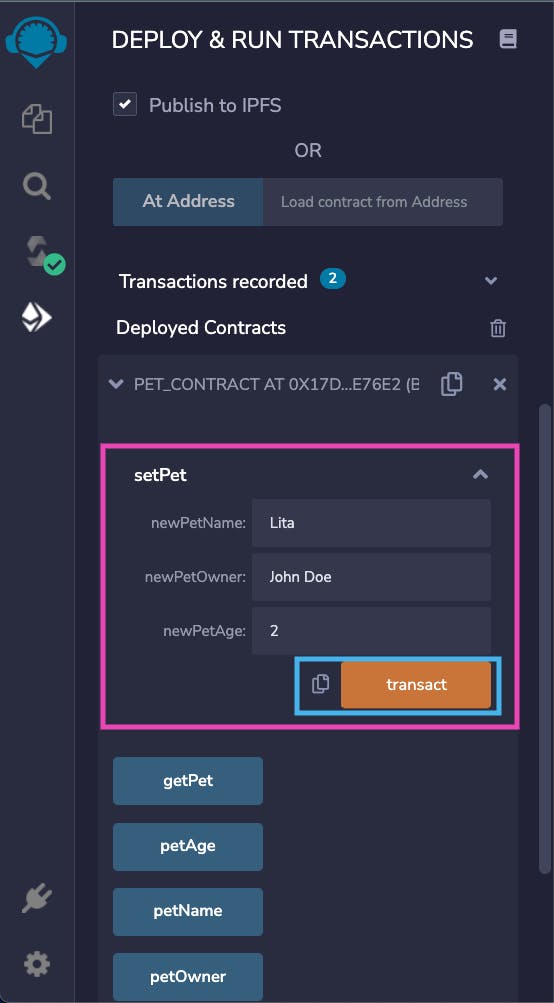
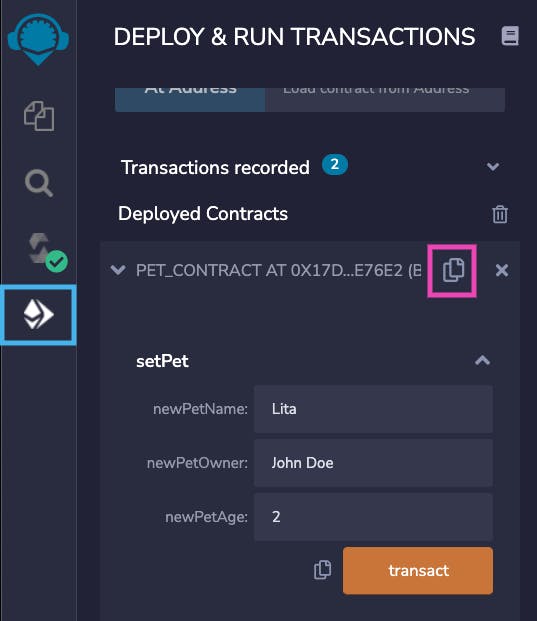
Click on the dropdown arrow in the
setPetfunction to expand the input boxes:
Fill the input boxes with your pet's details and click on the "Transact" button:
Confirm the transaction gas fee:

Wait for the transaction to be confirmed:
Click on the
getPetfunction: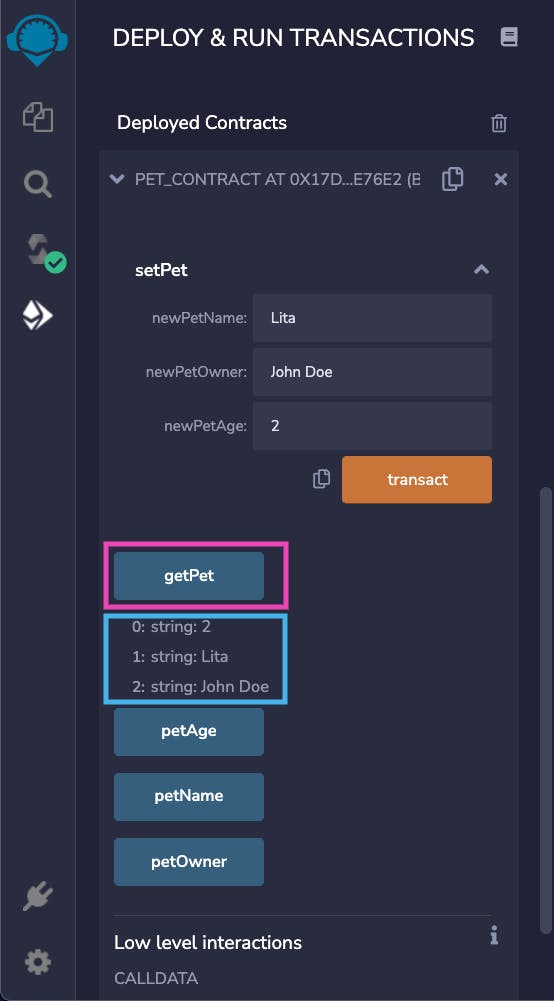
As shown above, the
getPetfunction should return an array of the pet's name, its owner's name, and its age.Next, click on all the "getter" buttons. Each getter function should return the value from their respective state variables, as shown below:
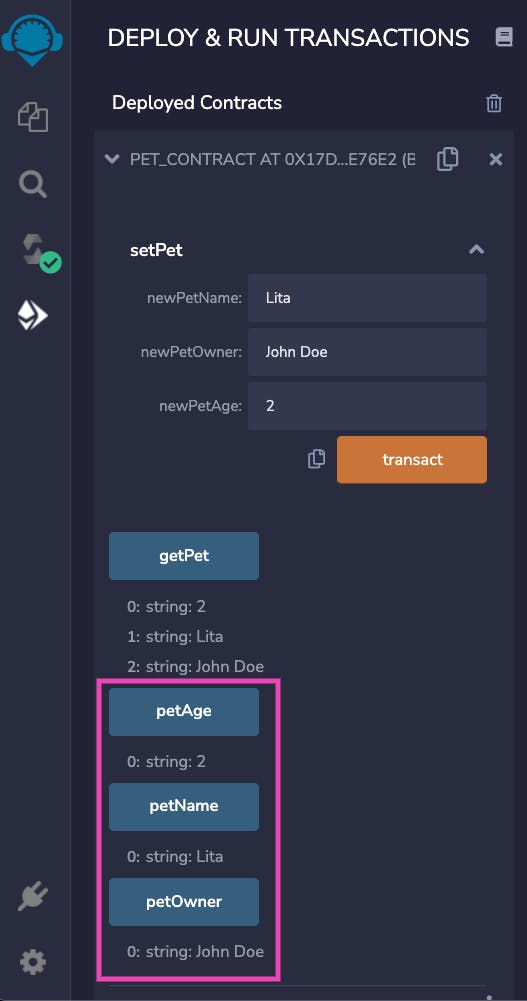
Our Solidity smart contract is functioning as expected. You may go ahead and test the smart contract with a different pet name, owner’s name, and age.
Building the Front End
In this part, we're going to build the front end of our dApp, which interacts with our smart contract using Ethers.js.
What Is Ethers.js
Ethers.js is an alternative to web3.js library. It’s a JavaScript library that allows developers to interact with the Ethereum blockchain.
In case you have a preference for an SDK, I recommend taking a look at the Alchemy Ethers.js SDK. You may also want to explore related Web3 Dapps and Developer Tools that are associated with ethers.js, which you can find here.
Step 1 - Installing Ethers.js
The quickest way to work with Ethers.js in our project is through the Ethers.js CDN.
- Create a new
index.htmlfile with the content below:
<!DOCTYPE html>
<html lang="en">
  <head>
    <meta charset="UTF-8" />
    <meta http-equiv="X-UA-Compatible" content="IE=edge" />
    <meta name="viewport" content="width=device-width, initial-scale=1.0" />
    <!-- Importing css styles -->
    <link rel="stylesheet" href="./index.css" />
    <title>Pet dApp</title>
  </head>
  <body>


    <!-- Importing Ethers.js script -->
    <script
      src="https://cdn.ethers.io/lib/ethers-5.2.umd.min.js"
      type="application/javascript"
    ></script>

    <!-- Importing javascript file -->
    <script src="./index.js"></script>
  </body>
</html>
In the code above, we're importing the Ethers.js CDN script, our CSS, and the JavaScript files that we’ll create later.
Your JavaScript file should be imported after the Ethers.js CDN script.
Step 2 - Building the Pet Form
In this step, we're going to create a form that'll accept the pet's name, its owner’s name, and its age, as well as a ”Submit” button to send the details to our deployed smart contract.
Add the following lines of code within the body tag in your index.html file:
<section class="pet-form-section">
    <section class="section-header">
    <h1>Pet Form</h1>
    </section>
    <!-- Form -->
    <form>
    <label for="pet-name">Pet Name</label>
    <input type="text" id="pet-name" />
    <label for="pet-owner">Pet Owner</label>
    <input type="text" id="pet-owner" />
    <label for="pet-age">Pet Age</label>
    <input type="number" id="pet-age" />
    <input type="button" value="Submit" id="set-new-pet" />
    </form>
</section>
Next, create a new index.css file, and add the code below:
/* Reset browser styles */
* {
  margin: 0;
  box-sizing: border-box;
}

body {
  font-family: Arial;
  line-height: 1.5;
  color: #333333;
  display: flex;
  justify-content: center;
  flex-direction: column;
  min-height: 100vh;
  max-width: 500px;
  margin:  0 auto;
  padding: 0 20px;
}

/* Header */
.section-header{
    font-size: 1.5rem;
    font-weight: bold;
    margin-bottom: 1rem;
    background-color: #333333;
    color: #ffffff;
    padding: 0.5rem 1rem;
    border-radius: 0.25rem;
    text-align: center;
}

/* Pet Form Section */
form {
  padding: 20px;
  border-radius: 5px;
  box-shadow: 0 0 10px rgba(0, 0, 0, 0.2);
}

label {
  font-size: 14px;
  display: block;
  margin-bottom: 5px;
}

input {
  width: 100%;
  border: 1px solid #cccccc;
  border-radius: 5px;
  padding: 10px;
  margin-bottom: 10px;
}

input[type=button]{
    border: 1px solid #333333;
    background-color: #333333;
    color: #fff;
    cursor: pointer;
}
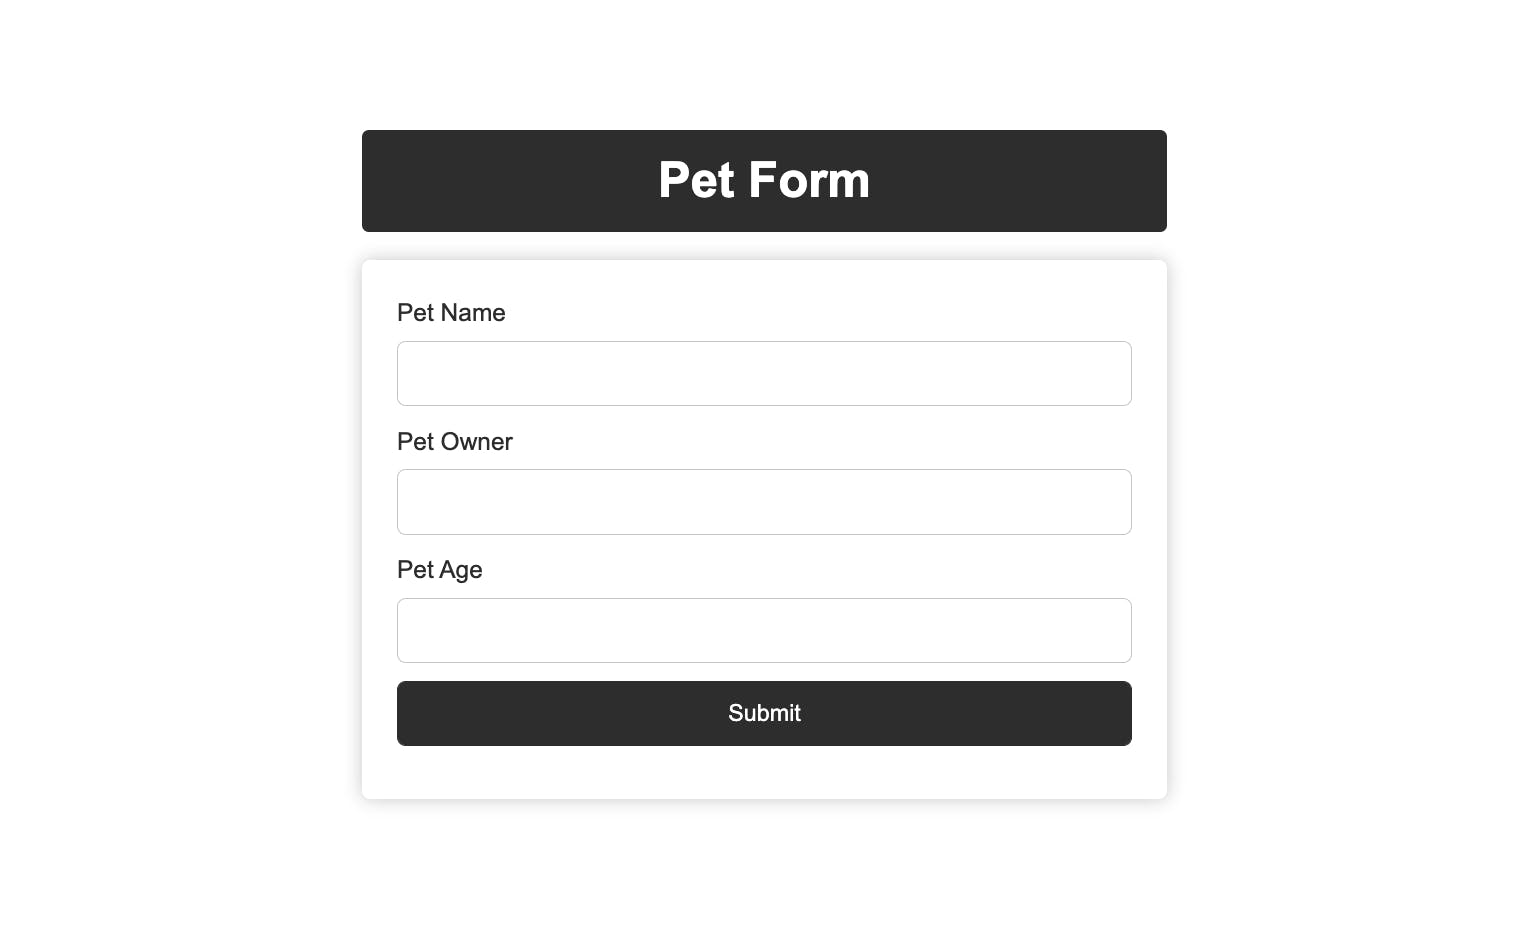
Our pet form should look something like this in the browser:
Step 3 - Building the Pet Details Section
In this step, we're going to create the pet details section that'll display the current pet's information stored in our smart contract memory.
After the pet form section, add the code below in your index.html file:
 <!-- Pet details section -->
<section class="pet-detail-section">
      <section class="section-header">
        <h1>Pet Details</h1>
      </section>
      <section class="pet-details">
        <h3 class="pet-detail-heading">
            Pet Name:
            <span class="pet-data pet-detail-name"></span>
        </h3>
        <h3 class="pet-detail-heading">
            Pet Owner:
            <span class="pet-data pet-detail-owner"></span>
        </h3>
        <h3 class="pet-detail-heading">
            Pet Age:
            <span class="pet-data pet-detail-age"></span>
        </h3>
      </section>
      <section class="section-footer">
        <button class="show-pet-form-btn">Set New Pet</button>
        <button class="refresh-pet-details-btn">Refresh</button>
      </section>
</section>
Next, update your index.css file with the code below:
/* Pet details section */
.pet-detail-section{
  display: none; /* hidden by default */
}

.pet-details {
  margin-bottom: 10px;
  padding: 20px;
  border-radius: 5px;
  box-shadow: 0 0 10px rgba(0, 0, 0, 0.2);
}

.pet-detail-heading {
  font-size: 16px;
  margin-bottom: 10px;
  font-weight: 500;
  letter-spacing: 0.5px;
}

.section-footer{
  display: flex;
  gap: 12px;
}

.show-pet-form-btn, .refresh-pet-details-btn{
    width: 50%;
    padding: 10px;
    border: none;
    border-radius: 5px;
    color: #fff;
    cursor: pointer;
}

.show-pet-form-btn{
  background-color: #4CAF50;
}

.refresh-pet-details-btn{
  background-color: #00a8ff;
}
In the code above, the pet details section will be hidden by default; it’ll be visible only if pet details are set on our smart contract. We'll implement the logic in the next step.
Our pet details section will look like this:
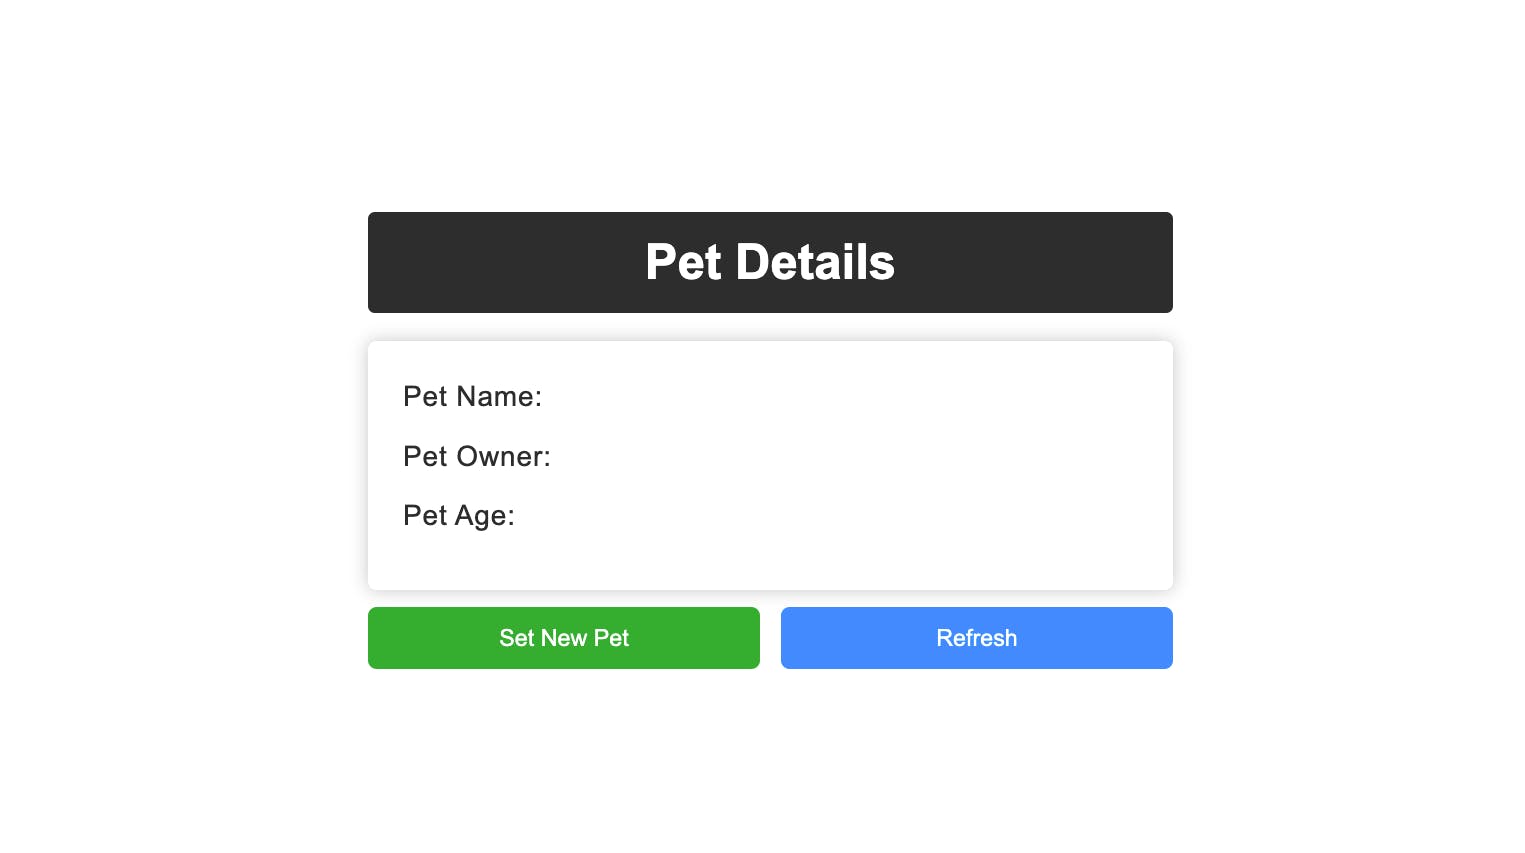
The "Set New Pet" button will return the user back to the pet form section we built earlier.
The Goerli transaction confirmation may take a few seconds. We can refresh the pet details by clicking the "Refresh" button.
Step 4 - Creating the Signer Logic
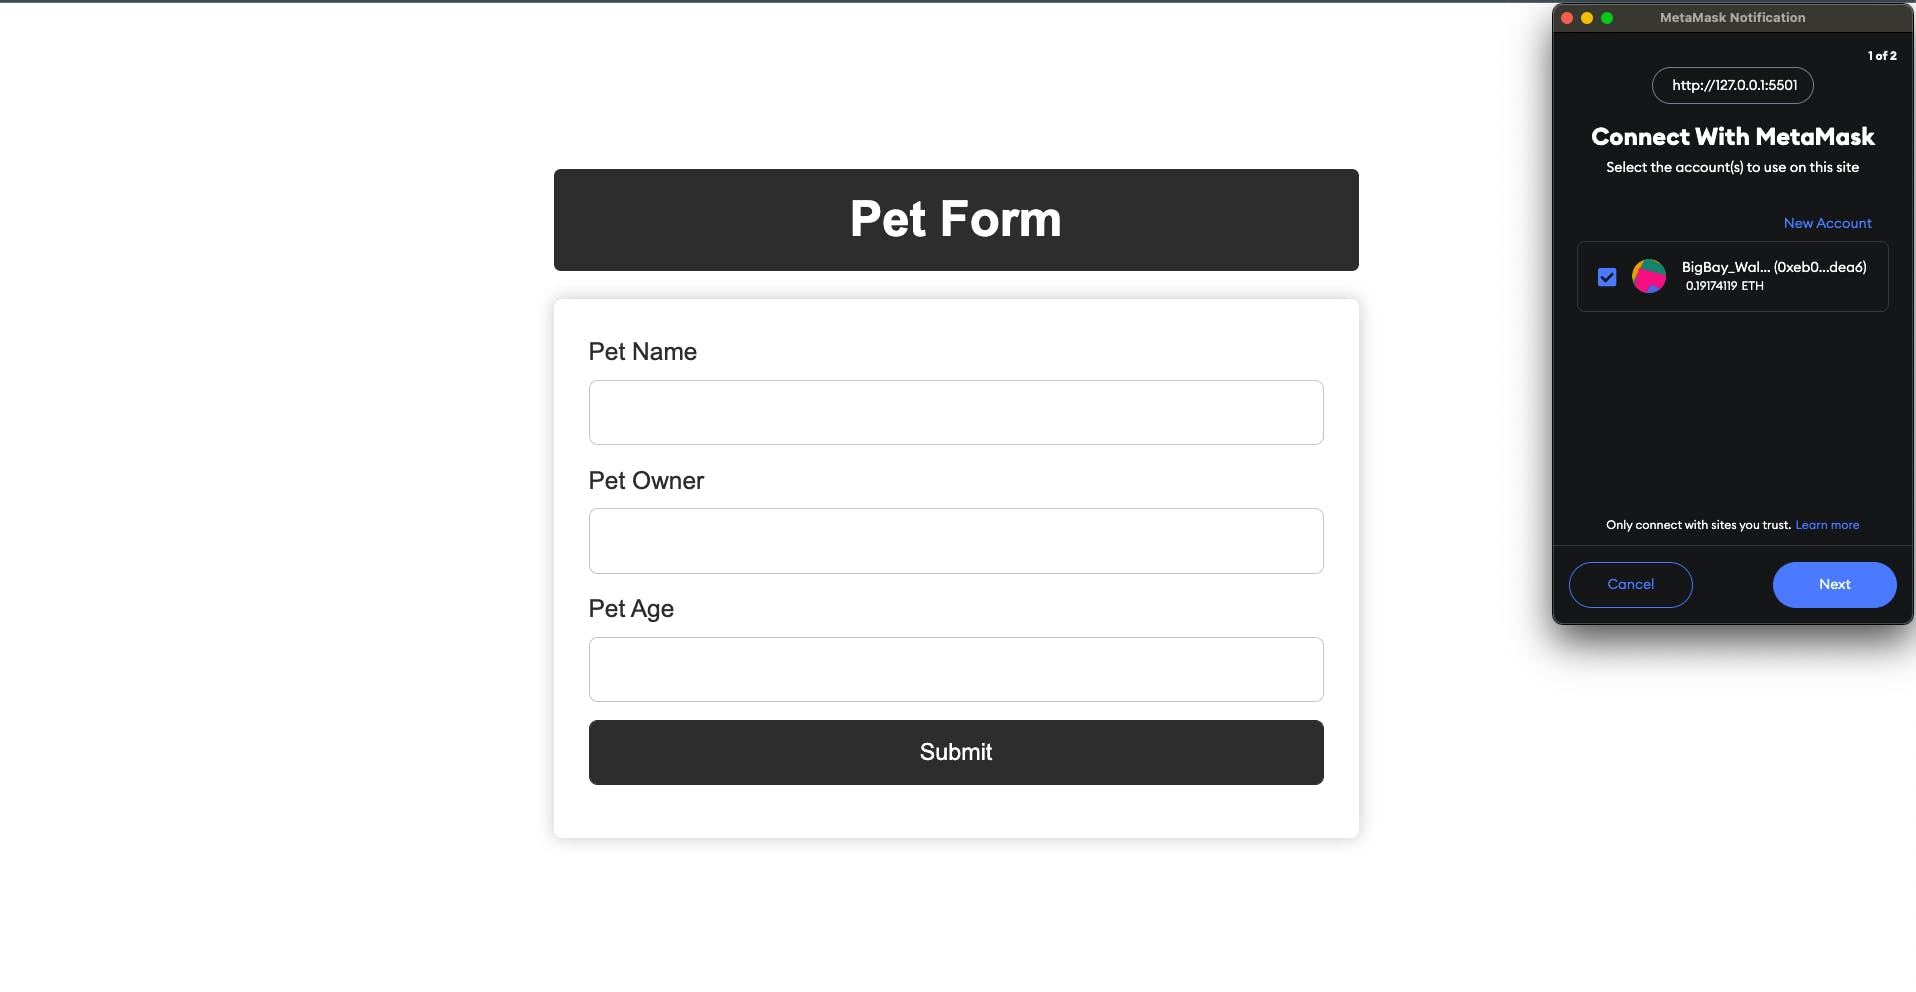
In this step, we're going to prompt the user to connect their Metamask wallet address with our dApp before they can interact with our smart contract. The user will then be identified as the signer, using their wallet address.
Create a new
index.jsfile with the content below:// 1. Declare global variable to store the web3 instance let PetContract; // 2. Set contract address and ABI const Pet_Contract_Address = ""; const Pet_Contract_ABI = []; /* 3. Prompt user to sign in to MetaMask */ const provider = new ethers.providers.Web3Provider(window.ethereum, "goerli"); provider.send("eth_requestAccounts", []).then(() => { provider.listAccounts().then((accounts) => { const signer = provider.getSigner(accounts[0]); /* 3.1 Create instance of pet smart contract */ PetContract = new ethers.Contract( Pet_Contract_Address, Pet_Contract_ABI, signer ); }); });
In the above code:
1. We're making the PetContract variable global because we'll reuse it in other functions.
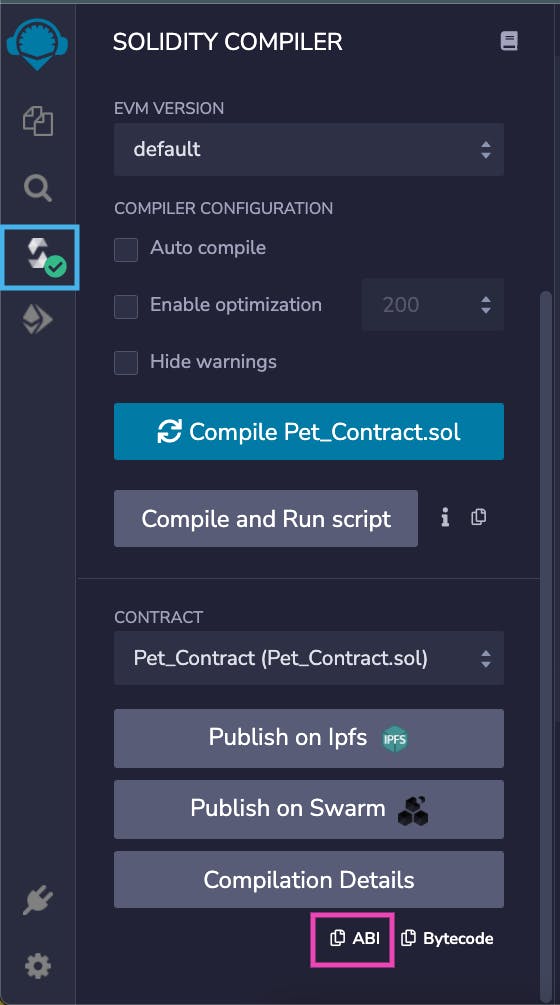
2. Provide your smart contract Address and ABI in the Pet_Contract_Address and Pet_Contract_ABI.
- You can get your smart contract ABI code from your Remix "Solidity Compiler" section:
- Navigate to the Remix "Deploy and Run Transactions" section to copy your smart contract address:
3. We're prompting the user to connect to the Goerli network on their MetaMask wallet, where our smart contract is deployed (see Backend - Step 5).
When a user visits our pet form page, they'll see the screen below:
After a wallet address has been connected, we can now access the setPet and getPet functions from our smart contract, through the PetContract variable.
Step 5 - Creating the SetNewPet Function
In this step, we're going to create a setNewPet function that'll send the pet's details from the pet form to our smart contract, using the PetContract.setPet() function from our smart contract (see Backend - Step 2).
Update your index.js file with the code below:
// 4. Creating variables for reusable dom elements
const petFormSection = document.querySelector(".pet-form-section");
const showPetFormBtn = document.querySelector(".show-pet-form-btn");
const petSection = document.querySelector(".pet-detail-section");
const setPetButton = document.querySelector("#set-new-pet");
const refreshBtn = document.querySelector(".refresh-pet-details-btn");

/* 5. Function to set pet details */
const setNewPet = () => {
  // update button value
  setPetButton.value = "Setting Pet...";

  /* 5.1 Get inputs from pet form */
  const petNameInput = document.querySelector("#pet-name");
  const petOwnerInput = document.querySelector("#pet-owner");
  const petAgeInput = document.querySelector("#pet-age");

  // 5.2 Getting values from the inputs
  petName = petNameInput.value;
  petOwner = petOwnerInput.value;
  petAge = petAgeInput.value;

  /* 5.3 Set pet details in smart contract */
  PetContract.setPet(petName, petOwner, petAge)
    .then(() => {
      // update button value
      setPetButton.value = "Pet Set...";

      /* 5.4 Reset form */
      petNameInput.value = "";
      petOwnerInput.value = "";
      petAgeInput.value = "";

      // update button value
      setPetButton.value = "Set Pet";

      /* 5.5 Get pet details from smart contract */
      getCurrentPet();
    })
    .catch((err) => {
      // If error occurs, display error message
      setPetButton.value = "Set Pet";
      alert("Error setting pet details" + err.message);
    });
};

/* Function to set pet details on click of button */
setPetButton.addEventListener("click", setNewPet);
Step 6 - Creating the getCurrentPet Function
In this step, we're going to create the getCurrentPet function to fetch the last pet details in our smart contract memory, using the PetContract.getPet() function from our smart contract (see Backend - Step 2).
Update your index.js file with the code below:
/* 6. Function to get pet details */
const getCurrentPet = async () => {
  setPetButton.value = "Getting Pet...";

  /* 6.1 Get pet details from smart contract */
  const pet = await PetContract.getPet();

  /* 6.2 Display the pet details section

   6.2.1 Hide the pet form in DOM */
  petSection.style.display = "block";
  petFormSection.style.display = "none";

  /* 6.3 Pet is an array of 3 strings [petName, petOwner, petAge] */
  const petName = pet[0];
  const petOwner = pet[1];
  const petAge = pet[2];

  /* 6.4 Display pet details in DOM */
  document.querySelector(".pet-detail-name").innerText = petName;
  document.querySelector(".pet-detail-owner").innerText = petOwner;
  document.querySelector(".pet-detail-age").innerText = petAge;
};
Finally, we'll add a function to allow the user to return to the pet form and another function to refresh the pet details.
Add the following lines of code to your index.js file:
/* 7. Function to show the pet form on click of button */
showPetFormBtn.addEventListener("click", () => {
  petSection.style.display = "none";
  petFormSection.style.display = "block";
  setPetButton.value = "Submit";
});

/* 8. Function to refresh pet details */
refreshBtn.addEventListener("click", (e) => {
  e.target.innerText = "Refreshing...";
  getCurrentPet().then(() => {
    e.target.innerText = "Refreshed";
    setTimeout(() => {
      e.target.innerText = "Refresh";
    }, 2000);
  });
});
Testing Our dApp
Now that our dApp is code ready, we can proceed to test our implementations, as shown below:
The complete source code of this project can be found in this repository.
Wrapping Up
In this tutorial, we learned how to interact with a Solidity smart contract from a front-end application using Ether.js.
This article is a part of the Hashnode Web3 blog, where a team of curated writers are bringing out new resources to help you discover the universe of web3. Check us out for more on NFTs, DAOs, blockchains, and the decentralized future.