

What is Web3-React and How to Use it in Your Next Project?


Table of contents
- What is Web3-react?
- What makes Web3-react a good choice?
- How to install Web3-react
- Web3-react examples
- Connecting Your dApp with Meta Mask
- { STEP 1 } Add a Connector folder to your project.
- { STEP 2 } Inside the Connector folder, Add a file Connectors.js.
- { STEP 3 } Assuming that you have installed Web3-react within your project, you should now install the dependency that allows you to connect to Meta Mask.
- { STEP 4 } Import Injected-Connector into your connectors.js file.
- { STEP 5 } You will need a frontend to export that data from Meta Mask.
- Connecting Your App with any Other Wallet
- Disconnecting a Wallet
- Conclusion
By now, you probably have heard about blockchain and Web3 and maybe want to make some Decentralized Apps (dApps) to show your friends and community.
Similar to a normal web app, dApps also have a backend and a frontend.
In this article, we will address the frontend side of dApps and mainly using web3-react.
Web3-react is a web3 framework made by Noah Zinsmeister to help blockchain developers make modern Ethereum dApps using React architecture.
In 2021, web3-react gained a lot of traction in the blockchain community for building dApps.
Let's see why and how to use it.
What is Web3-react?
Web3-react is an easy-to-use, simple, extensible web3 framework for building dApps on the Ethereum blockchain network.
In a nutshell, web3-react is a state machine that stores certain essential bits of data pertinent to your dApp up to date.
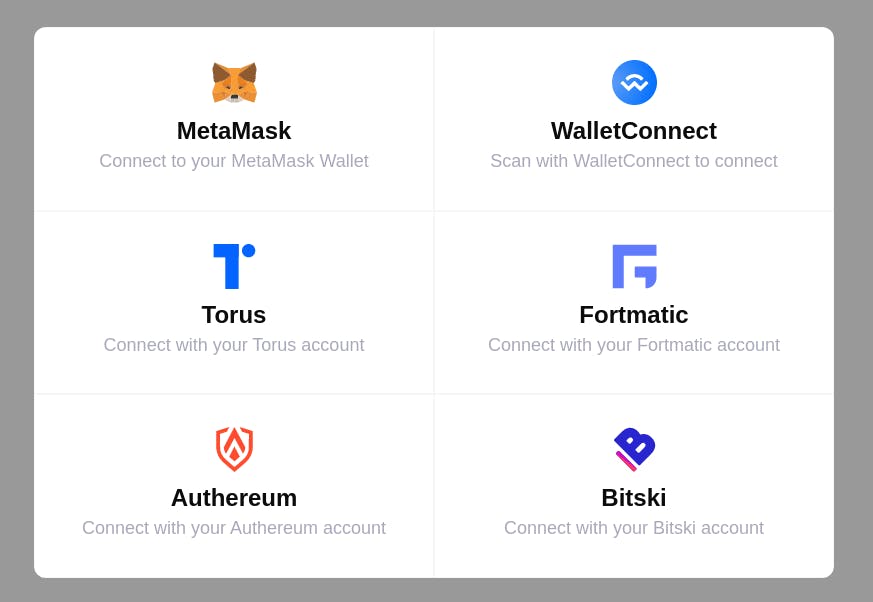
By default, it supports injected providers like Meta Mask, Gnosis Safe, Frame, and WalletConnect.
You can easily configure it to use other wallets such as Portis, Squarelink, and Arkane.
The most popular supported wallets in web3-react 👇
As previously discussed, web3-react uses React architecture for building frontend of dApps.
Web3-react is the choice of many developers because of these reasons;
- Building modern web apps.
- Fully responsive and customizable.
- Simple and easy to use.
- Faster development.
- Large and growing community.
What makes Web3-react a good choice?
Web3-react establishes itself as a viable option for dApp developers.
The ability to create customizable, full-featured connectors that manage every aspect of your dApp's Ethereum blockchain and user account connectivity is a huge plus point.
It is also a developer-friendly environment that contains an instantiated ethers.js or web3.js instance, the current account and network id, and other information that is available globally across your decentralized apps.
Web3-react is a well-suited framework for dApp development because;
- You can programmatically write plugins to blockchain.
- There's no traditional data architecture.
- You can make systematic, powerful, and extensible dApps.
Another super important feature you will find with web3-react is the ability to easily connect to nodes on the blockchain.
Nodes are the pieces of software that are running in the Cloud somewhere, that are connected to other nodes, that also can read from the blockchain and then broadcast back to the blockchain.
How to install Web3-react
Installing web3-react is a fairly straightforward task. All you need to get started is to install a few packages, and you good to go.
{ STEP 1 } Install Yarn.
Yarn is a package manager that Facebook created as a replacement for the NPM client.
It enables teams to create JavaScript code and distribute it via software packages.
Check the installation guide of yarn .
After installation, check the version of the installed Yarn package. Make sure it's the latest one.
Run this command to check the version of yarn installed.
yarn --version
Note: NPM can also be used instead of yarn, but it's not recommended.
{ STEP 2 } Install react and react-dom versions
Make sure that you have installed the latest versions of React and React-dom. These packages are required for running Web3-react.
yarn add react@latest react-dom@latest
{ STEP 3 } Install ethers.js
Ethers.js is a complete Ethereum wallet implementation and utilities in JavaScript and TypeScript. You can learn more about Ethers.js on GitHub.
It is a required package for Web3-react as it's an internal dependency on the library.
yarn add ethers
{ Optional } Install web3.js
Web3.js is a set of libraries that let you use HTTP, IPC, or Web Socket to communicate with a local or remote Ethereum node.
It is an optional package for Web3 react.
yarn add web3
{ STEP 4 } Install web3-react
Finally, you will need to install Web3-react to your project.
You can either download the latest version of web3-react into your project by running this command.
yarn add web3-react@unstable
Or you can install the core version of it by running this command.
yarn add @web3-react/core
Congratulations.🥳 You have finally installed web3-react into your project. Now you are ready to make the frontend of your dApps. Wasn't that simple?
By now, your dApp component should look like this.
import { Web3ReactProvider } from '@web3-react/core'
import { Web3Provider } from "@ethersproject/providers";

function getLibrary(provider, connector) {
  return new Web3Provider(provider);
}

const App => () {
  return (
    <Web3ReactProvider getLibrary={getLibrary}>
      <YourAwesomeComponent />
    </Web3ReactProvider>
  )
}
Based on Web3-react docs.
In a nutshell, the idea is to import a provider, then instantiate and return it in the getLibrary function.
Web3-react examples
Check out some recent stats of Web3-react 🤩

Companies like Uniswap use web3-react to build frontend of the dApps. This definitely shows the capability of this framework.
Now let's check out some web3-react tutorials & examples.
Connecting Your dApp with Meta Mask
Meta Mask is a cryptocurrency wallet that interacts with the Ethereum blockchain through software. It's one of the most popular wallets in the world, with over 21 million users.
It's the primary wallet used for dApps as it has a lot of benefits;
- Very secure & fast
- Easy to use
- Interactive with almost any type of DApp based on Ethereum Blockchain.
Now let's see how to connect Meta Mask with our frontend using Web3-react.
{ STEP 1 } Add a Connector folder to your project.
You will store all your connecting and interacting code with the wallet in this folder. This will end up managing your code in the long term.
{ STEP 2 } Inside the Connector folder, Add a file Connectors.js.
Developers use connector.js file to write code that interacts & setups the protocol with the desired wallet.
{ STEP 3 } Assuming that you have installed Web3-react within your project, you should now install the dependency that allows you to connect to Meta Mask.
yarn add @web3-react/injected-connector
{ STEP 4 } Import Injected-Connector into your connectors.js file.
import { InjectedConnector } from '@web3-react/injected-connector'

export const injected = new InjectedConnector({
  supportedChainIds: [1, 3, 4, 5, 42],
})
{ STEP 5 } You will need a frontend to export that data from Meta Mask.
This video on Youtube should help you export data from Meta Mask using the frontend.
Congratulations.💃 You are ready to use Meta Mask in your project.
Connecting Your App with any Other Wallet
Web3-react also supports many wallets such as Wallet Connect, etc. Large dApp projects give more options other than Meta Mask to interact with the app.
Just like we installed injected-connector for Meta Mask. We will need to install Walletconnect-connector for Wallet Connect.
yarn add @web3-react/walletconnect-connector
There are other options, like Portis, which can be connected by using portis-connector connector.
yarn add @web3react/portis-connector
Importing and exporting data from the wallets to your dApps is almost the same. You can find more information on it in the documentation.
Disconnecting a Wallet
Deactivate and close are the two options for disconnecting a wallet on web3-react.
Deactivate: The wallet information and interaction gets destructed from the dApp when you use this function. The user may have to reauthorize the app to connect with the wallet.
Close: When the Close function is used, the user gets disconnected from the wallet but the information is still stored in the dApp. The user can easily connect it again to the wallet with all the info left.
Unfortunately, knowing which function is being executed can be difficult sometimes.
Meta Mask and the injected connectors lack a close function, which can cause an error if used, and some wallets will not be deleted from the DOM unless close is used, implying that Deactivate is ineffective.
As a result, you might want to create a general disconnectWallet function to ensure that the appropriate functions are run when the wallet is completely disconnected.
Conclusion
That’s a wrap!!!
We have discussed what is web3-react, why web3-react is a good choice, how to install web3-react in your project, and how to get started with different wallets.
All together, web3-react is a new but worthy option for you to develop frontend of dApps.
It has a lot of advantages, which are discussed in the article.
Learning & building dApps can be difficult in the early stages, but you should not be discouraged by it.
Learning blockchain and Web3 now is like learning how to use the Internet and web development in the 2000s.
Let me know what you think about the future of Web3 and whether or not you think web3-react is something that you should consider for your tech stack.